CookieYes for US State Laws cookie compliance
Last updated on March 14, 2024
This guide provides an overview of how to use CookieYes to achieve US State Laws cookie compliance and ensure your website’s use of cookies adheres to the regulations.
If you are new to CookieYes, then sign up on CookieYes.
Note: If you want to display a US State law notice and a ‘Do not sell’ link, you can choose to skip the setup screens and head to your Dashboard.
Display an opt-out for the US State Laws banner
To comply with US State Laws, you can start by displaying a cookie banner on your website. A cookie notice will give your site visitors the choice to opt-out of cookies that are not essential, including third-party cookies. You can also respect the Global Privacy Control (GPC) signal by enabling the feature on CookieYes.
Help Guide: How to add CCPA Opt-out banner on your website
Implement geo-targeting
If you want to display the cookie banner for US State Laws, then you can use geo-targeting.
To implement a geo-targeting banner for US State Laws, follow the below steps:
- Navigate to CookieYes Dashboard > Cookie Banner > General.
- Under Geo-target banner, you can choose United States or Select Countries from the list to show the banner to only visitors from these regions.
- Click the Publish Change button.

Add ‘Do not sell’ link on the website
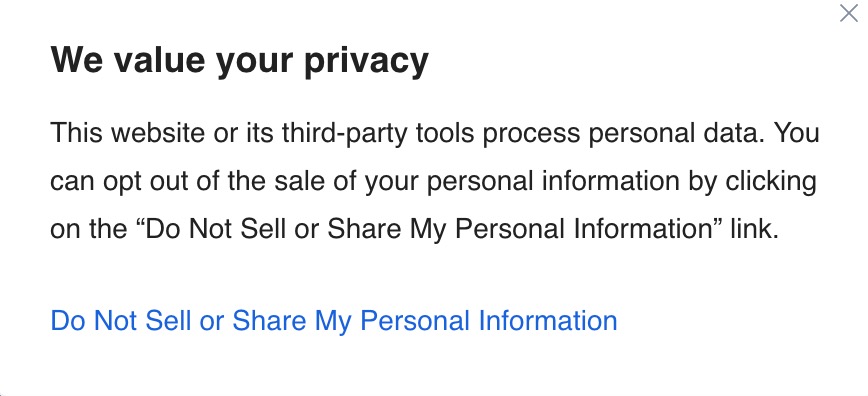
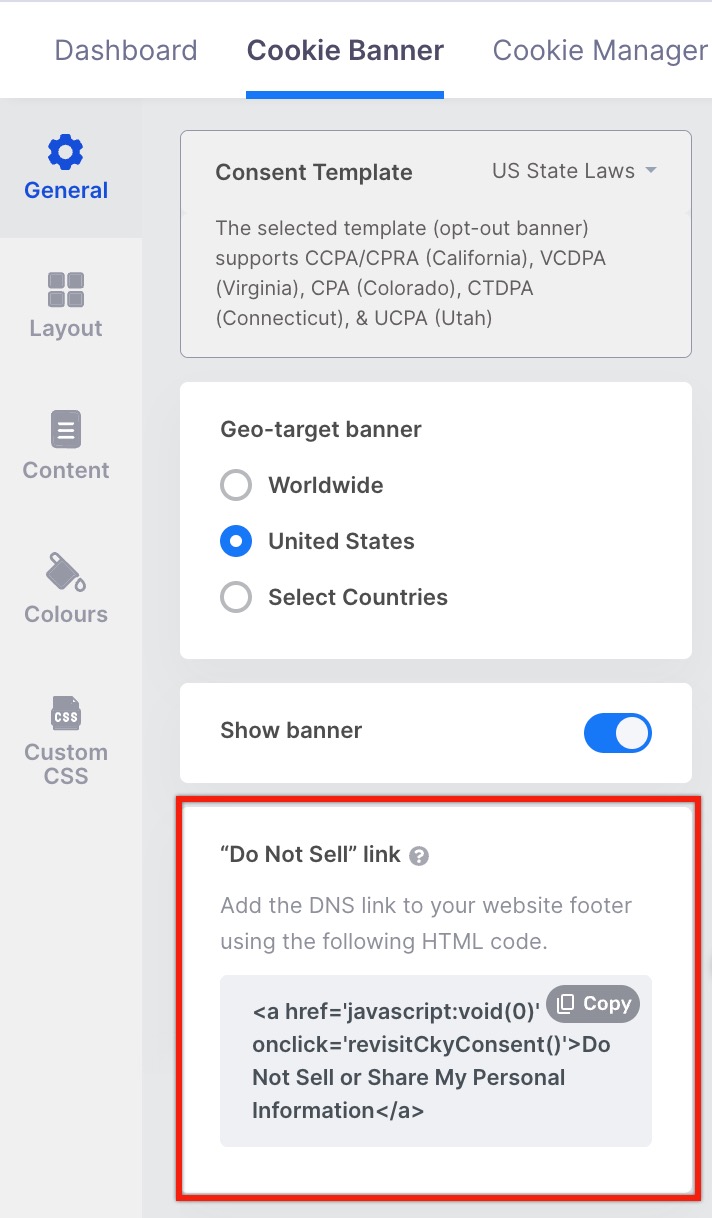
To comply with US State Laws, You should display a “Do not sell” link on your website’s footer, as legally required under the US State Laws. Go to Cookie Banner > General > “Do not sell” link. You can copy the code and add it to your website’s footer.
Select cookie categories for auto-blocking
After adding the ‘Do Not Sell’ link to your website, you should configure auto-blocking for cookie categories when your website visitors opt-out of data sales by clicking the ‘Do Not Sell My Personal Information’ link. (By default, all cookie categories will be enabled for auto-blocking.)
To implement this, follow the below steps:
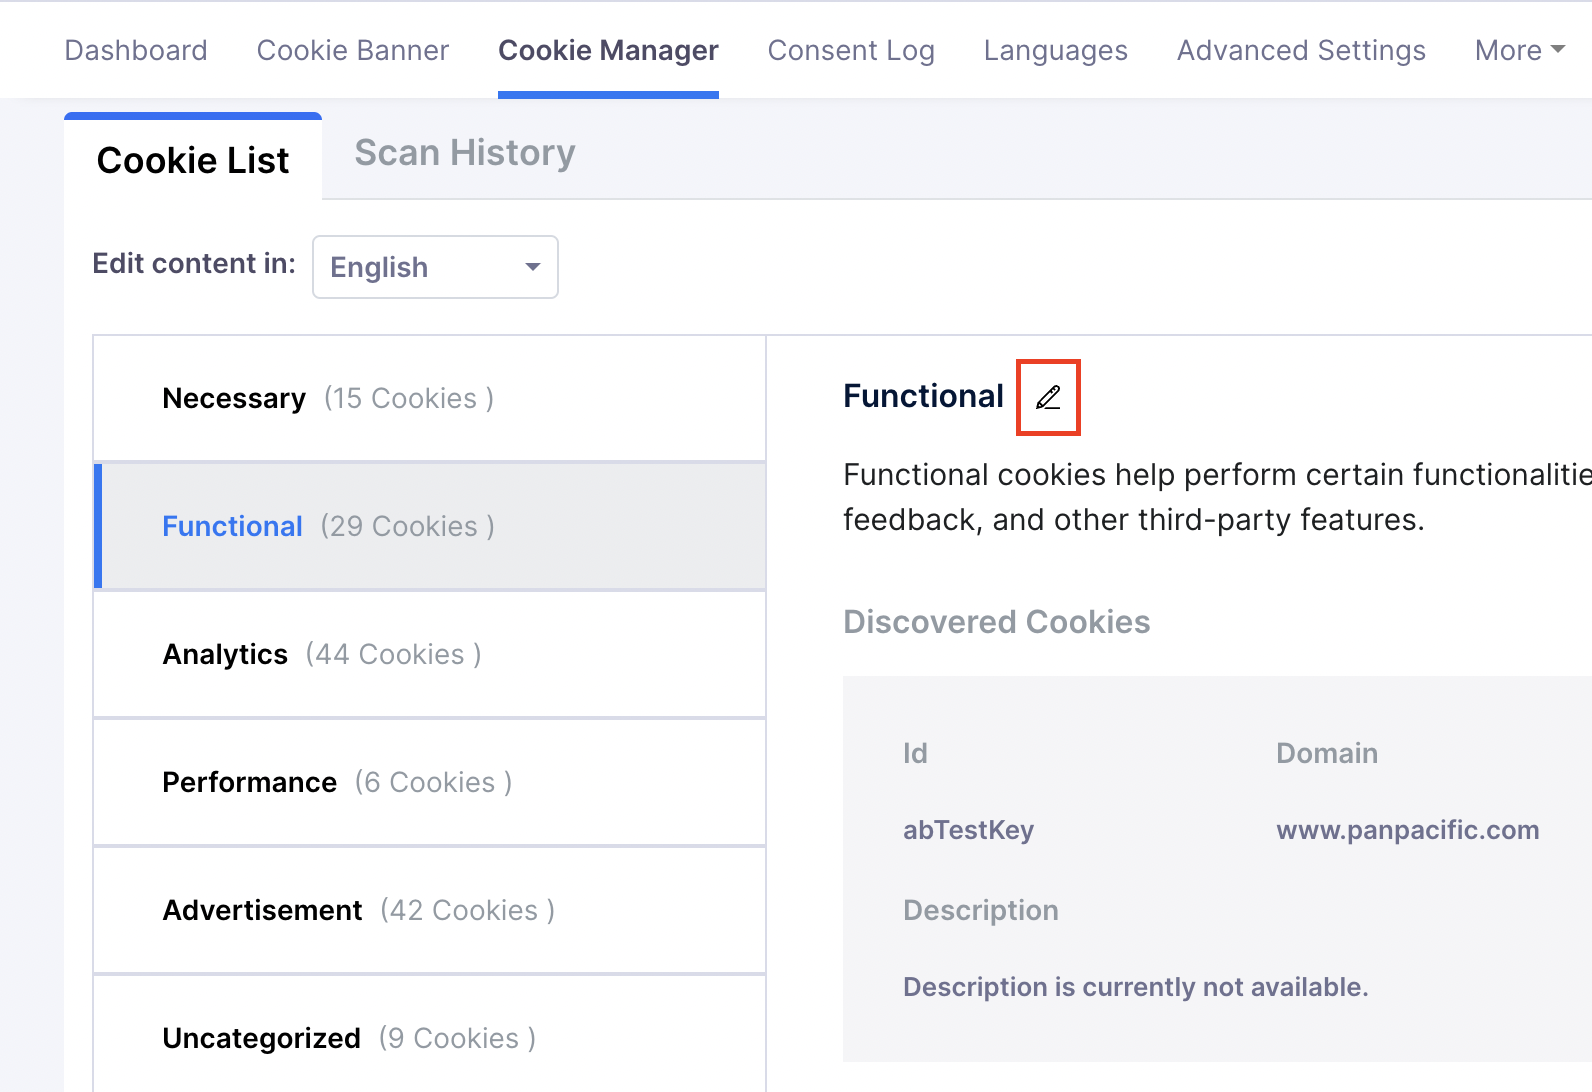
- Navigate to CookieYes Dashboard > Cookie Manager > Cookie List.
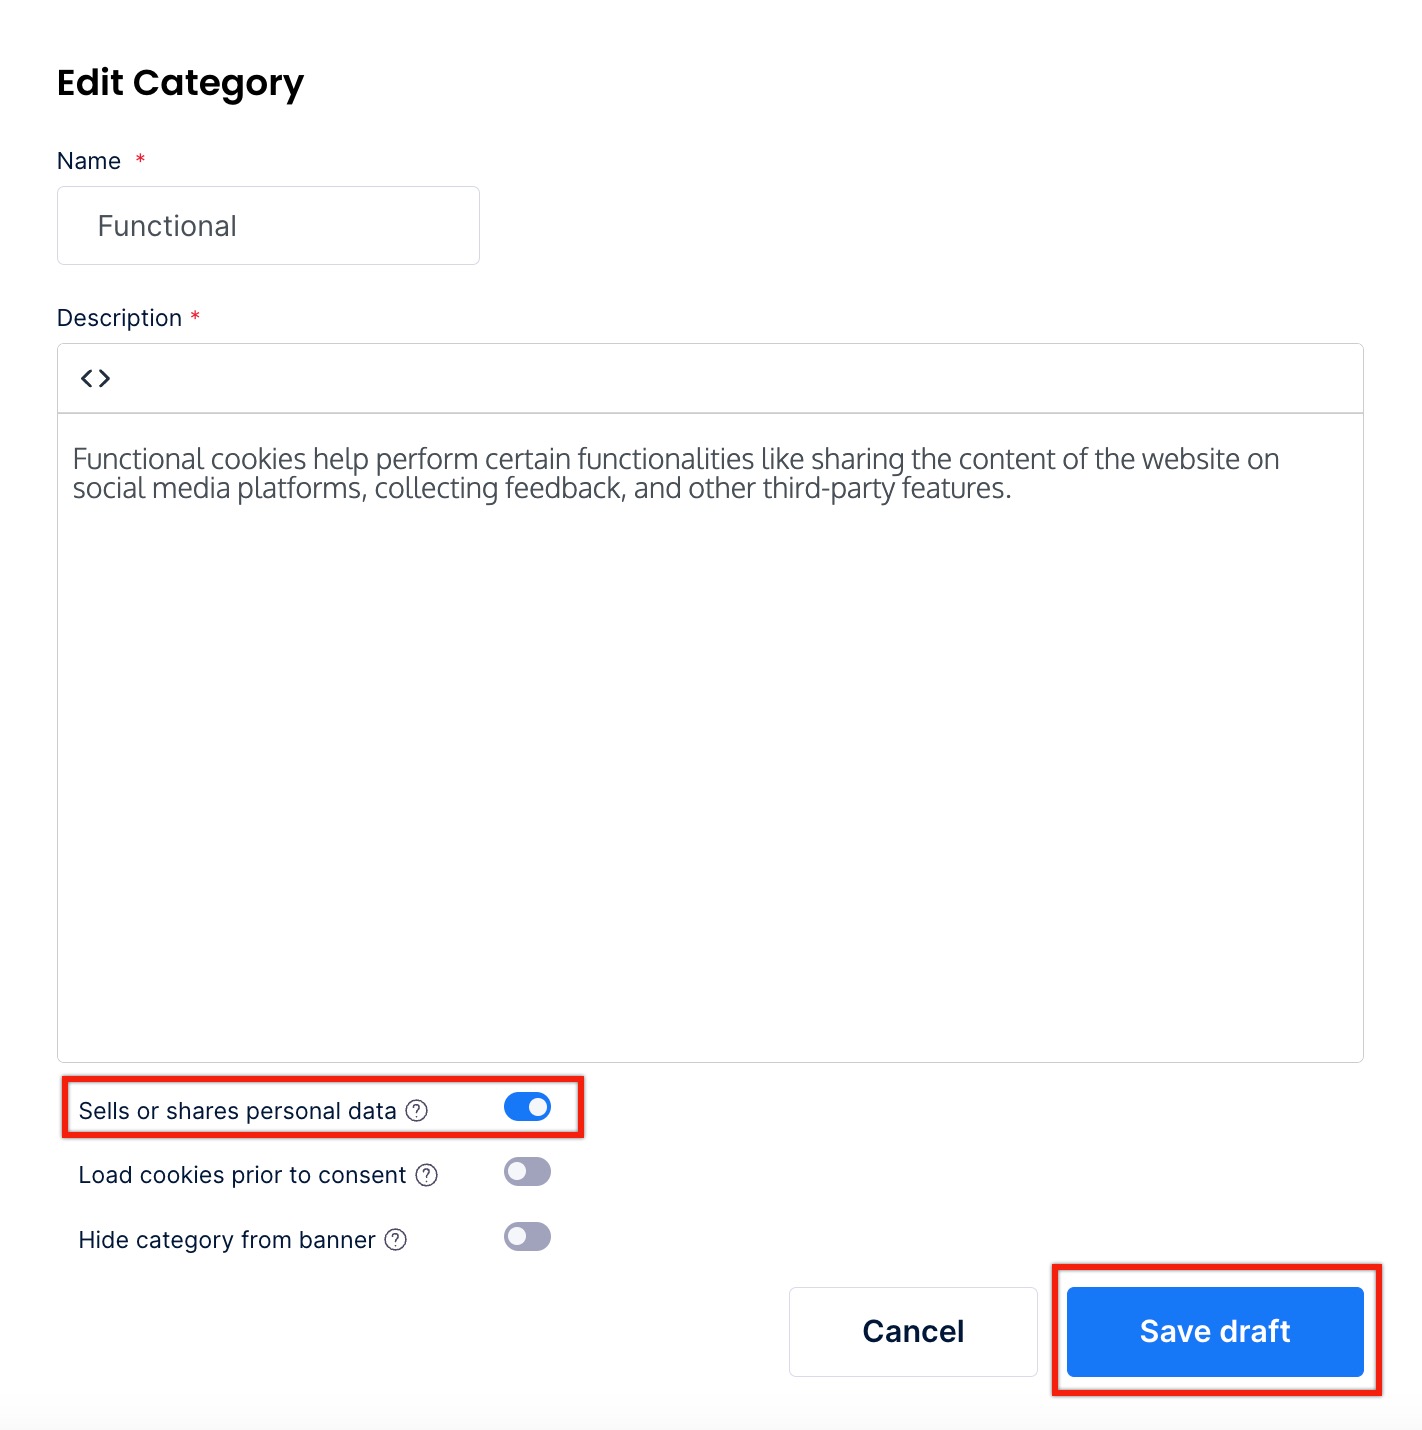
- Select the category you want to include in auto-blocking. Now click the edit icon of that category.
- In the Edit Category modal, enable the Sells or shares personal data and click the Save Draft button.
- Click the Publish Change button.
Once you’ve fine-tuned your settings, you can install the US State Laws cookie banner on your website. Navigate to Advanced Settings > Banner Settings > Get Installation Code > Copy Code.
Help Guide: Install cookie banner on your website
Enable multilingual cookie banner
If you have a multilingual website and want to display the cookie banner in multiple languages, you can use the auto-translation feature.
Help Guide: How to implement a multilingual cookie banner
If your website is in a language other than English and you want to display a cookie banner in that language, you can change your default banner language.
Help Guide: How to change cookie banner language
Schedule cookie scanning
You should ensure that your cookie list is up-to-date so that your cookie banner has accurate information about the cookies used on your website.
We suggest that you automate your website scanning in monthly intervals. From the top navigation bar, click on Cookie Manager > Schedule Scan. You can choose Monthly, Select Day and set the Time for your scans. For more details, refer to our guide.
If you have password-protected sections on your website, we recommend that you scan for cookies behind these sections as well. To access the Scan behind login feature (available only on the Ultimate plan), reach out to support@cookieyes.com.
Manage cookie list
CookieYes by default auto-blocks third-party cookie scripts until consent is provided by the visitor, as required by GDPR. However, we recommend you check for ‘Uncategorized’ cookies (unclassified cookies) to ensure that these cookies are appropriately handled.
You can view your updated cookie list and scan history under the Cookie Manager tab. You can then choose to implement cookie blocking manually for relevant cookies.
Generate a cookie policy
A detailed cookie policy is important so that your website provides full disclosure to your visitors. You can generate a cookie policy with a complete cookie list using CookieYes. From the top navigation bar, click on More > Cookie Policy Generator. Your cookie policy is generated instantly and you can customize the text to suit your needs. You can then simply copy-paste it to your website and publish your cookie policy page.
You can also link the cookie policy page on your cookie banner. Head to Cookie Banner > Content > Cookie Notice > “Cookie Policy” link (enable) > URL and enter the URL of your cookie policy.
Integrate with Google Consent Mode
If you want to continue monitoring and measuring website analytics in a legally compliant way, you can use Google Consent Mode. CookieYes can be easily integrated with Google Consent Mode and will allow you to adjust how Google tags and scripts behave on your website based on your visitor’s consent status.
Access the consent log for proof
CookieYes logs all the consent given by your site visitors in the Consent Log. You may use this log to demonstrate your proof of consent in case of any regulatory audits. To access your complete historical consent logs, you have the option to export the consent log. Simply navigate to Consent Log, then select “Export as CSV,” and choose your preferred date range. Additionally, to obtain a specific user’s Proof of Consent, you can click on the download icon. You can also utilize the Search Log feature by inputting their Consent ID.
Help Guide: Consent log and demonstration of consent
For general questions about CookieYes, please check our FAQ.
If you need any assistance or answers, reach out to support@cookieyes.com