A privacy policy page is legally required and will also help your website stay compliant with privacy laws like GDPR and ePrivacy Directive. This guide will walk you through how you can generate a custom privacy policy for Squarespace website in minutes.
To begin with, sign up on CookieYes and try it for free.
Note
After you sign up, you will be directed to the installation screens. You can install the cookie banner to support GDPR compliant for your use of cookies. If you want to create a privacy policy first, then skip the installation and proceed to the app dashboard.
How to generate a privacy policy for Squarespace
Step 1. Access the privacy policy generator
- Log in to your CookieYes account.
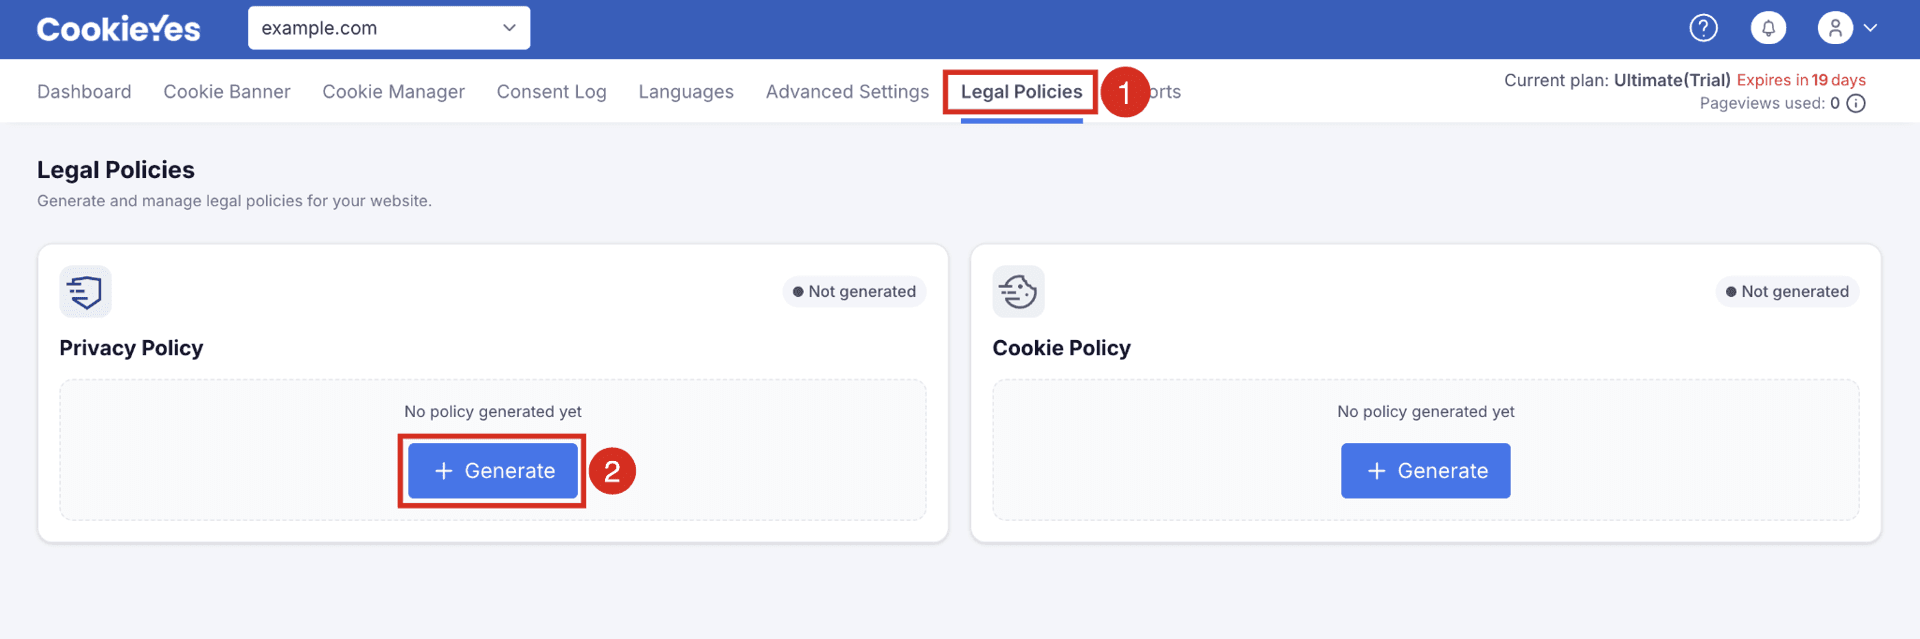
- From the top navigation bar, select Legal Policies.
- From the Privacy Policy section, click + Generate.
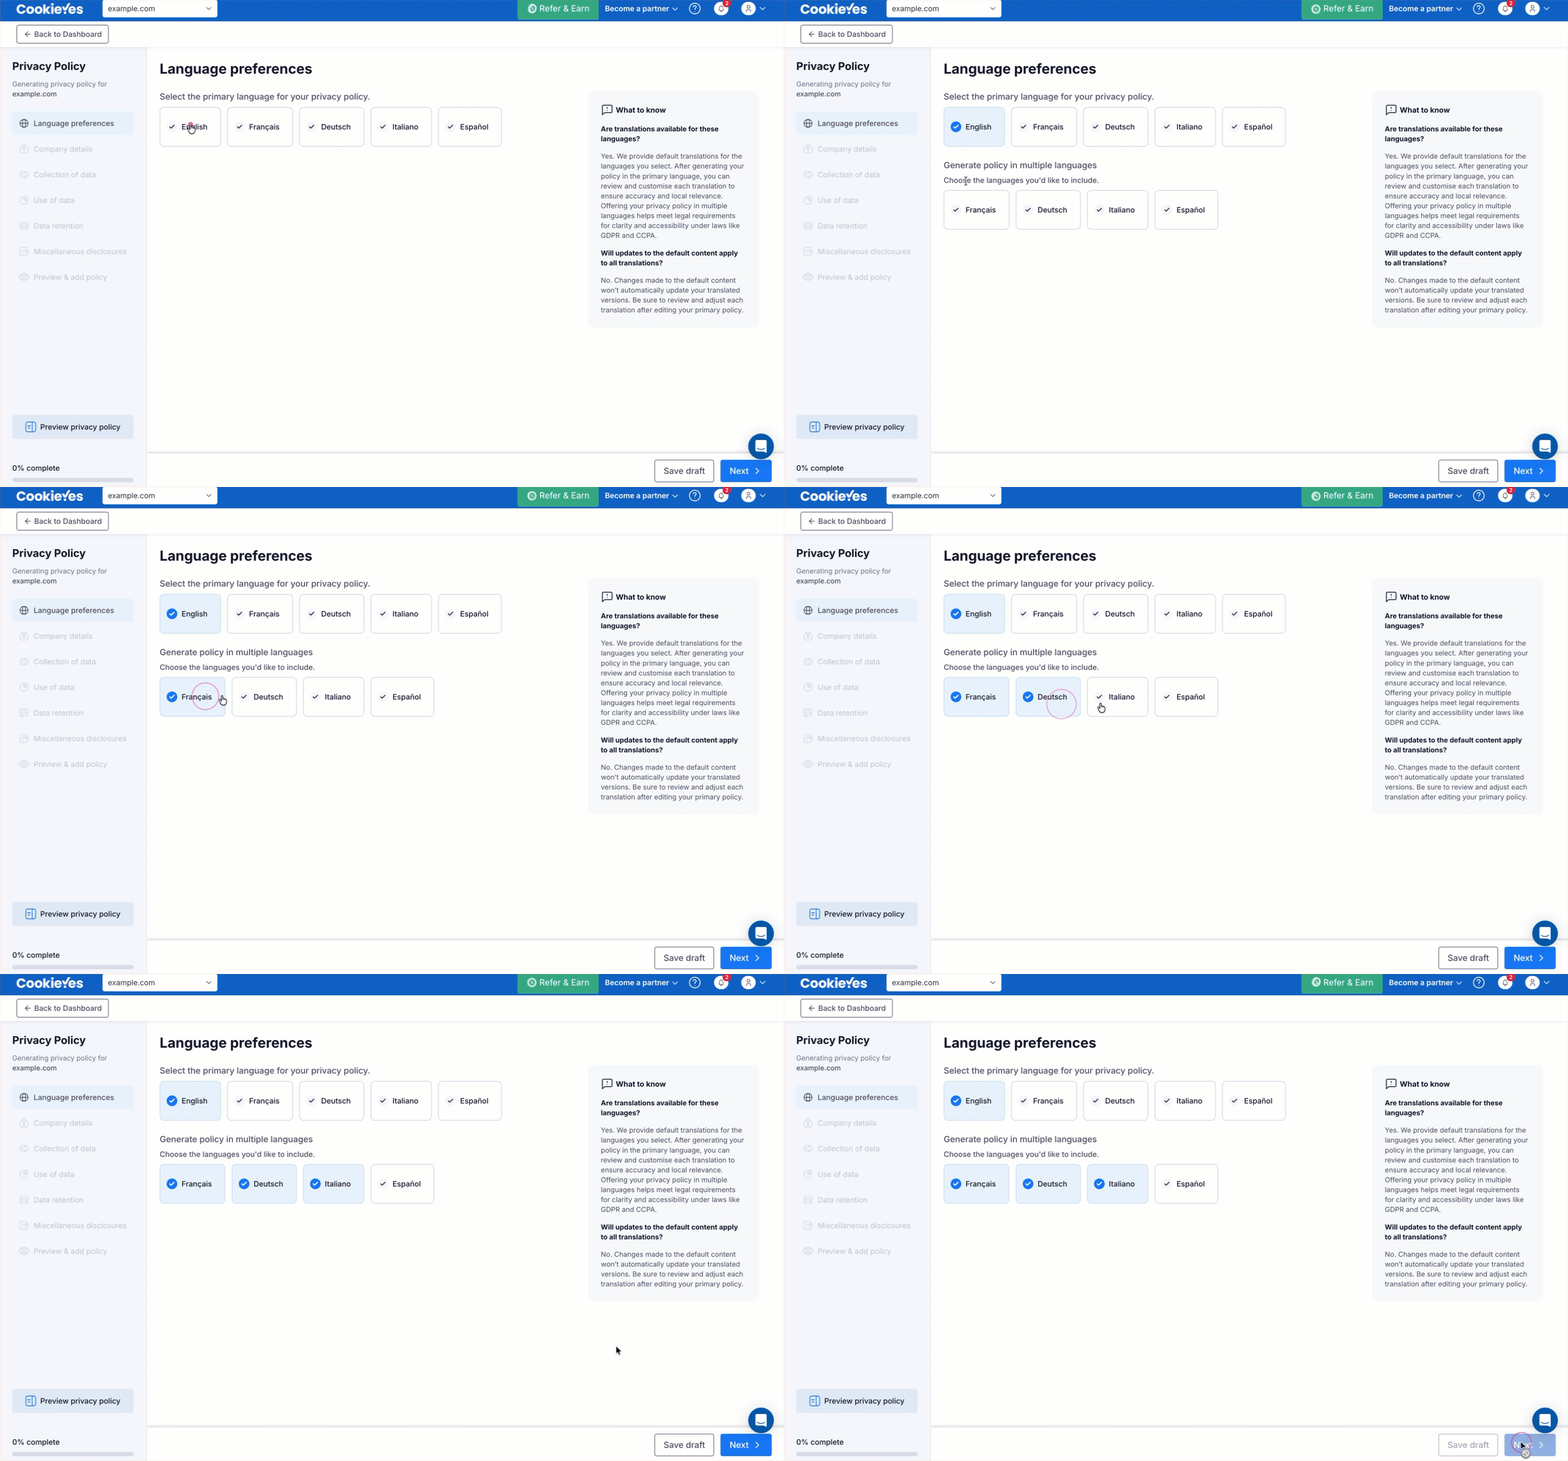
- Select the primary language
- Choose the default language of your privacy policy.
- Generate policy in multiple languages
- Select the additional languages you want to generate the privacy policy in. This feature is available only on Basic, Pro and Ultimate plans.
- Click Save draft to save your progress or Next to continue.
Step 3. Add company details
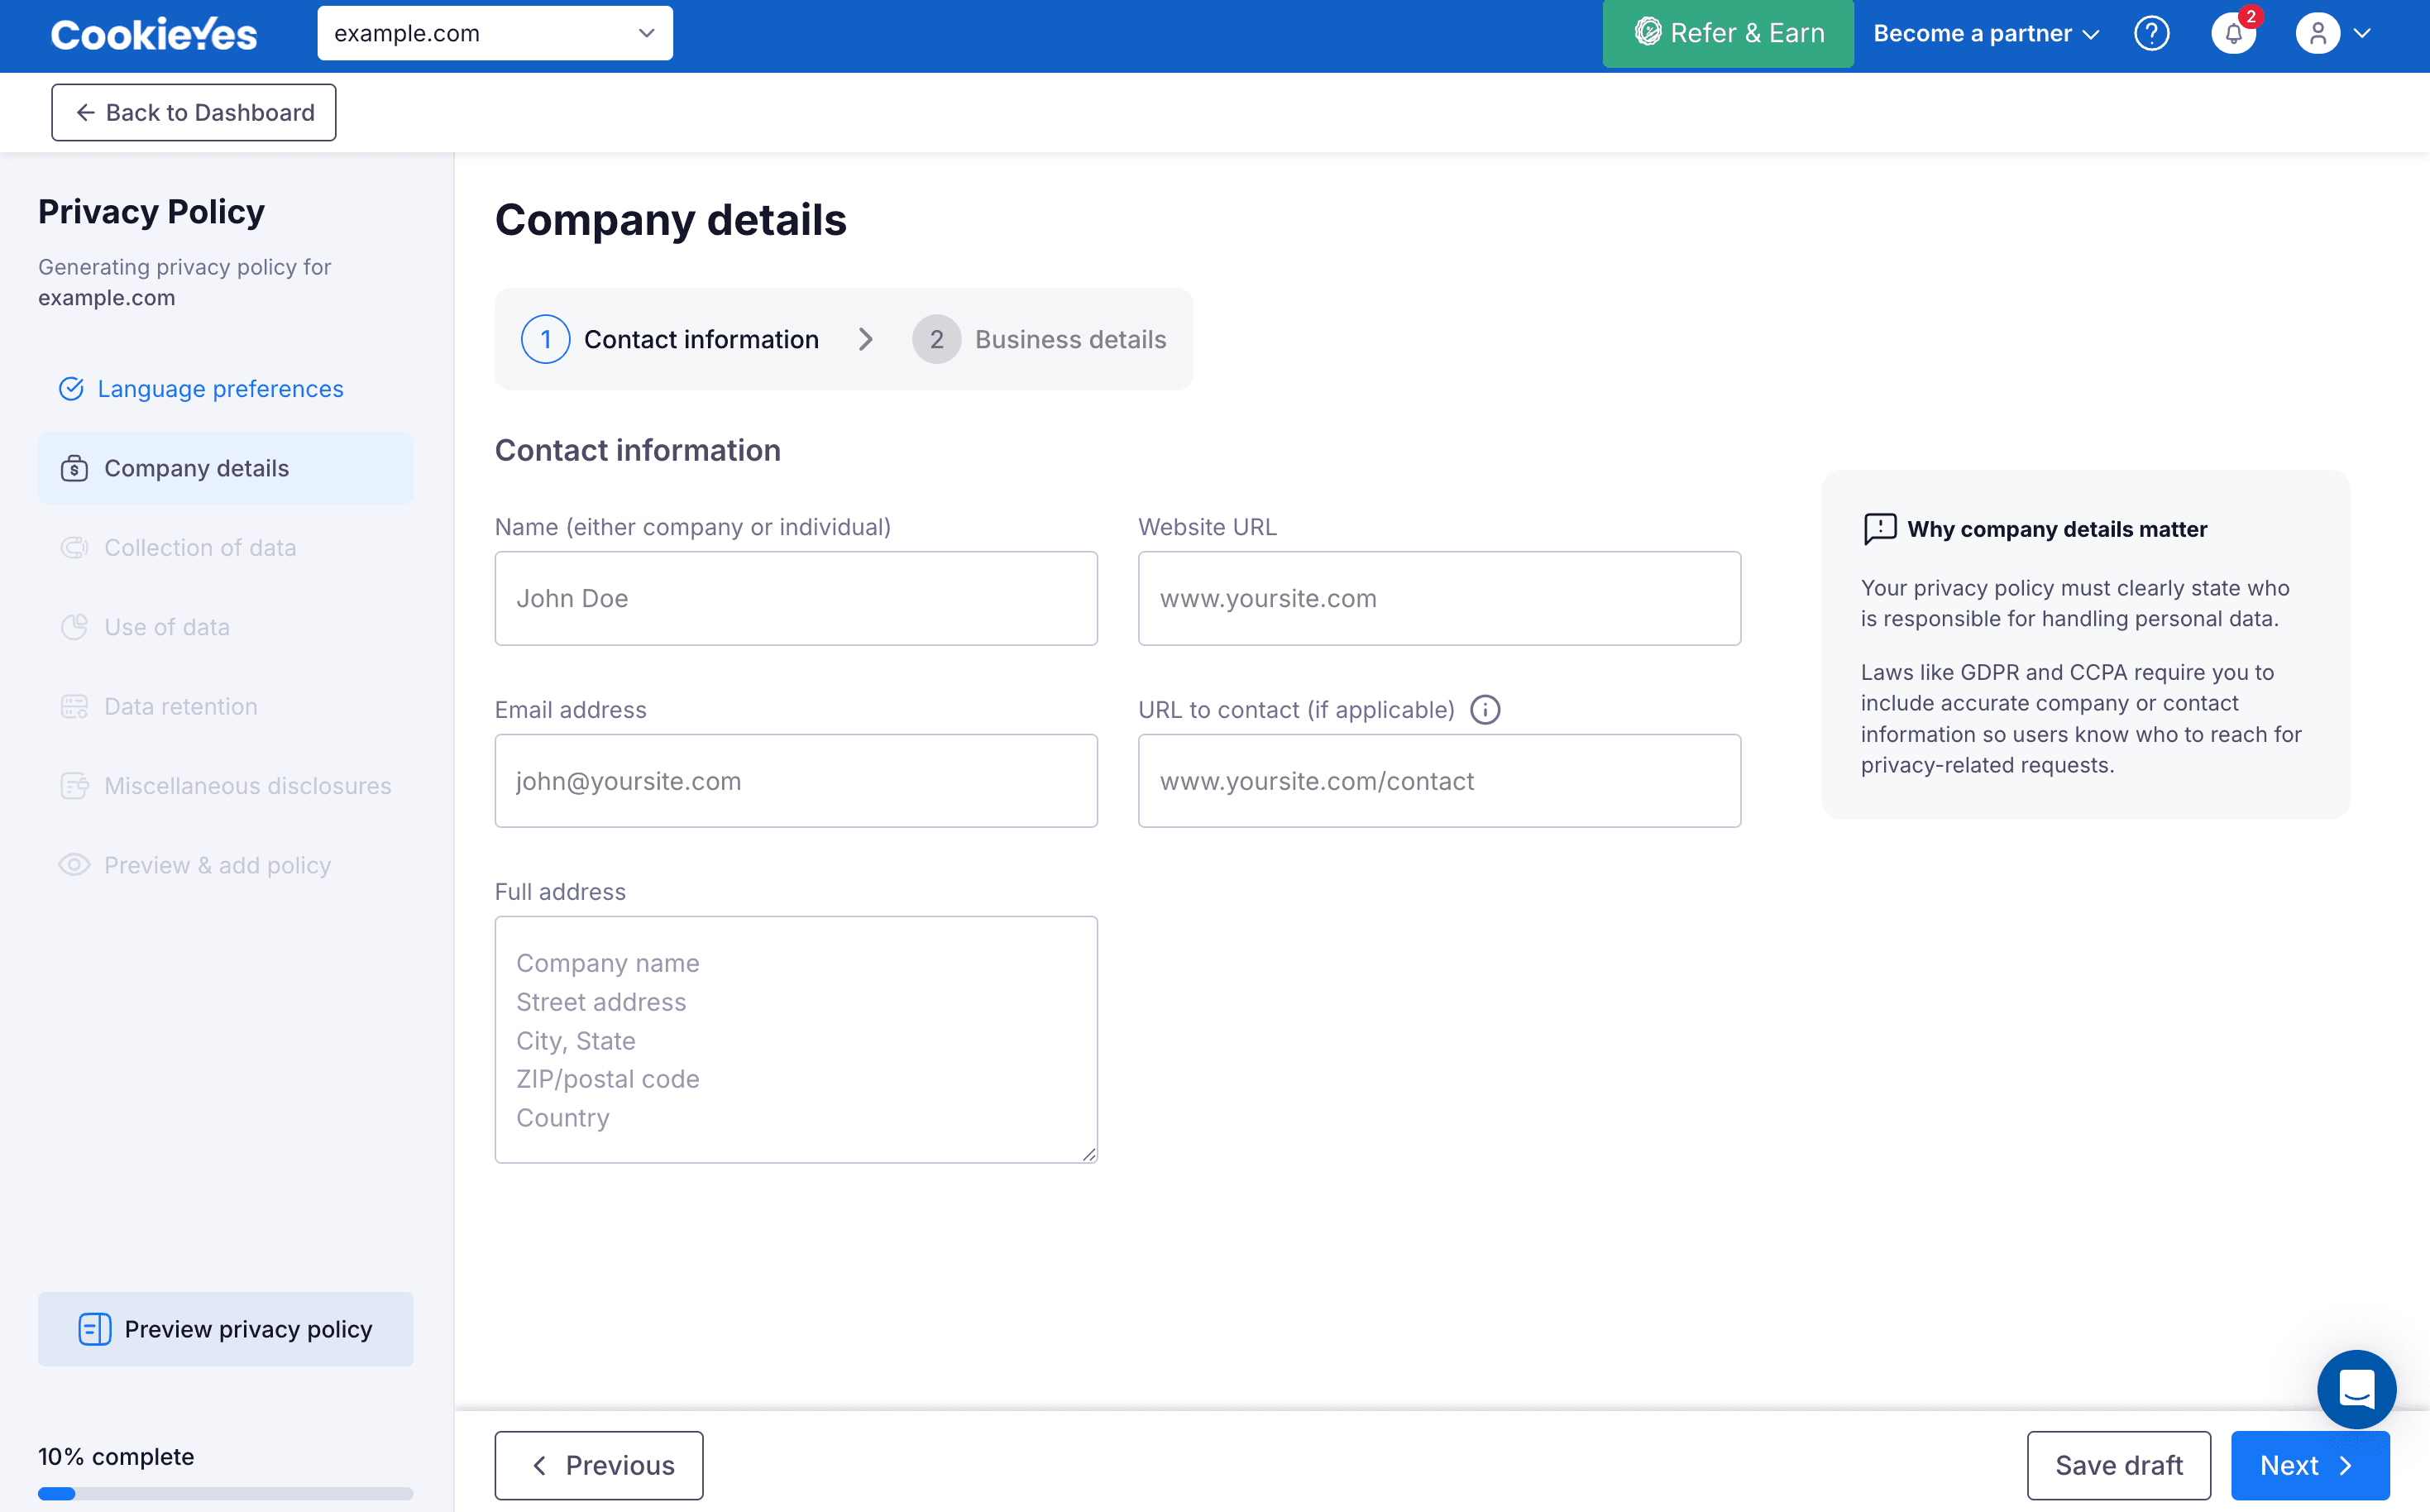
Company details has two sections: Contact information and Business details.
In Contact information, provide name (either company or individual), website URL, email address, contact URL (if applicable), and full address. Click Next to navigate to Business details.
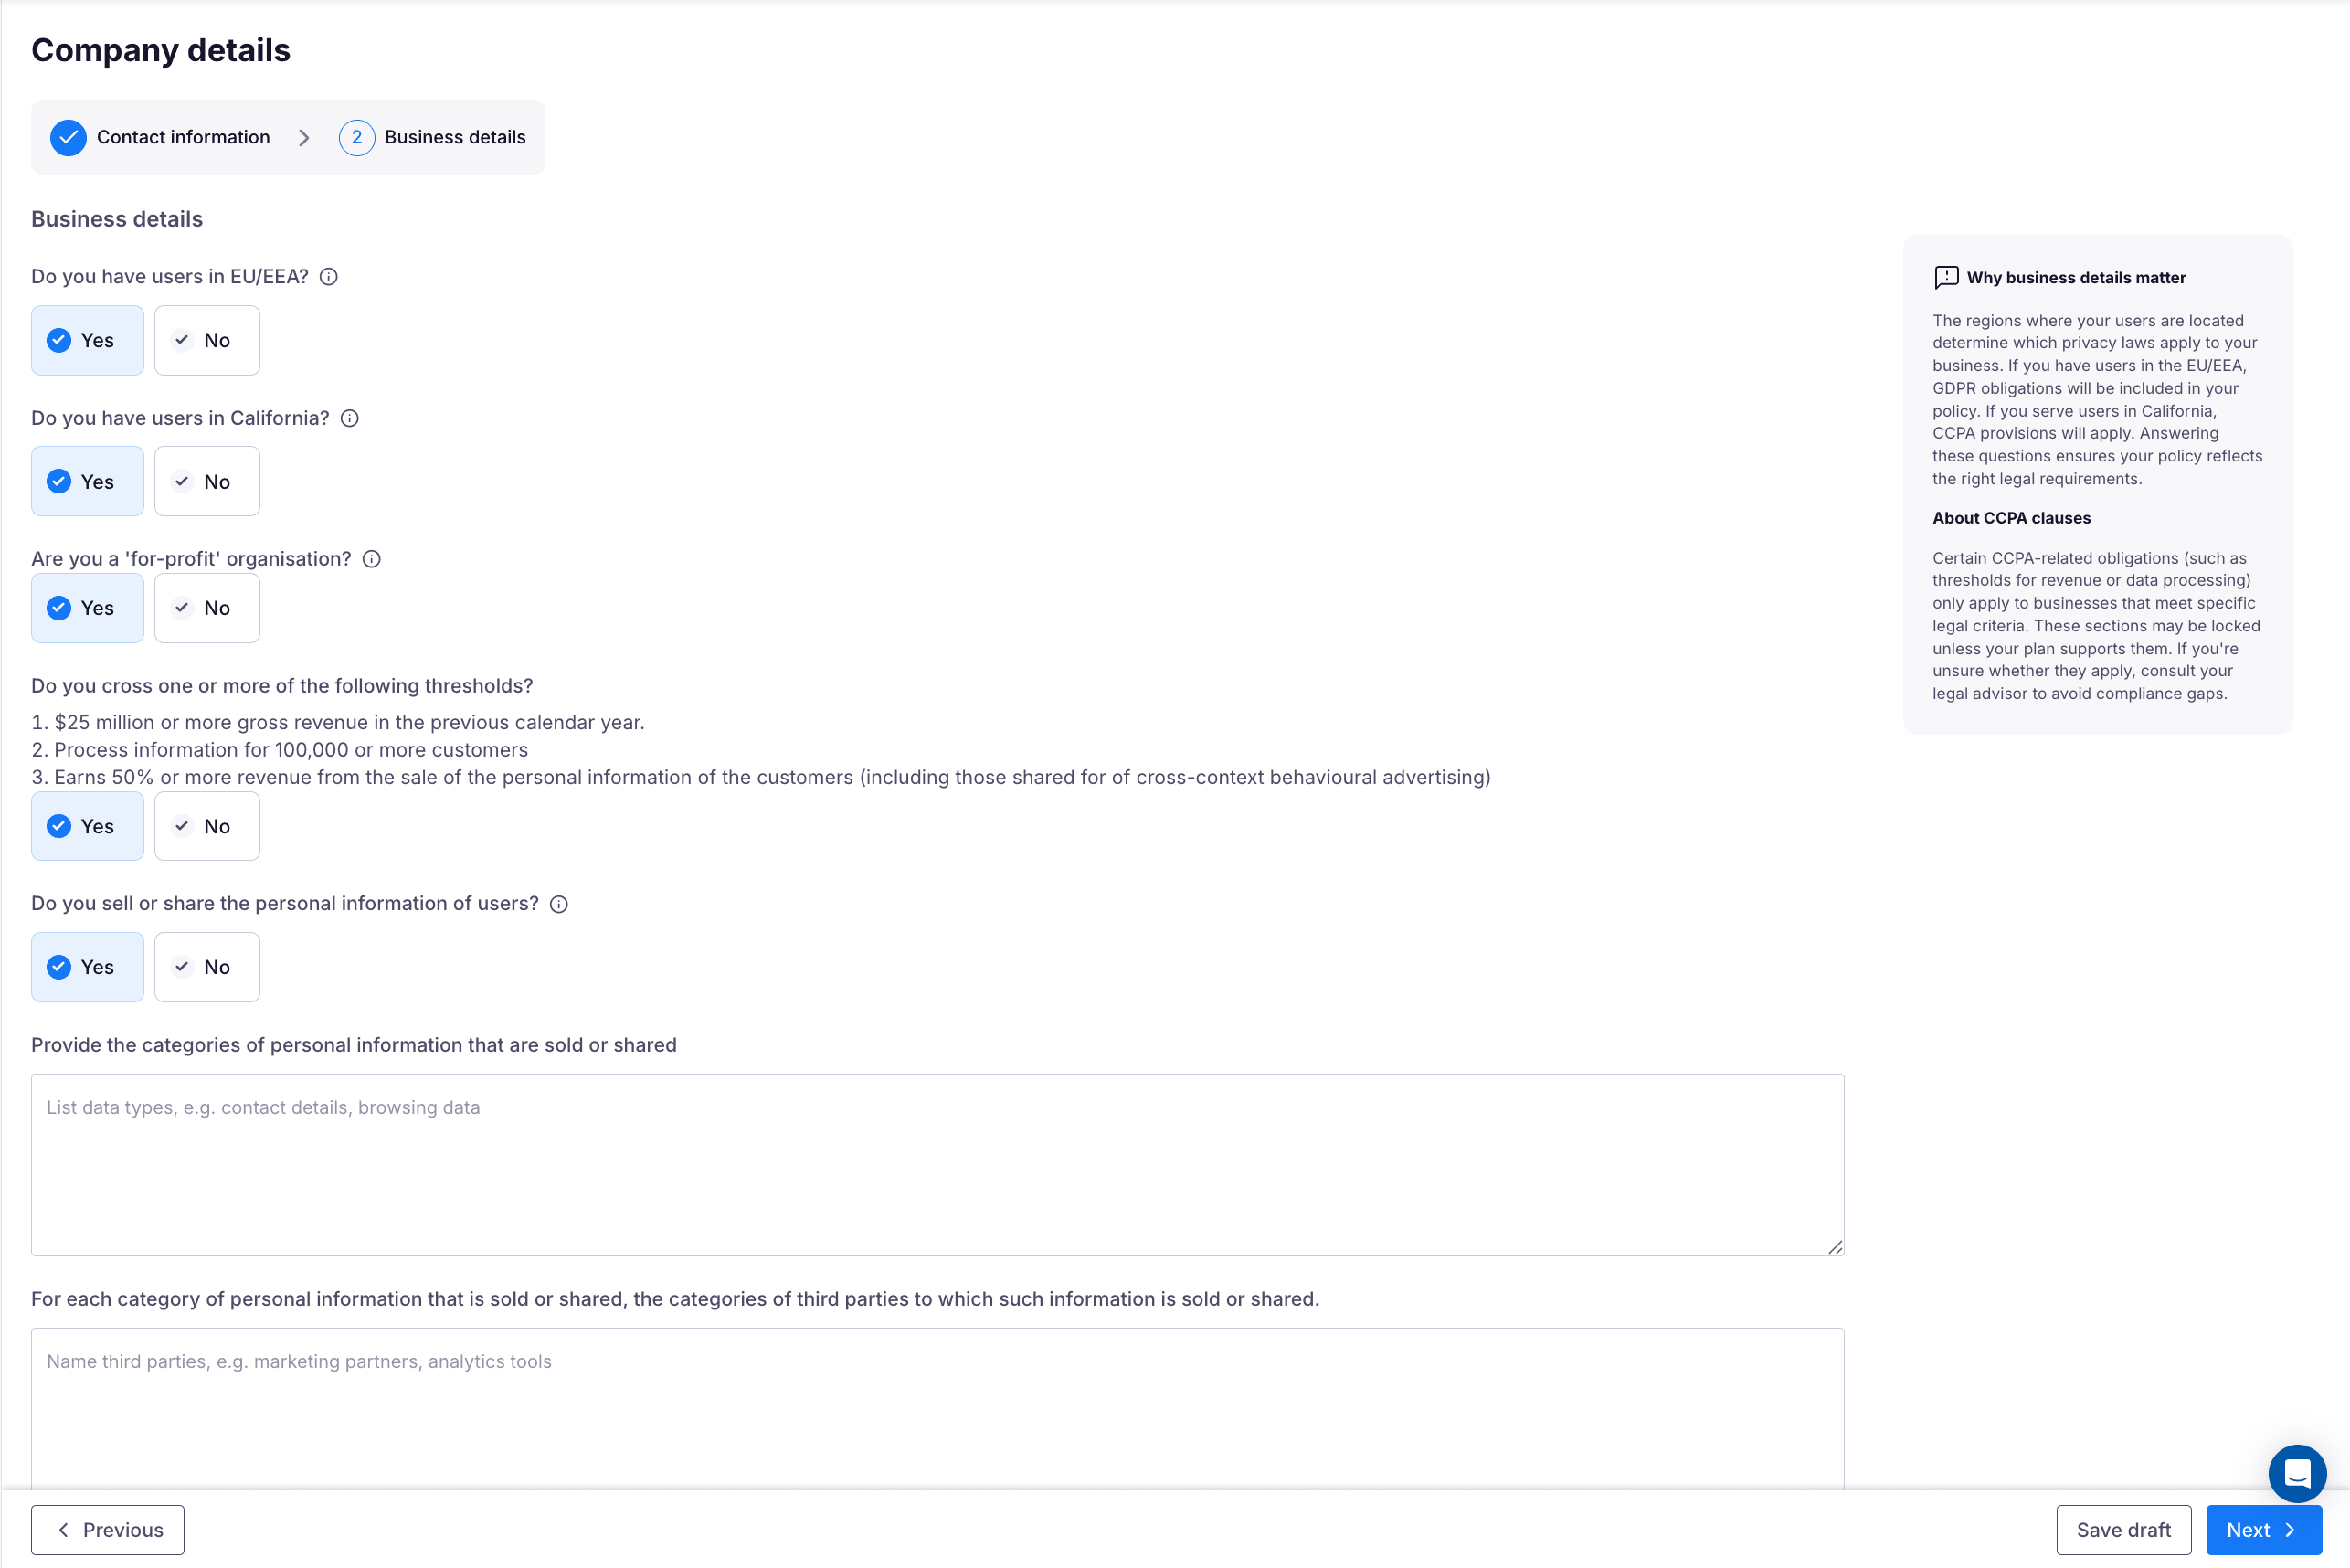
In Business details, provide the following details.
Do you have users in EU/EEA?
Select Yes or No to indicate whether your website has users in the EU or EEA. Selecting Yes includes GDPR-specific clauses in your privacy policy.
Note
The remaining questions in this section apply only to websites with users in California. If you do not have users in California, select No for the next question and click Next.
Do you have users in California?
Select Yes or No to indicate whether your website has users in California. Selecting Yes displays follow-up questions that determine whether the CCPA/CalOPPA applies to your business.
Note
The follow-up questions below are available only on the Basic, Pro, and Ultimate plans.
If you select No, no additional questions appear.
If you select Yes, answer the following questions:
- Are you a for-profit organisation?
- If you select No, no additional questions appear, as the CCPA applies only to for-profit businesses.
- If you select Yes, the following question appears:
- Do you cross one or more of the following thresholds? $25 million or more in annual gross revenue, data processing for 100,000 or more customers, or 50% or more of revenue from selling customers' personal information (including data shared for cross-context behavioral advertising).
- If Yes, the CCPA applies to your business. A Disclosure of data page appears later in the flow.
- If you select No, a follow-up question appears: Do you want to include CCPA-compliant clauses even if not legally required?
- If you select Yes, the Disclosure of data page is added to the flow.
- If you select No, no additional questions appear in this step.
- Do you sell or share the personal information of users?
- Selecting Yes prompts you to provide the categories of personal information that are sold or shared and, for each category, the categories of third parties to which the information is sold or shared. The Disclosure of data page is also added to the flow.
- If you select No, no further questions appear in this step.
Click Next to proceed to Step 4.
Step 4. Collection of data
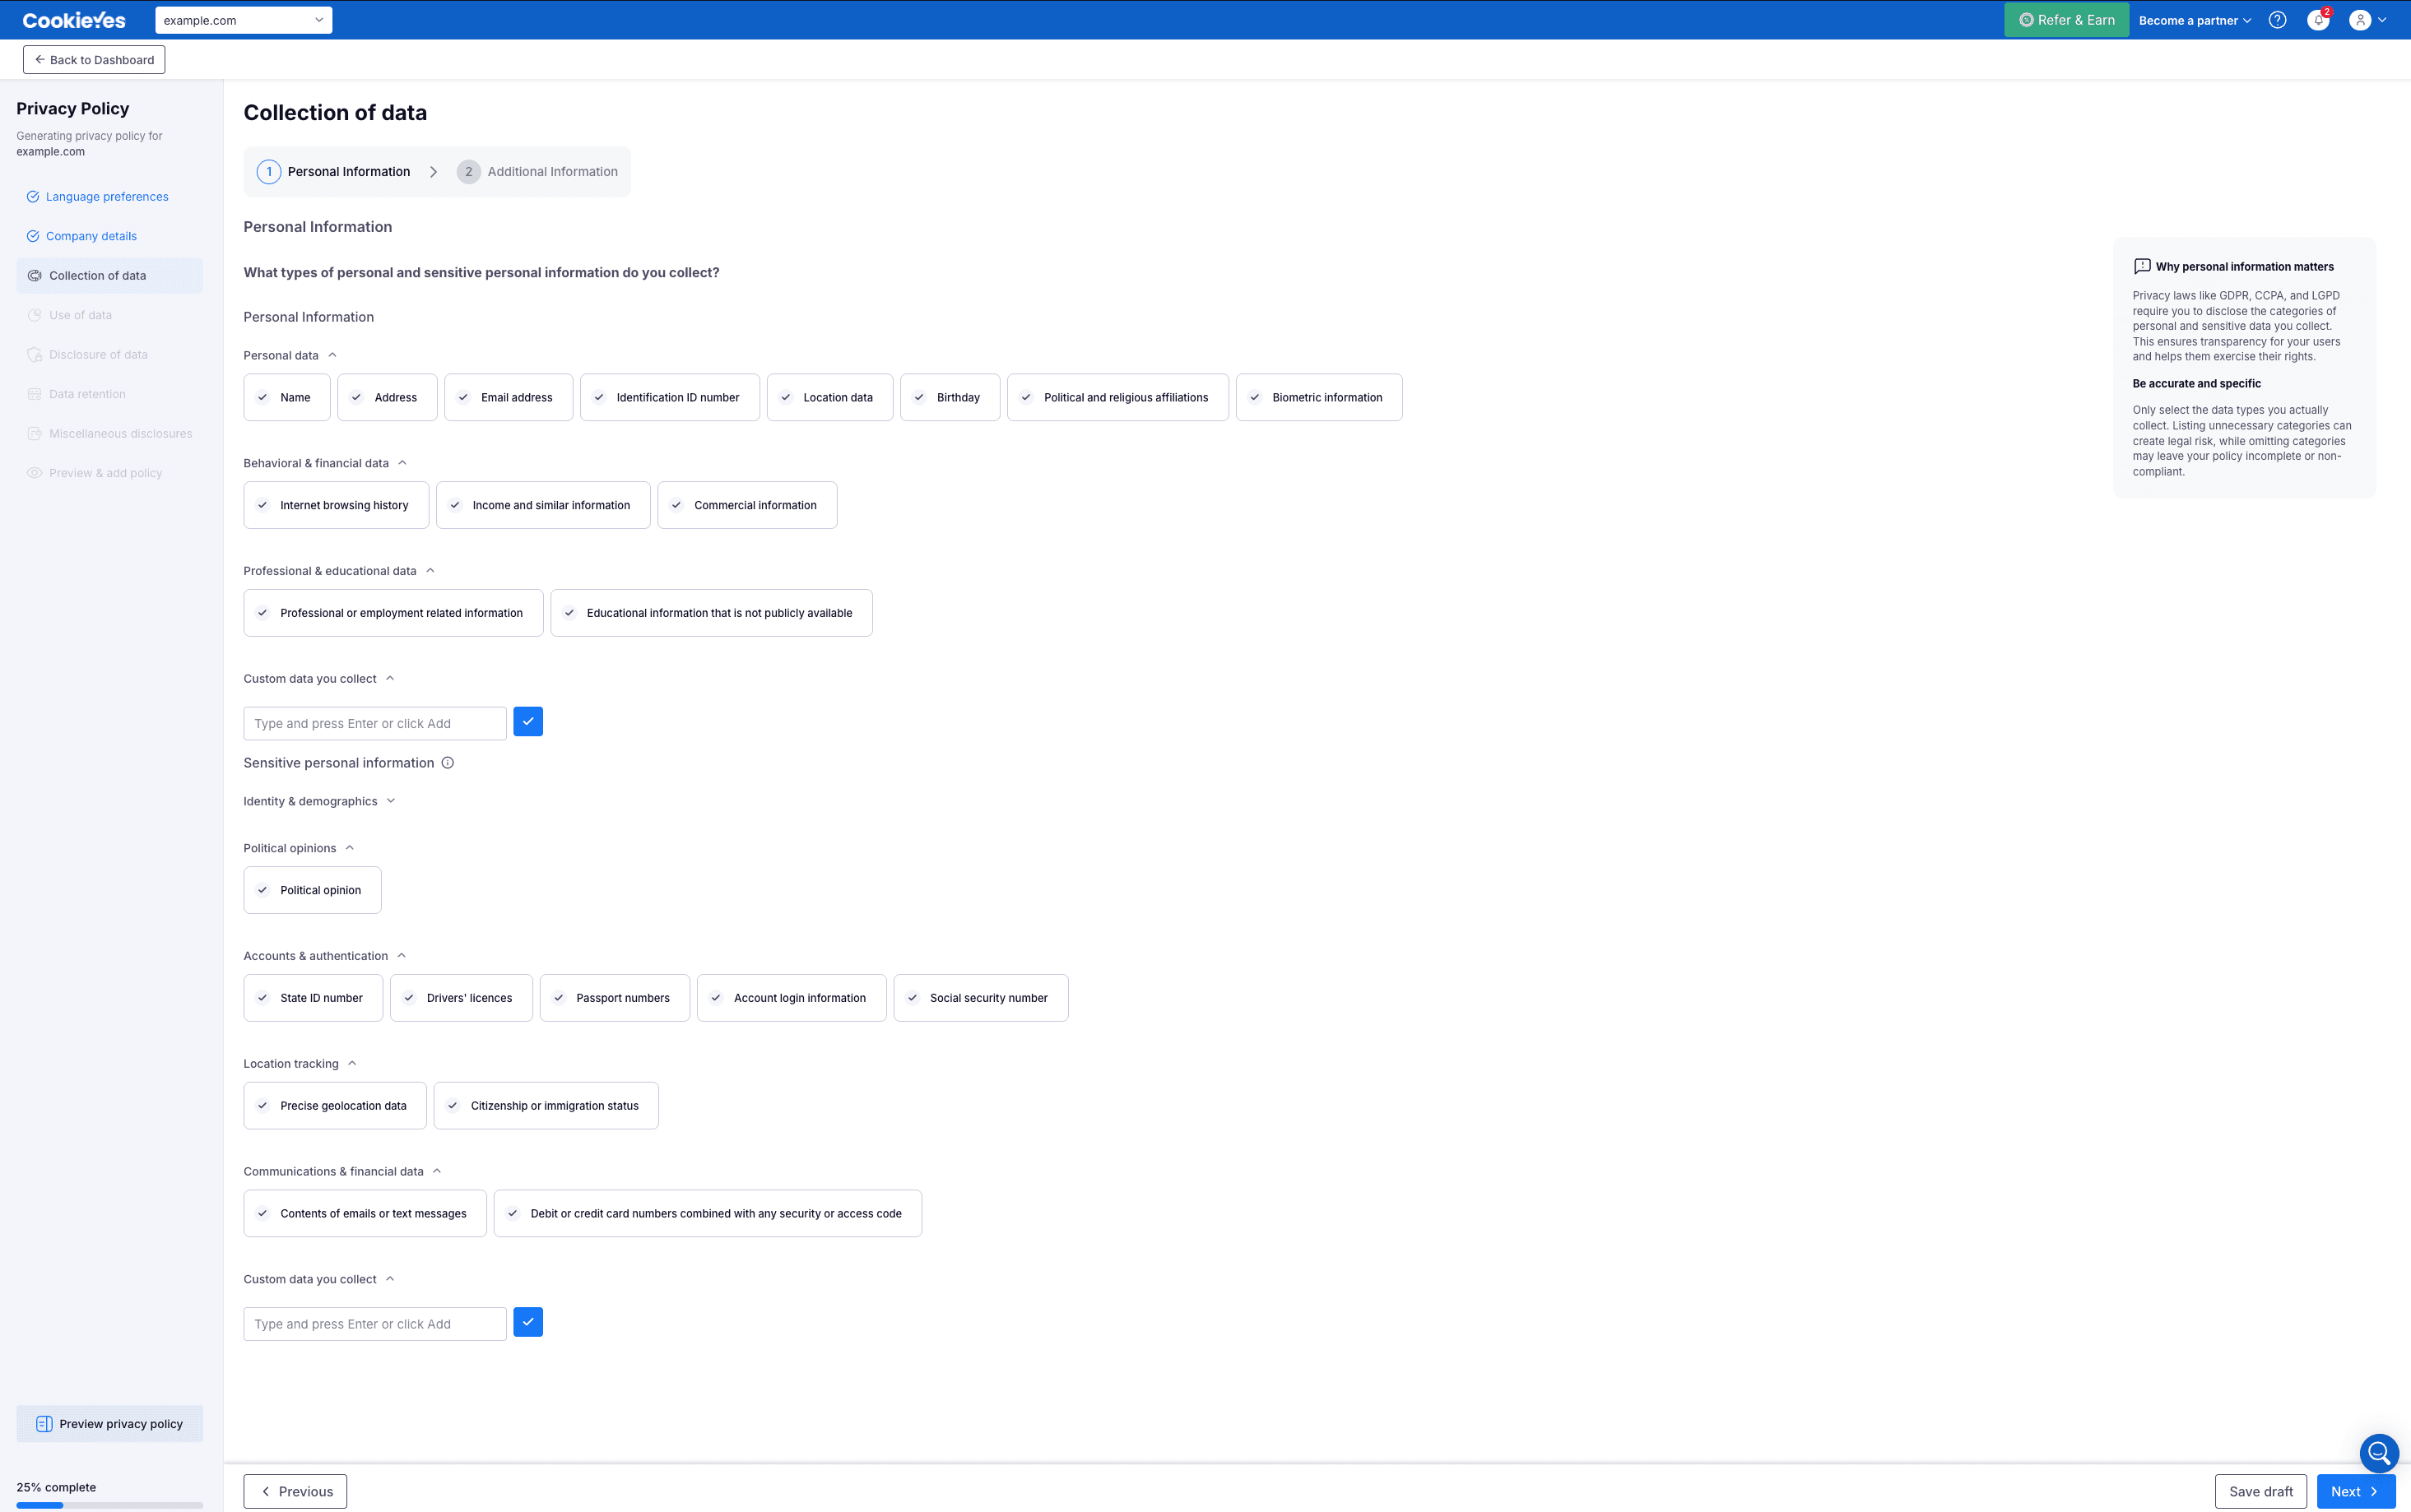
Collection of data has two sections: Personal information and Additional information.
In Personal information, specify the types of personal or sensitive personal information you collect. Click Next to navigate to the Additional information section.
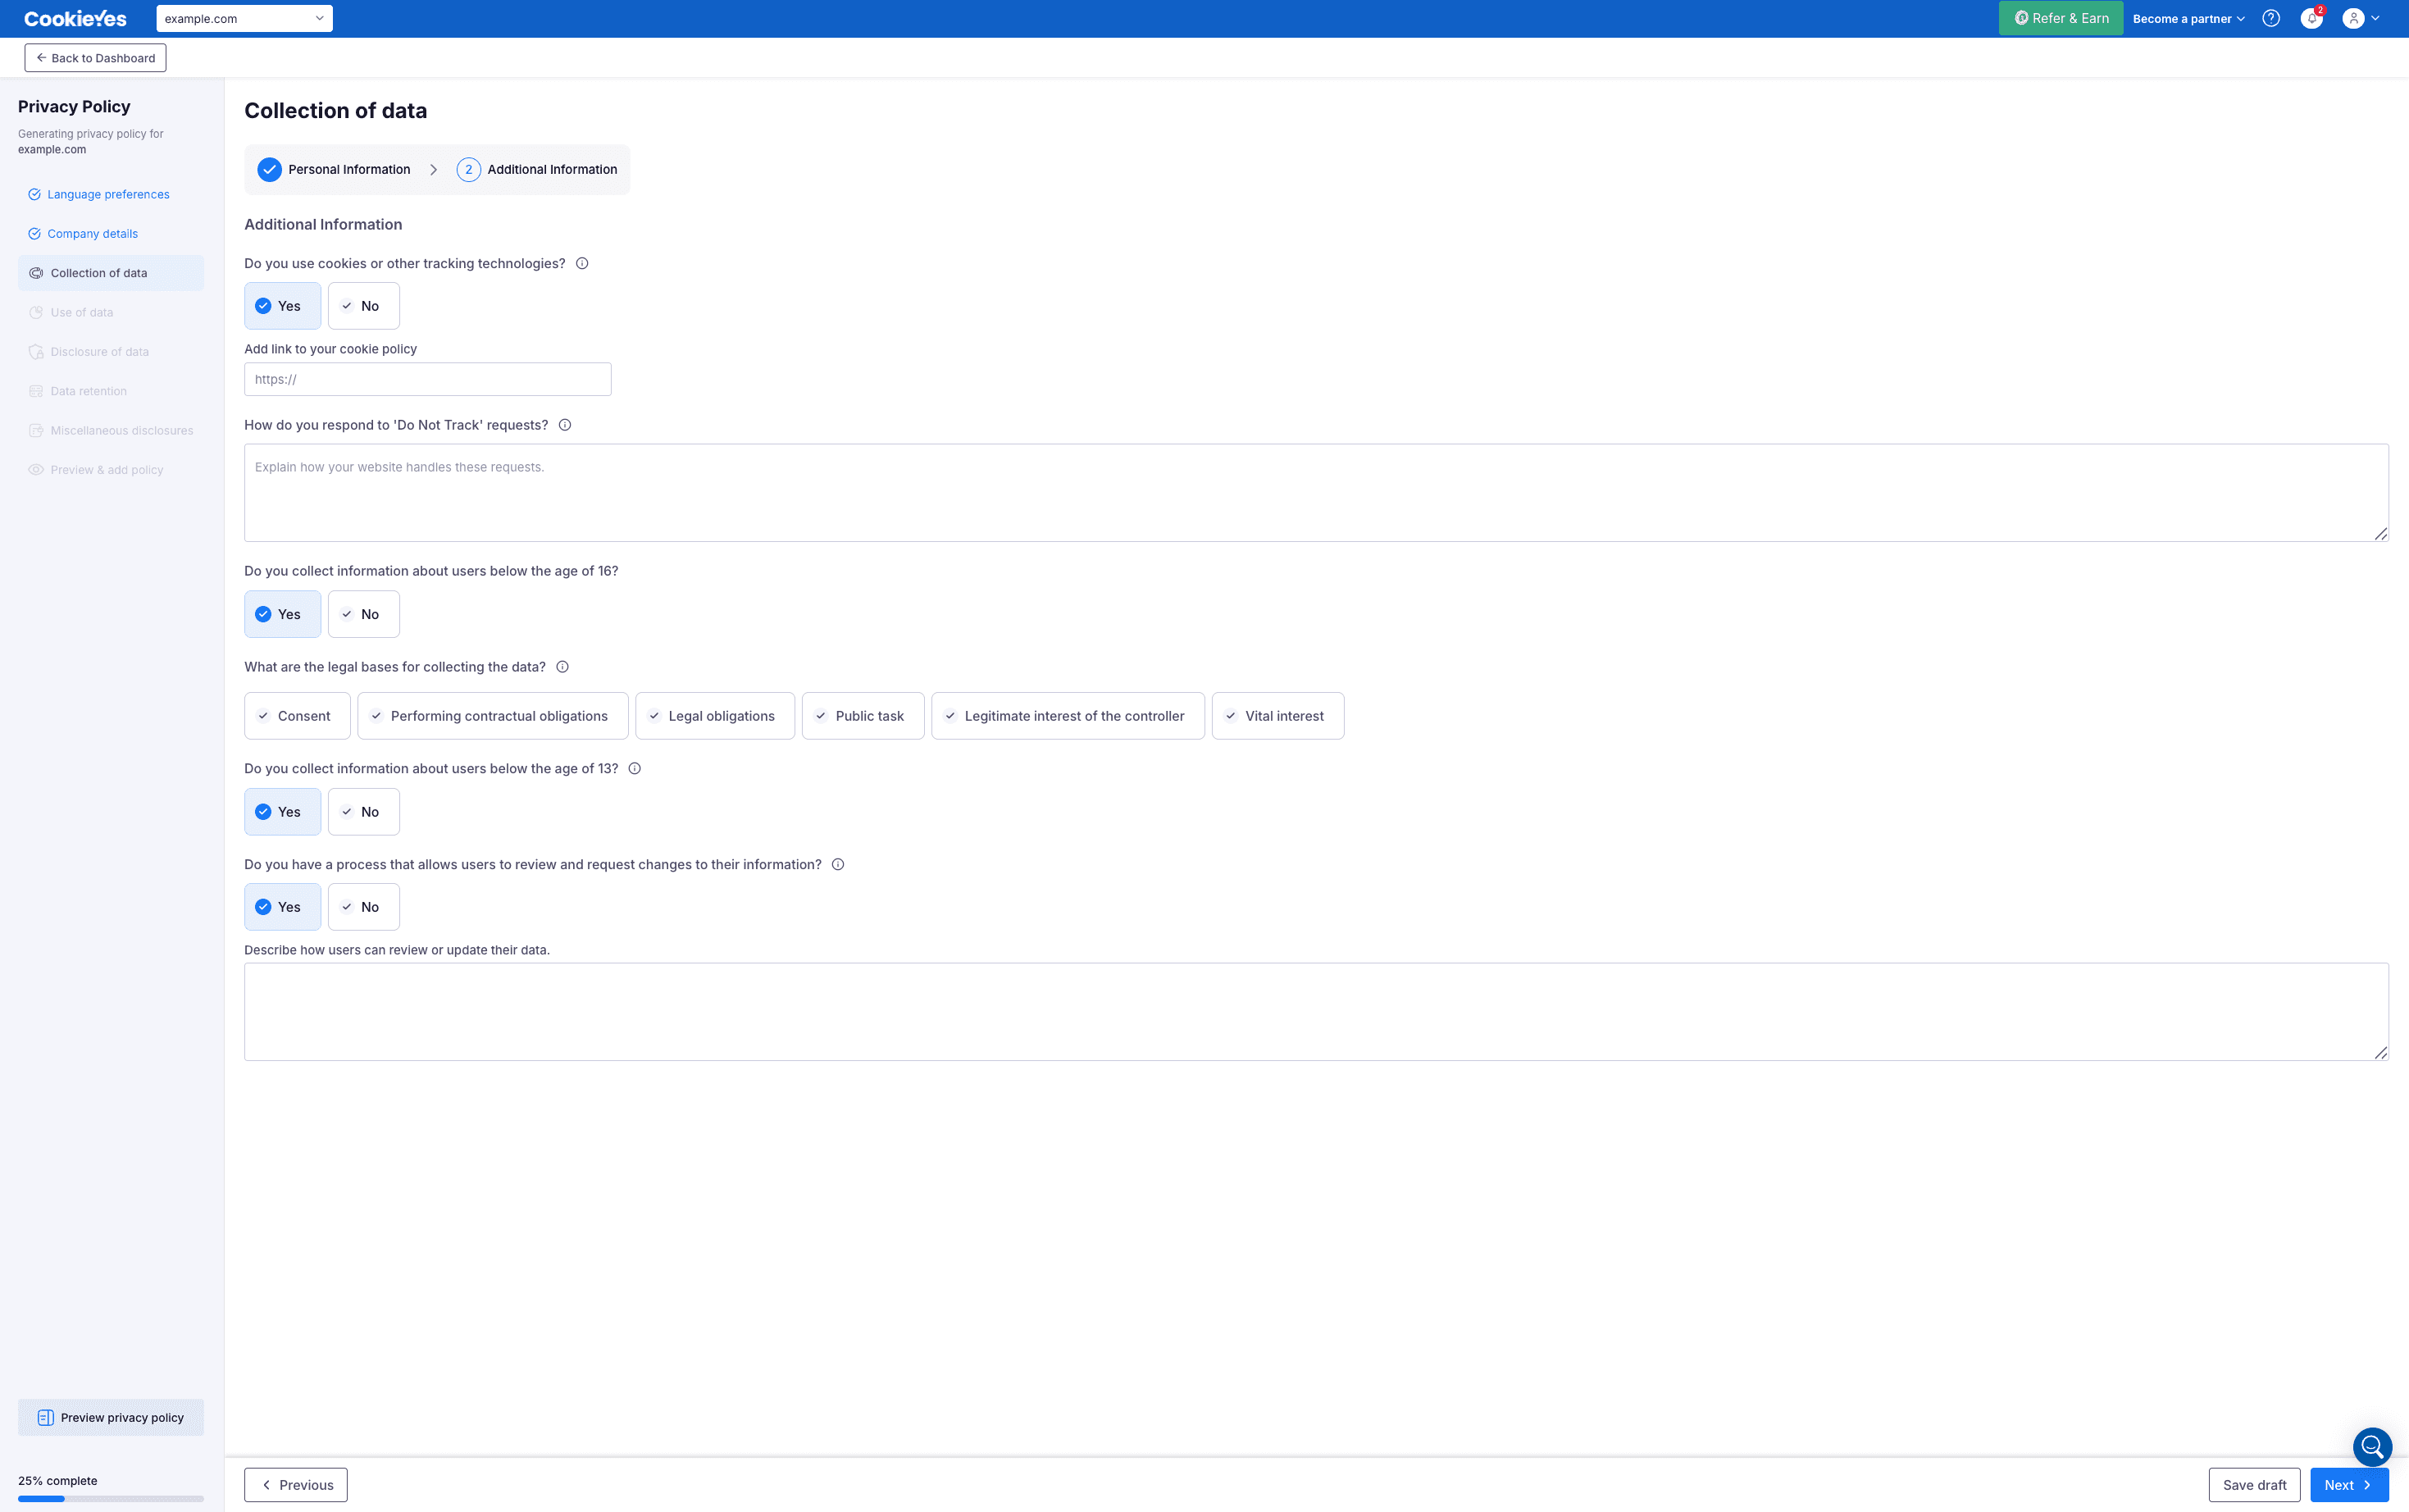
In Additional information, provide the following details:
- Specify whether you use cookies or other tracking technologies. If you select Yes, add a link to your cookie policy.
- Describe how you respond to Do Not Track requests.
- Specify whether you collect information about users below the age of 16.
- Select the legal bases for collecting the data.
- Specify whether you collect information about users below the age of 13.
- Specify whether you have a process that allows users to review and request changes to their information. If you select Yes, describe how users can review or update their data.
Click Next to proceed to Step 5.
Step 5. Use of data
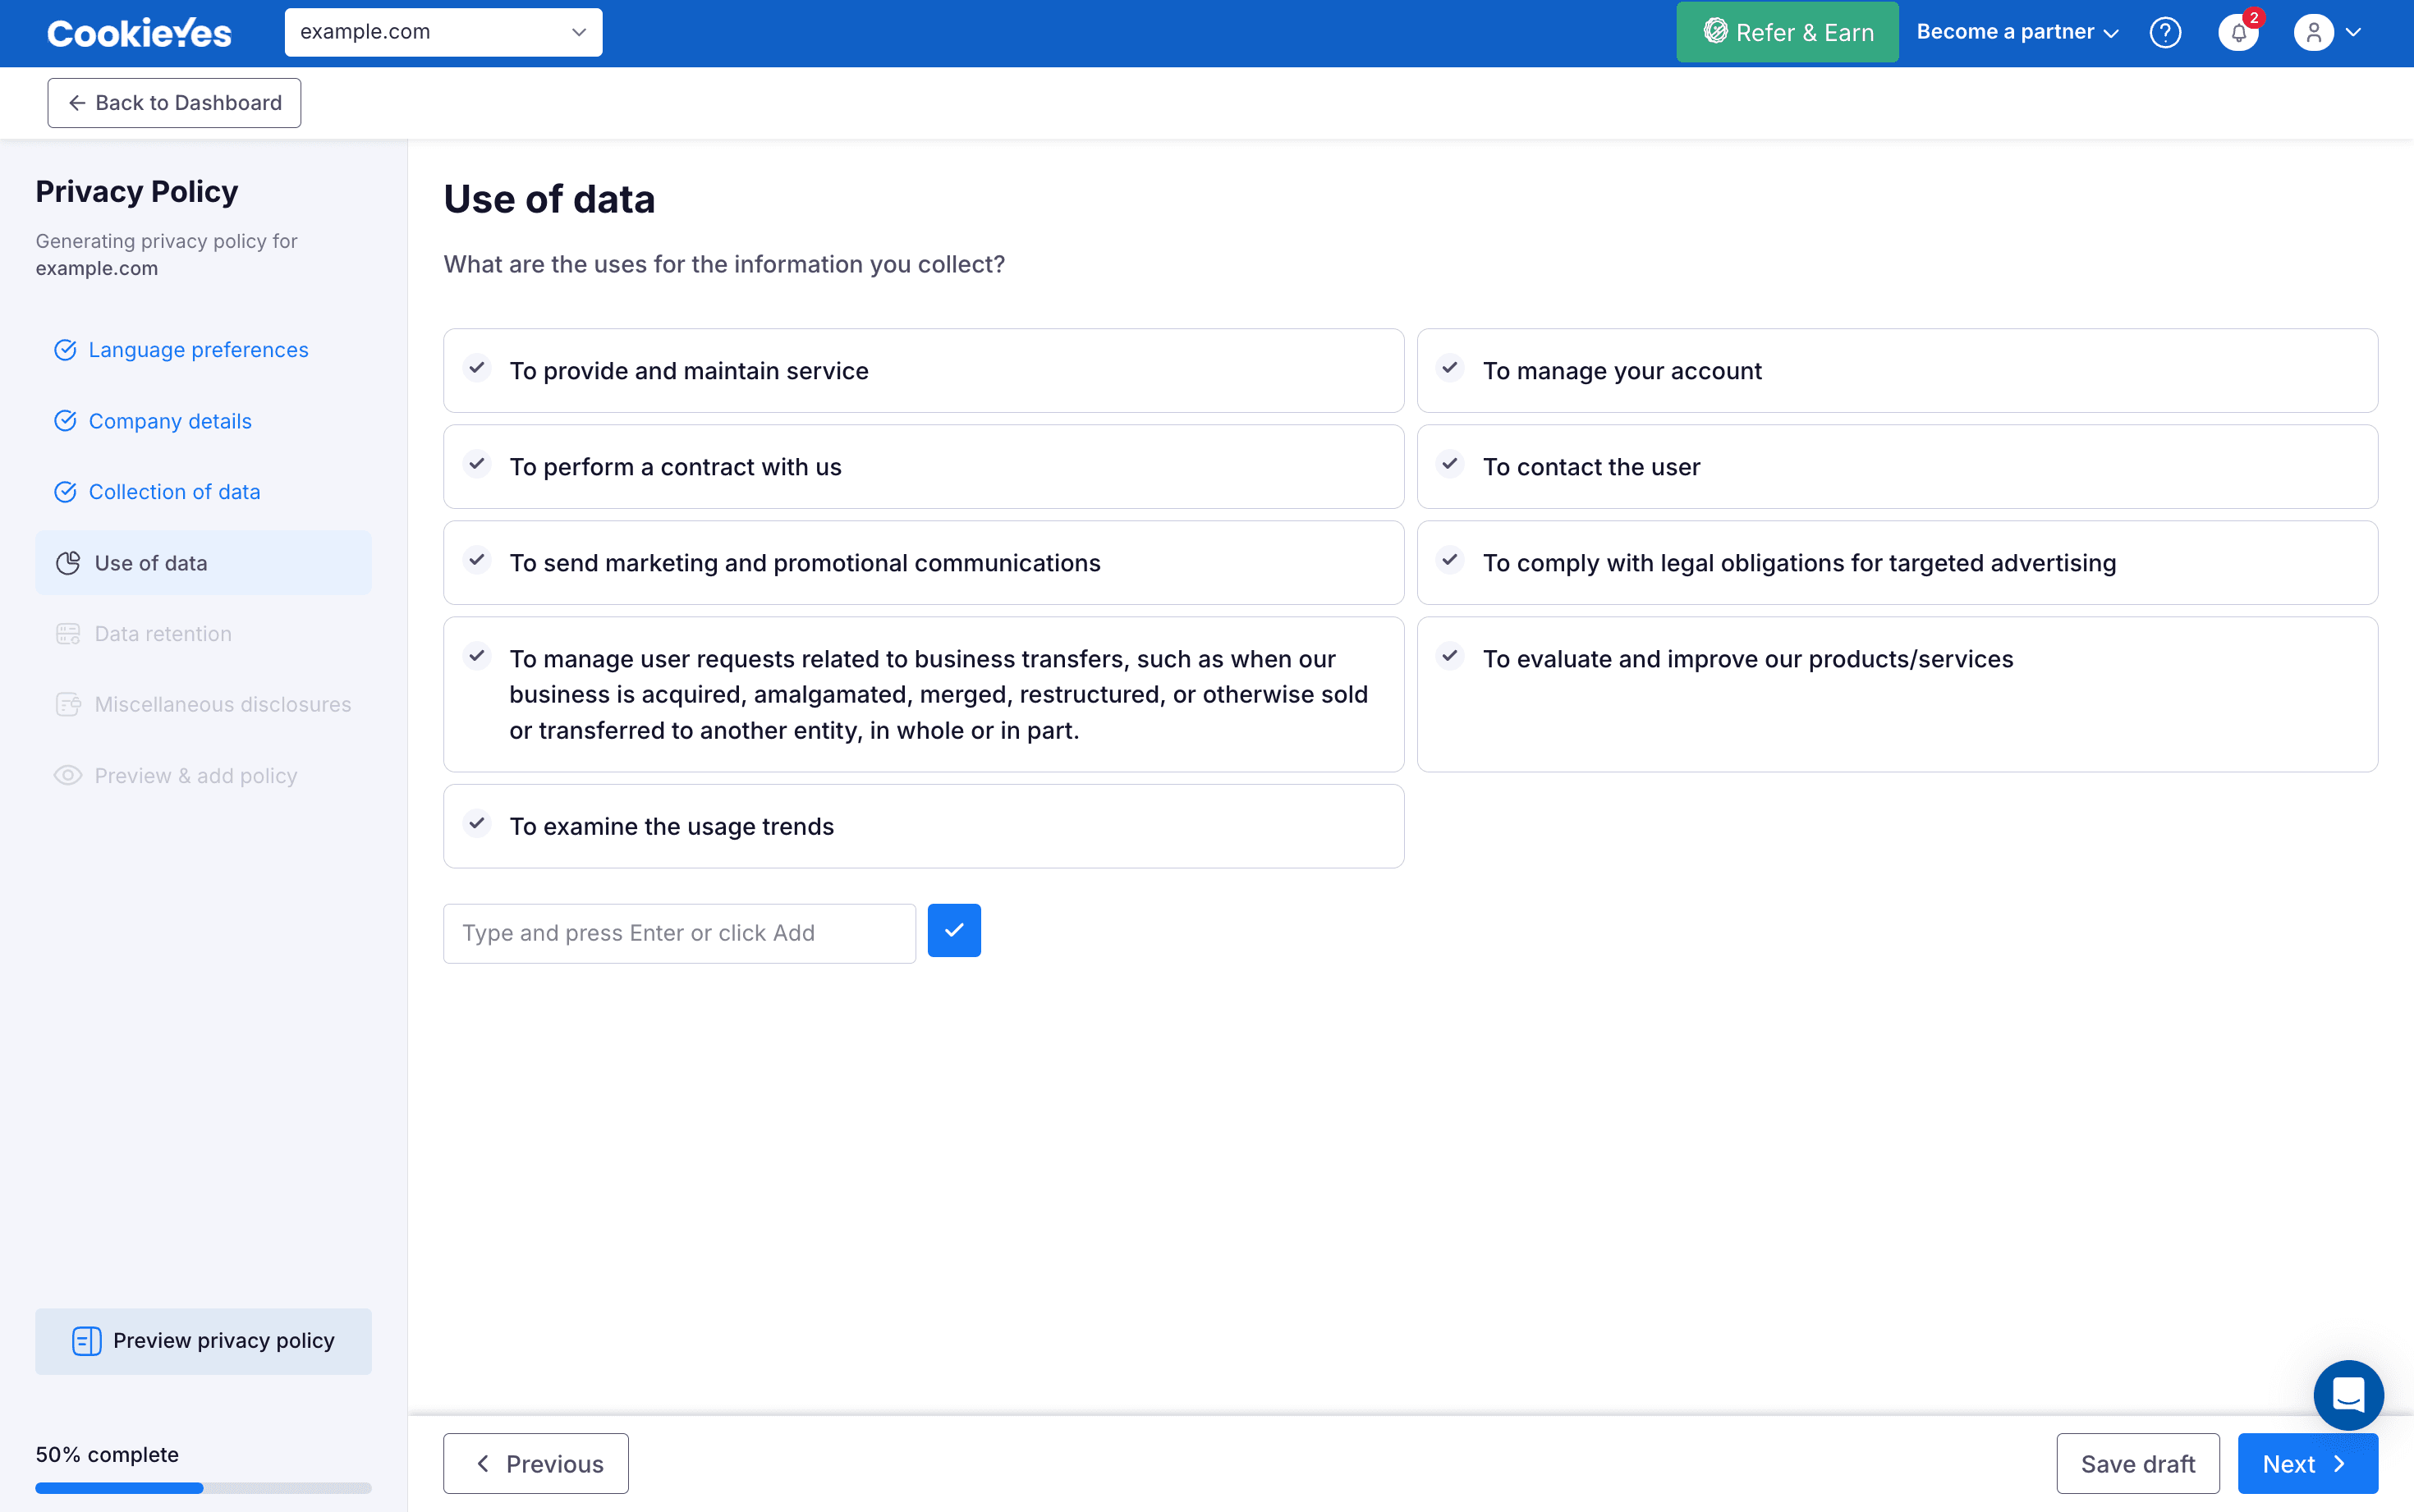
In Use of data, select the options that describe how the information you collect is used. Click Next to proceed to Step 6.
Step 6. Disclosure of data
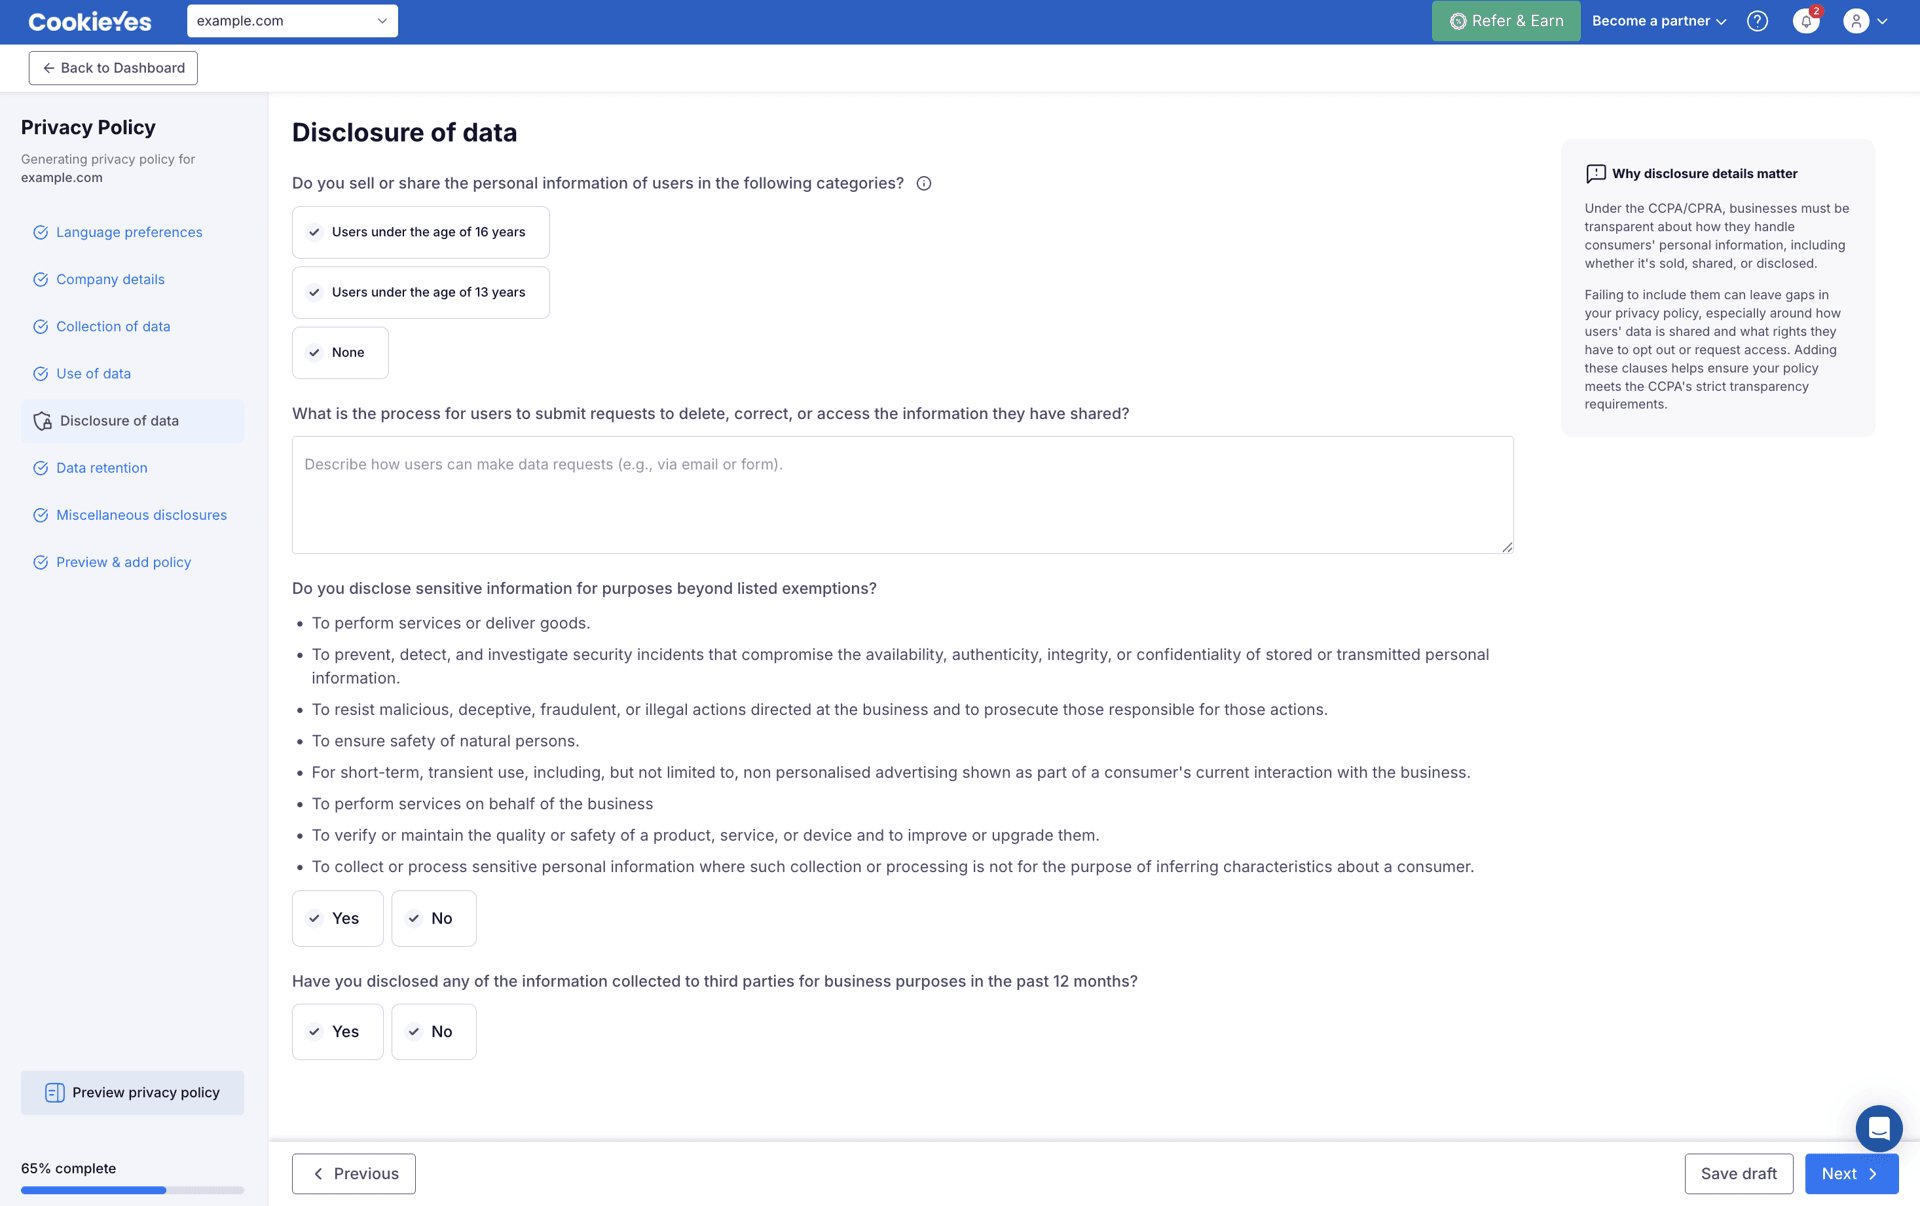
In Disclosure of data, provide details about the categories of users whose information is sold or shared, the request process for users to delete, correct, or access their information, sensitive information disclosures, and any third-party disclosures made in the past 12 months.
Disclosure of data appears only if you selected the relevant options in the Business details section of the Company Details page, so it may not be part of every user's setup.
Step 7. Data retention
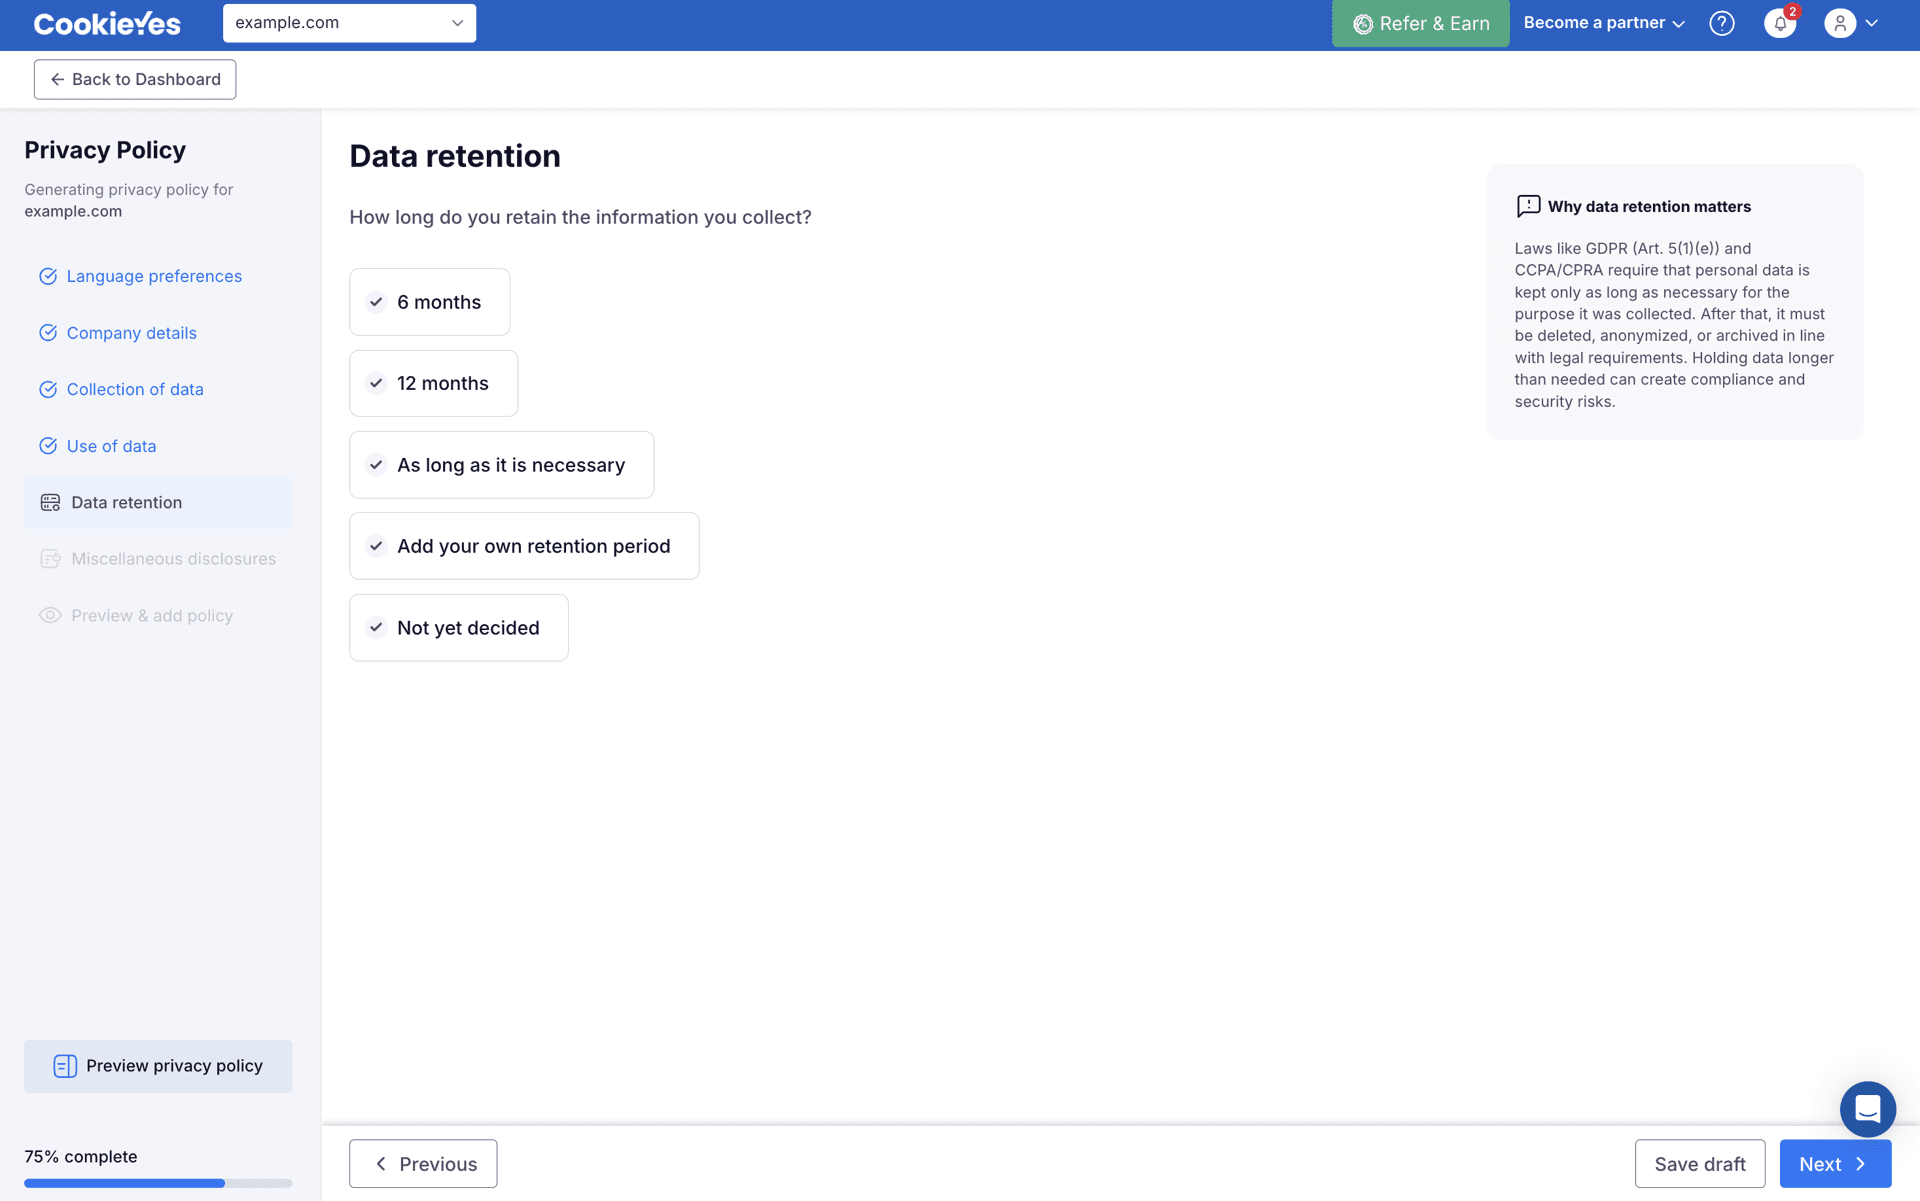
In Data retention, specify how long the information you collect is retained. Click Next to continue.
Step 8. Miscellaneous disclosures
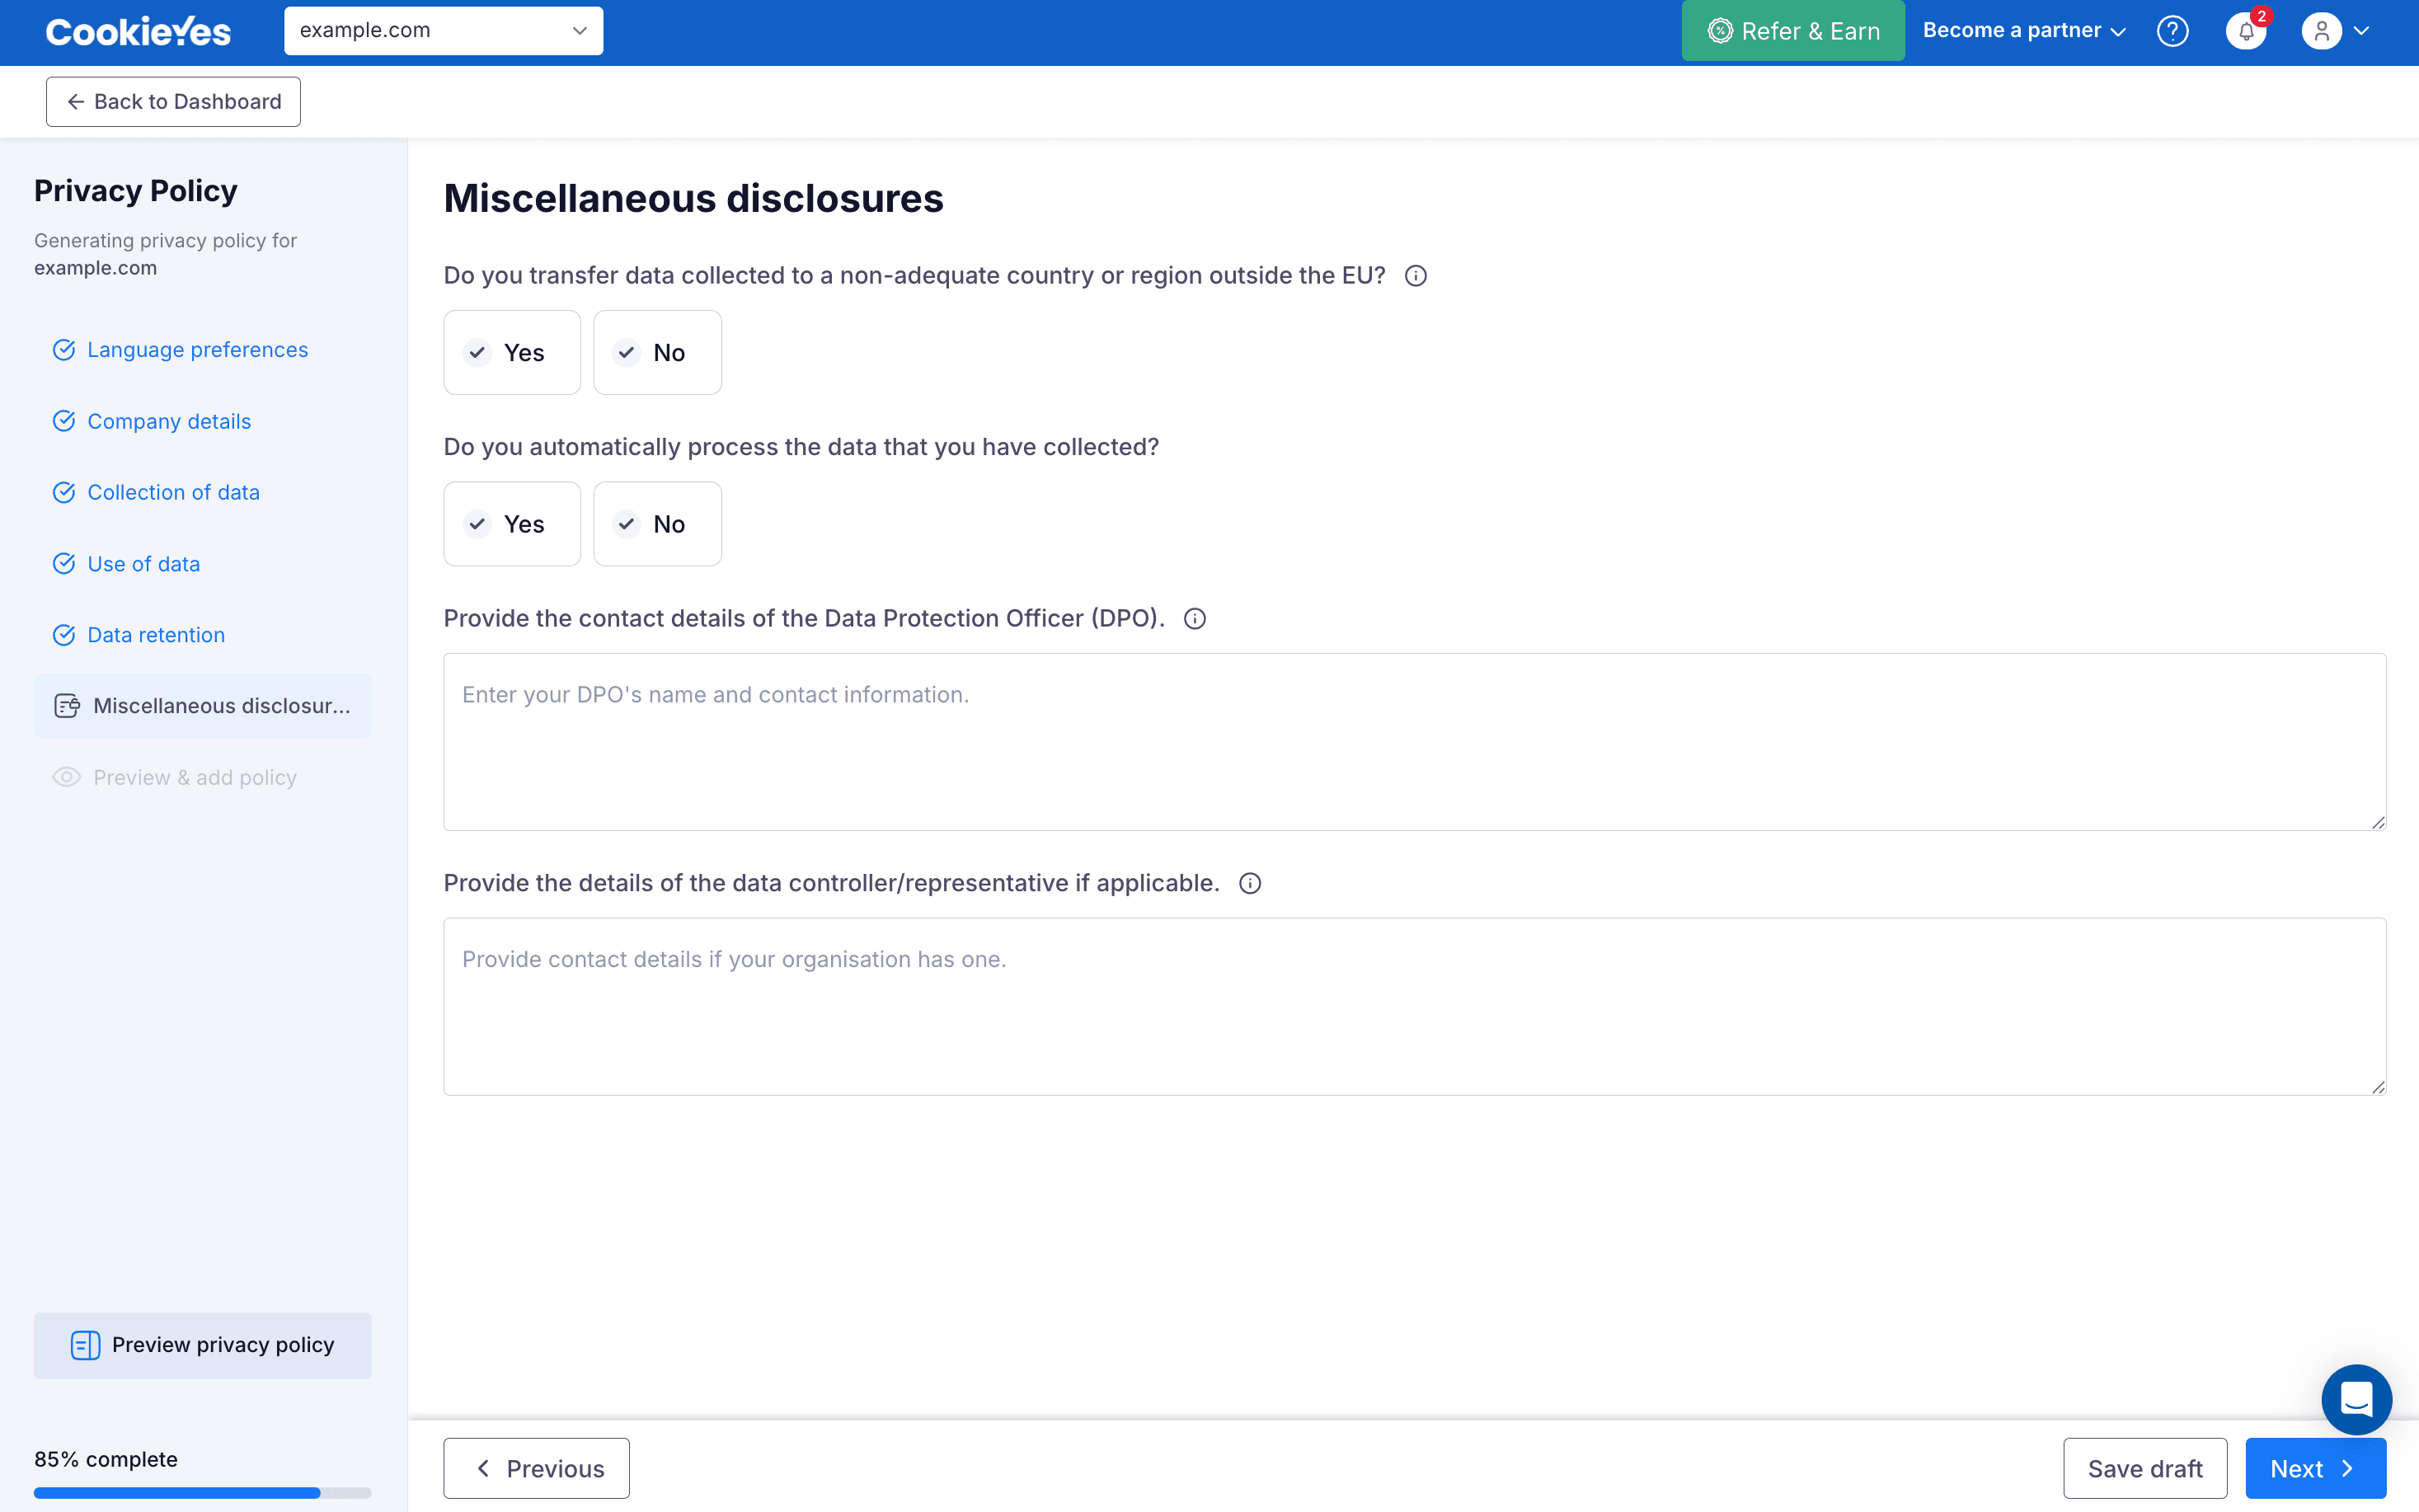
In Miscellaneous disclosures, provide details about cross-border data transfers (to non-adequate countries or regions outside the EU), automated data processing, your data protection officer's contact details, and your data controller or representative (if applicable). Click Next to continue.
Step 9. Preview and generate the privacy policy
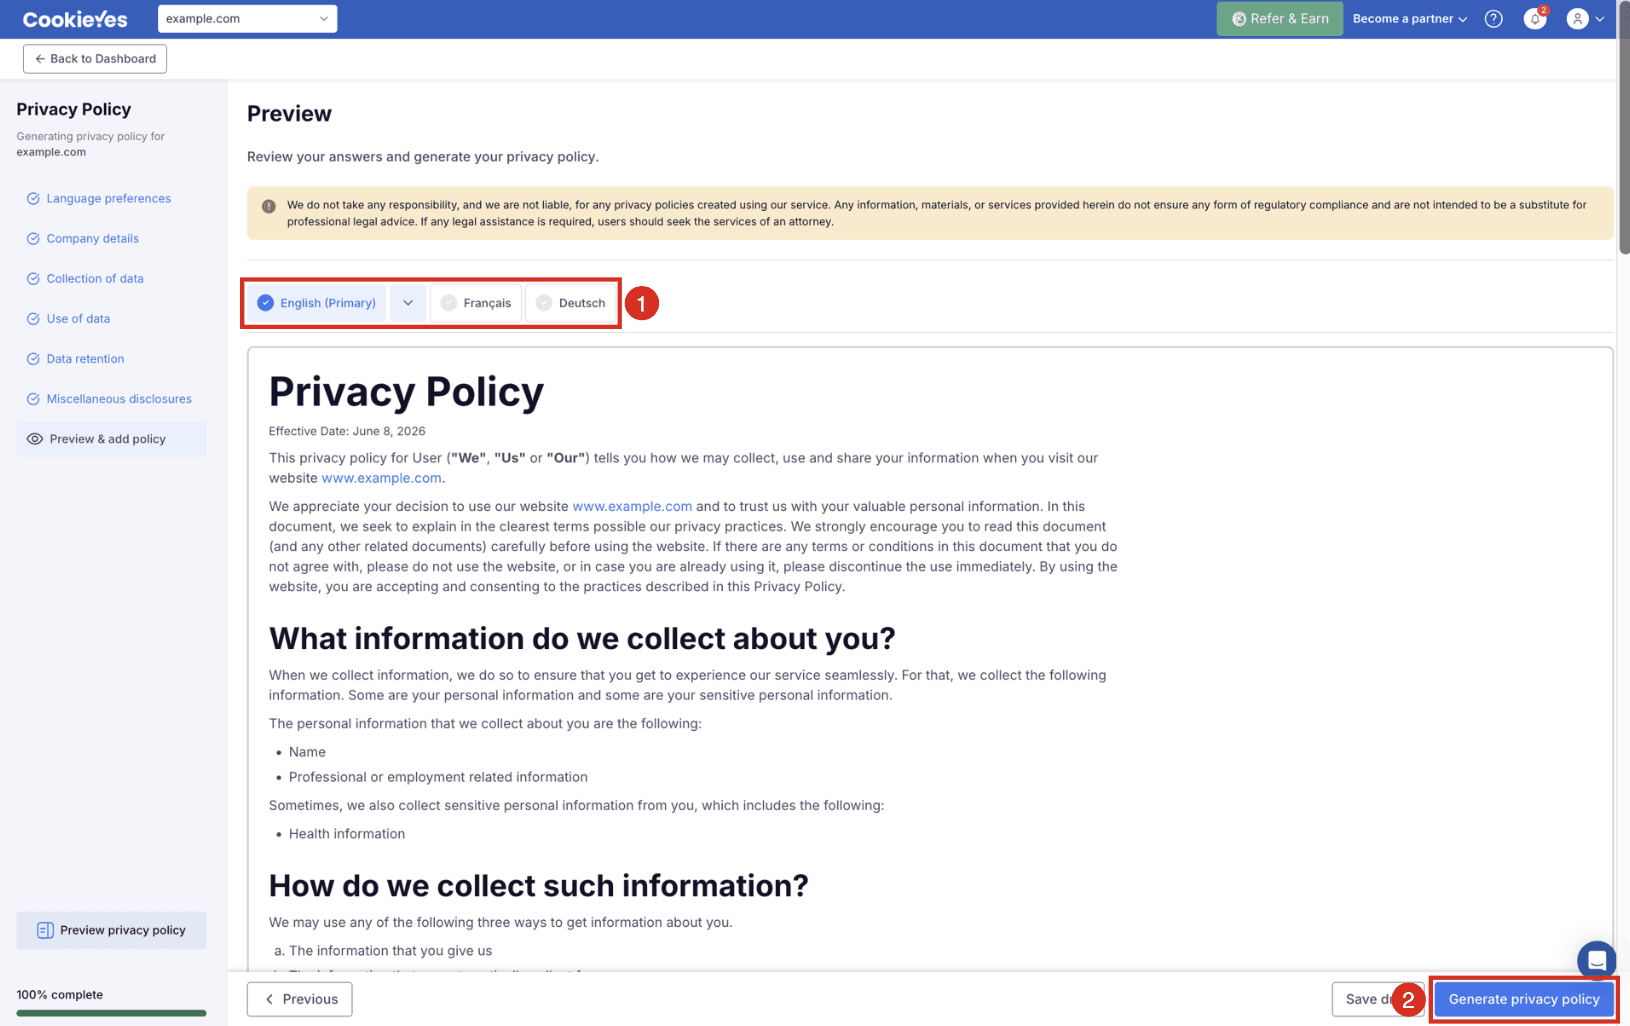
You can now preview your privacy policy in multiple languages. Click Generate privacy policy to generate the policy.
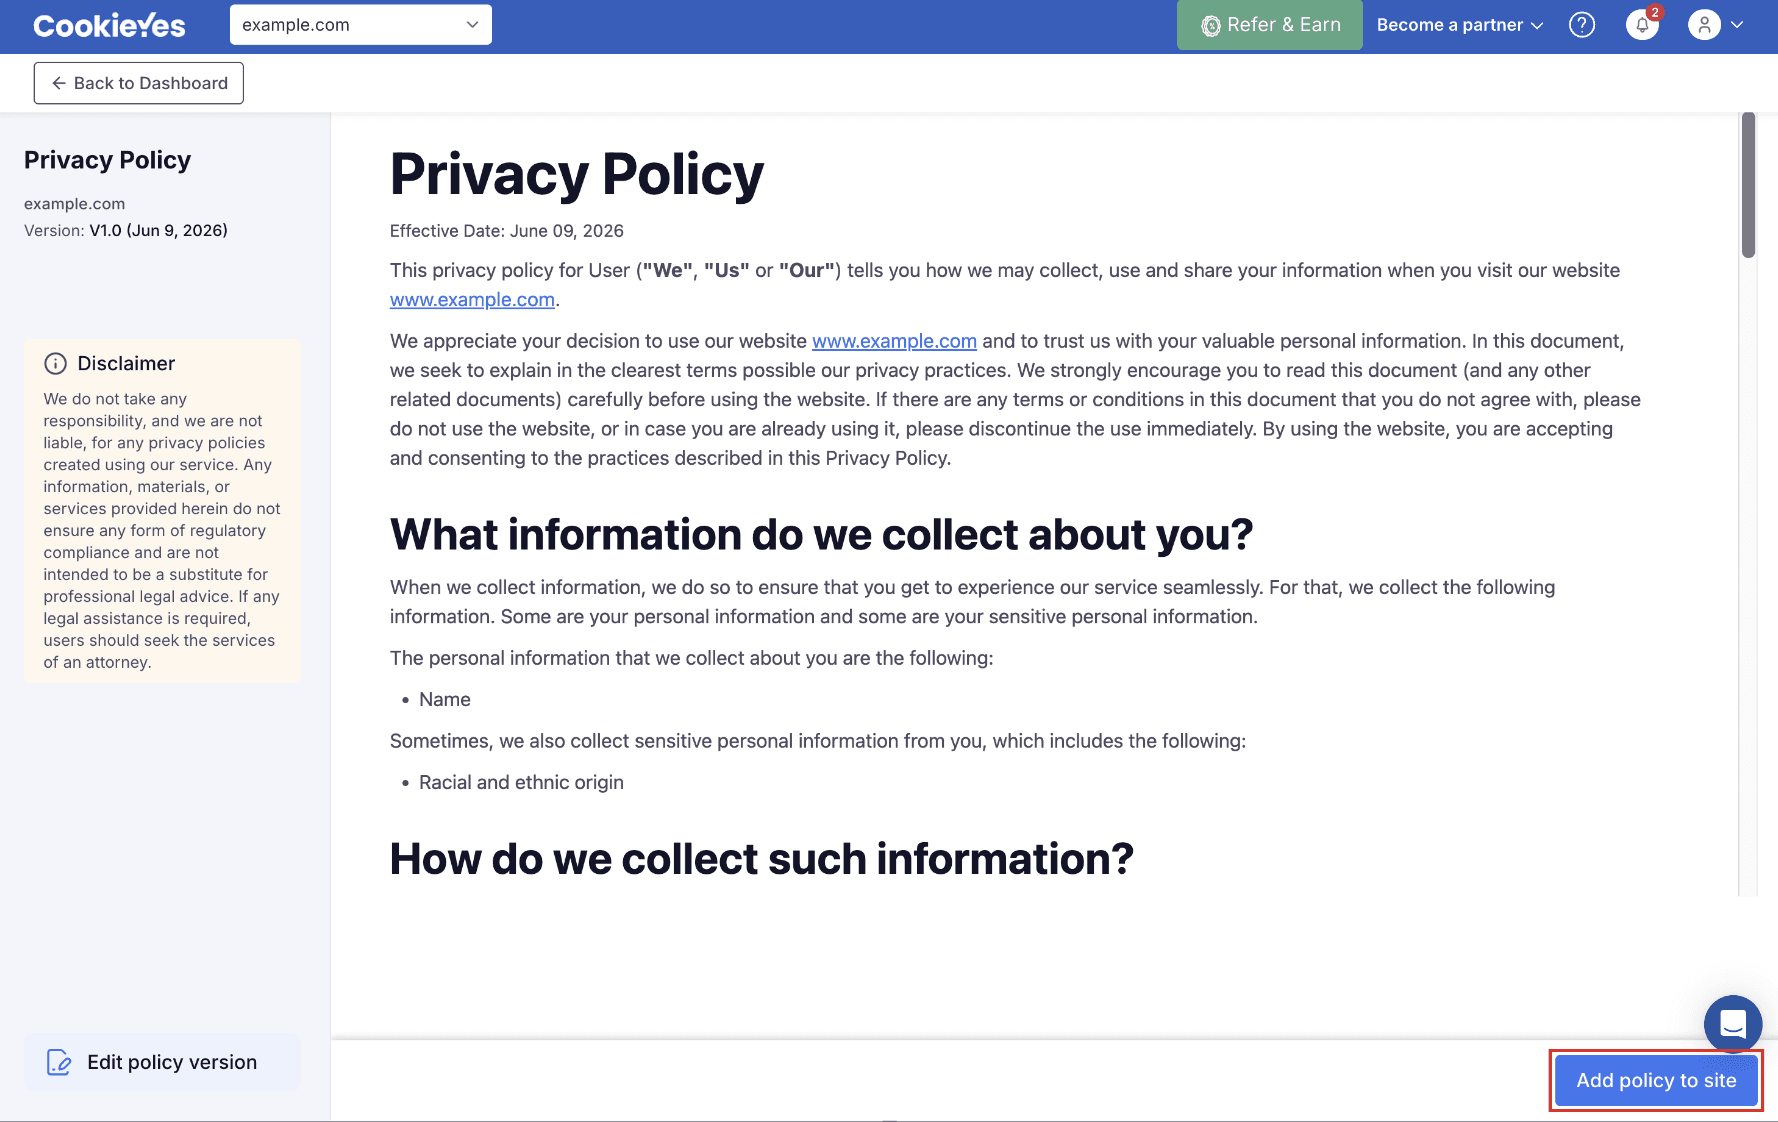
Click Add policy to site to see the methods for adding the privacy policy to your website.
How to add privacy policy into Squarespace website
CookieYes offers three ways to add your privacy policy. Choose one option and follow its steps.
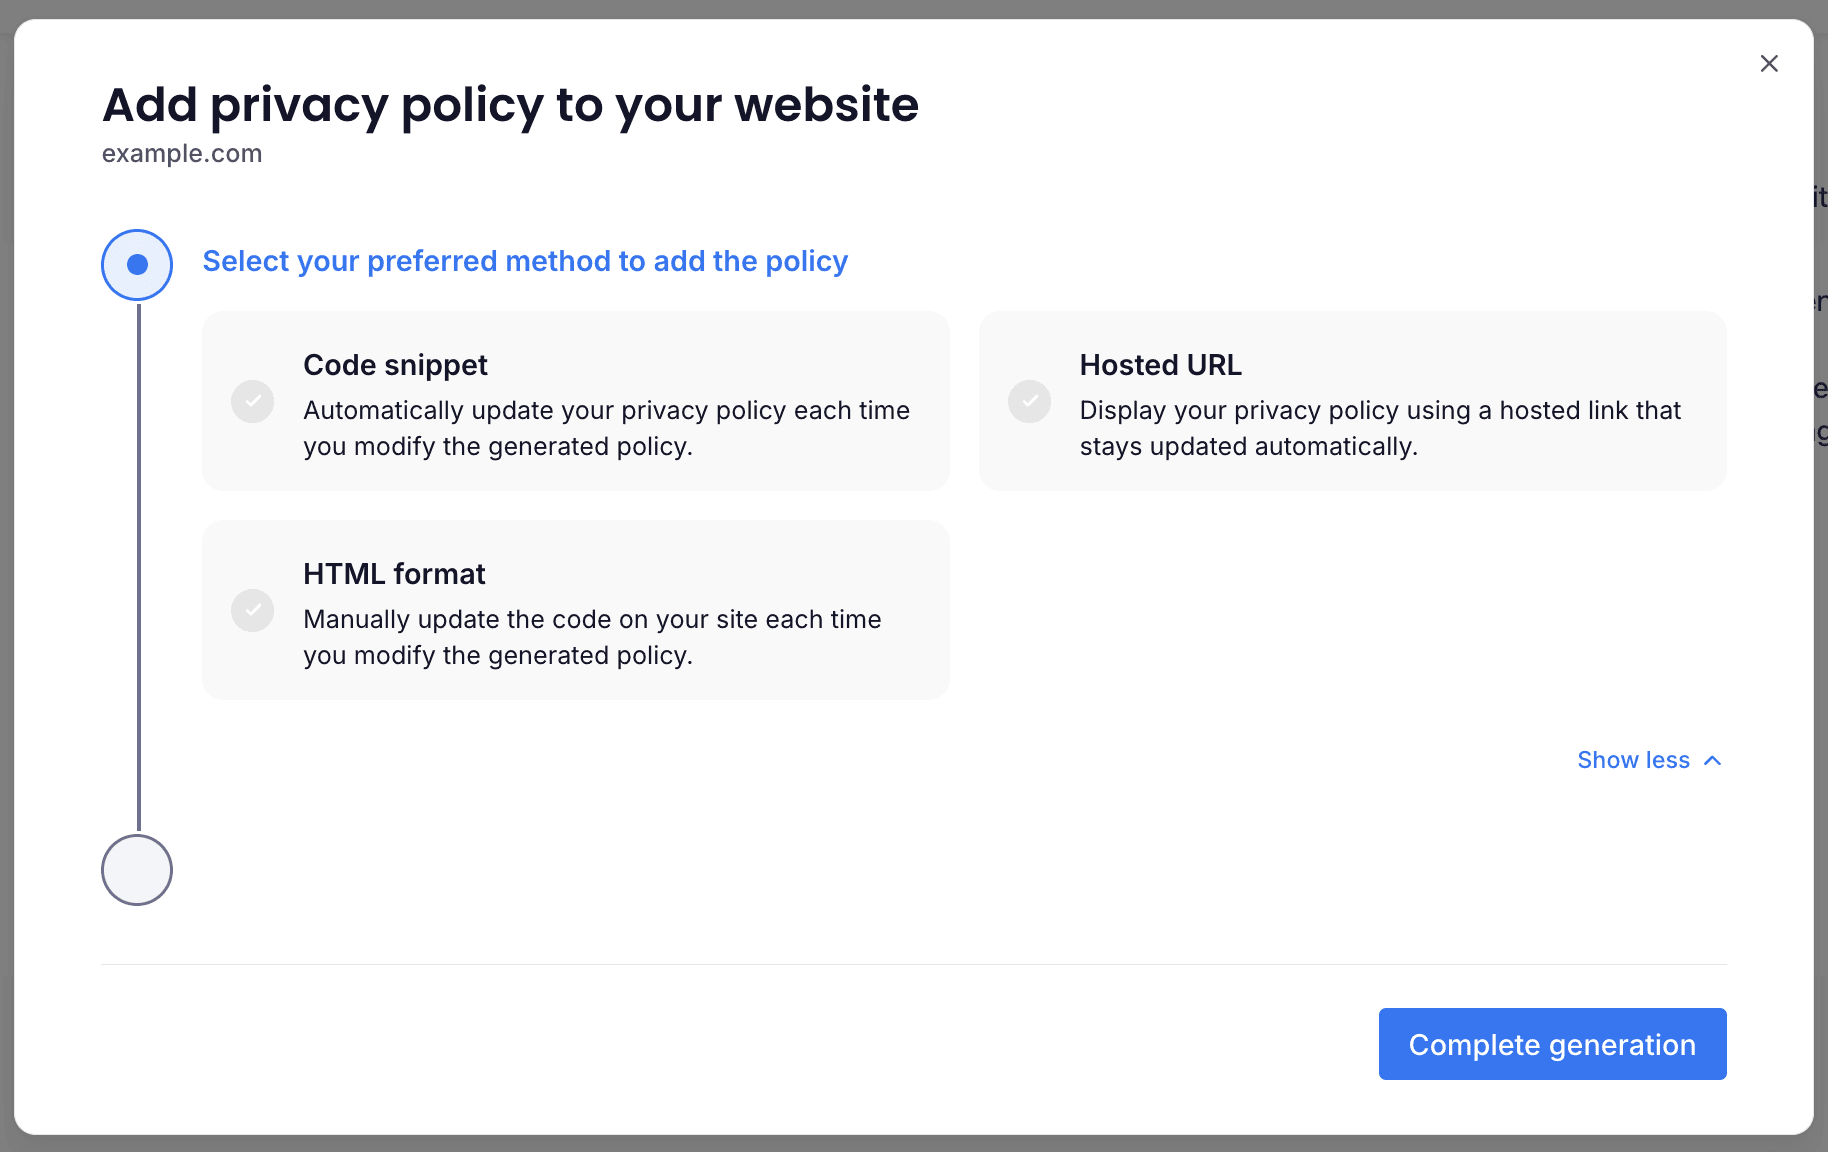
Option 1: Code snippet
Adds the privacy policy using a code snippet. The published policy updates automatically whenever you make changes in CookieYes.
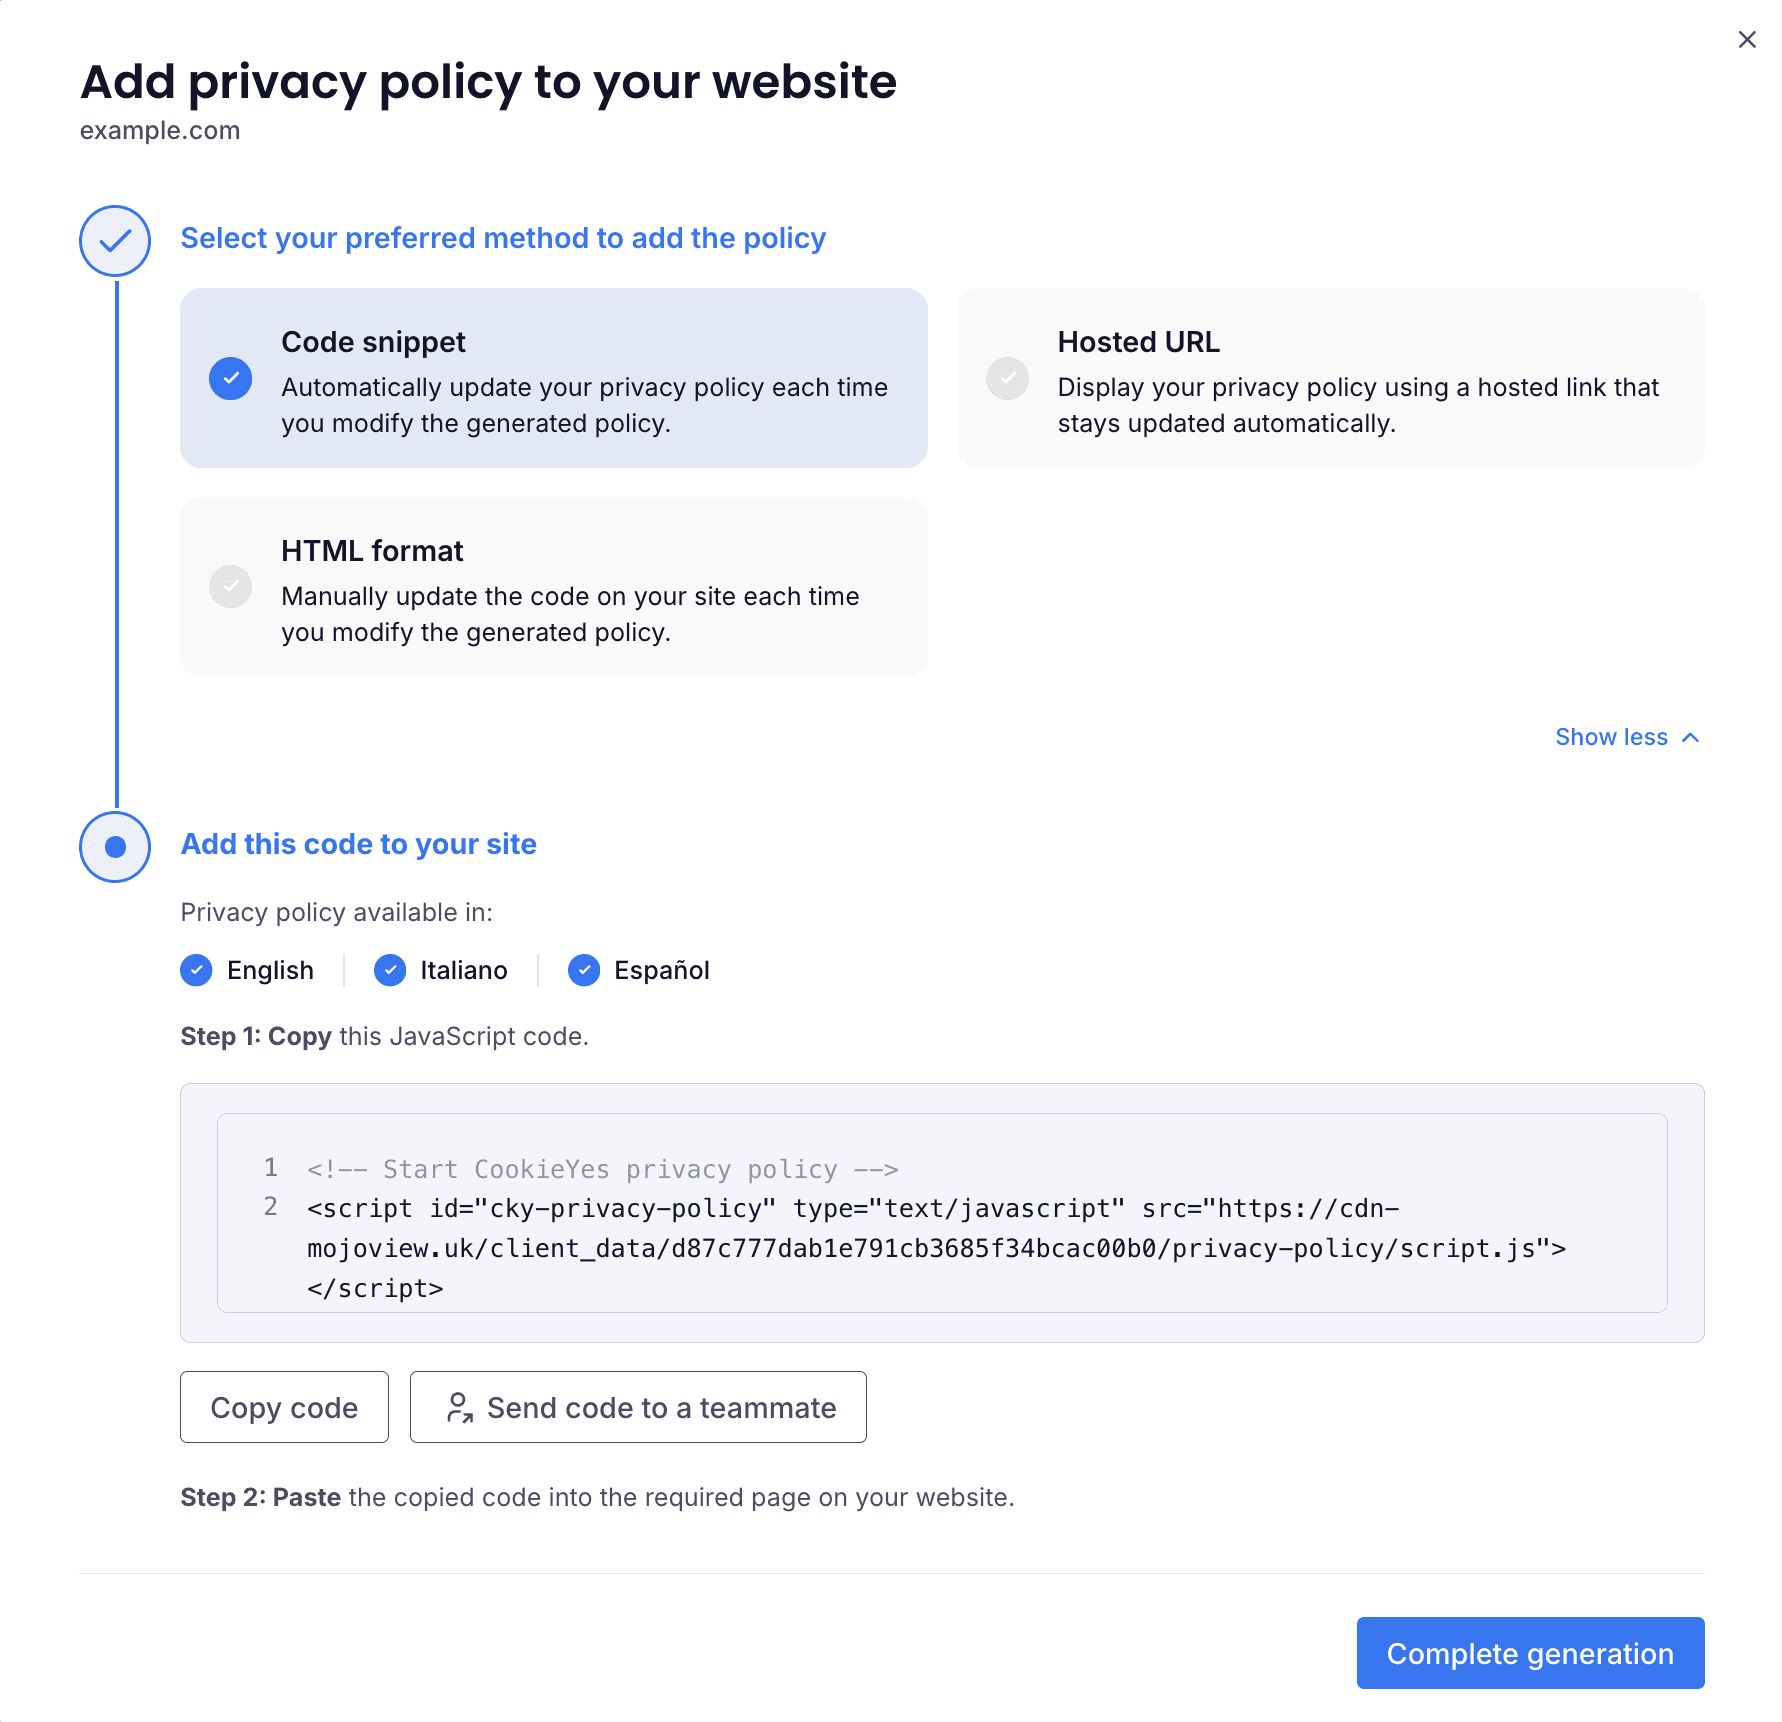
Step 1: Copy the code snippet
- In CookieYes, select Code snippet.
- Click Copy code.
Step 2: Create a policy page in Squarespace
- Log in to your Squarespace account.
- In My Dashboard, select your site.
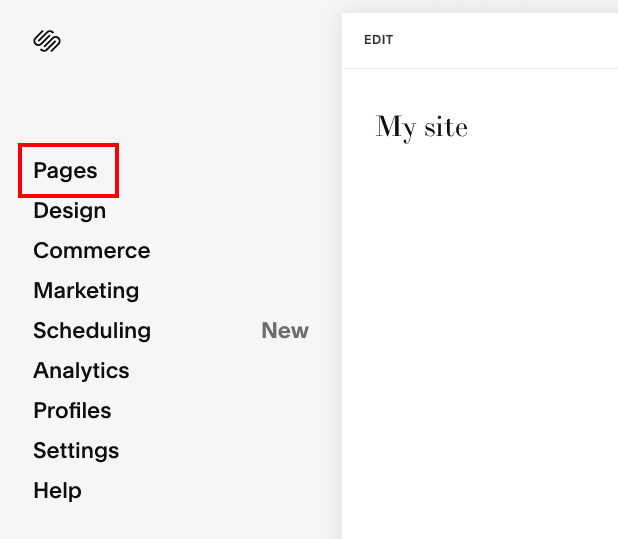
- In the side menu, click Pages.
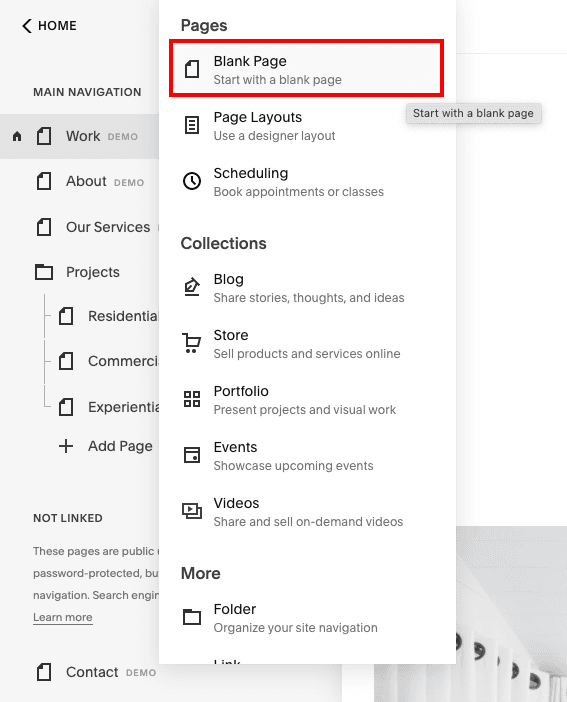
- In the Pages panel, click the + icon, then select Blank Page.
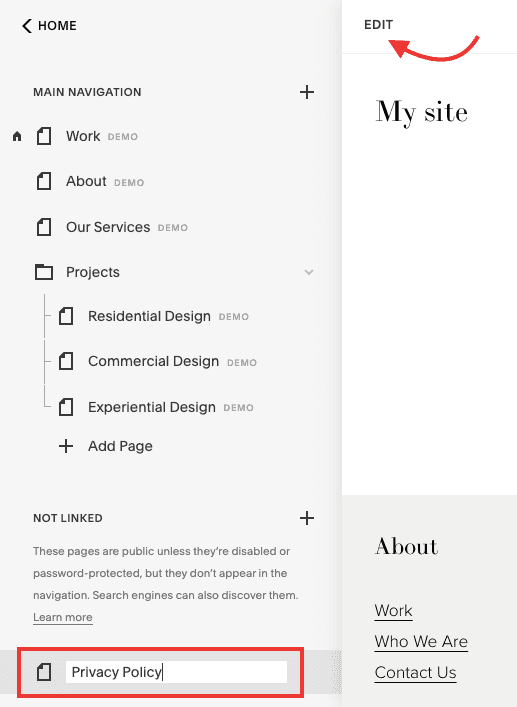
- Enter Privacy Policy as the page name, then click Edit.
Step 3: Embed the policy code
- In the page editor, click Add Section, then select Text.
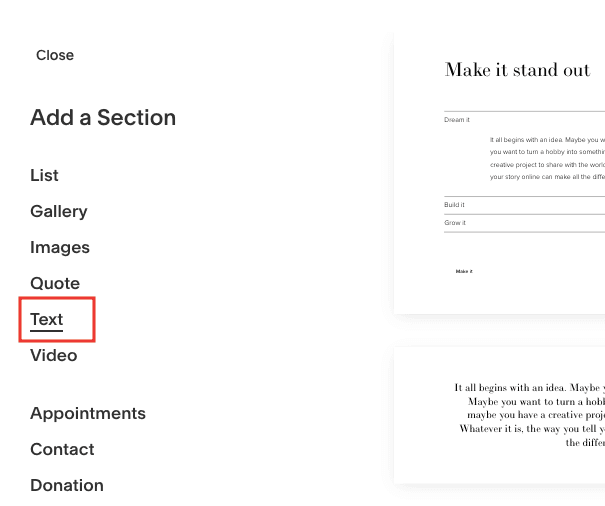
- Select a text block for the page.
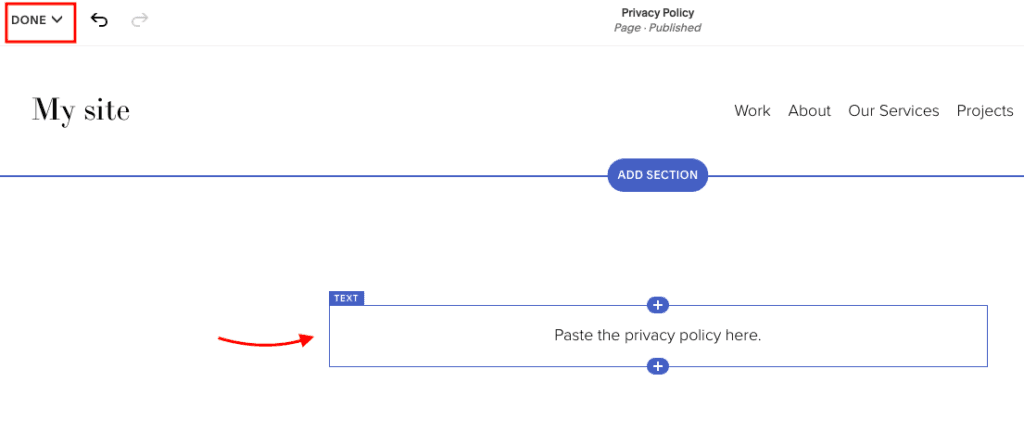
- Paste the code snippet into the paragraph block.
- Click Done, then click Save.
Option 2: Hosted URL
Displays your privacy policy through a hosted link. The policy updates automatically whenever you make changes in CookieYes.
Step 1: Copy the hosted URL
- In CookieYes, select Hosted URL.
- Click Copy URL.
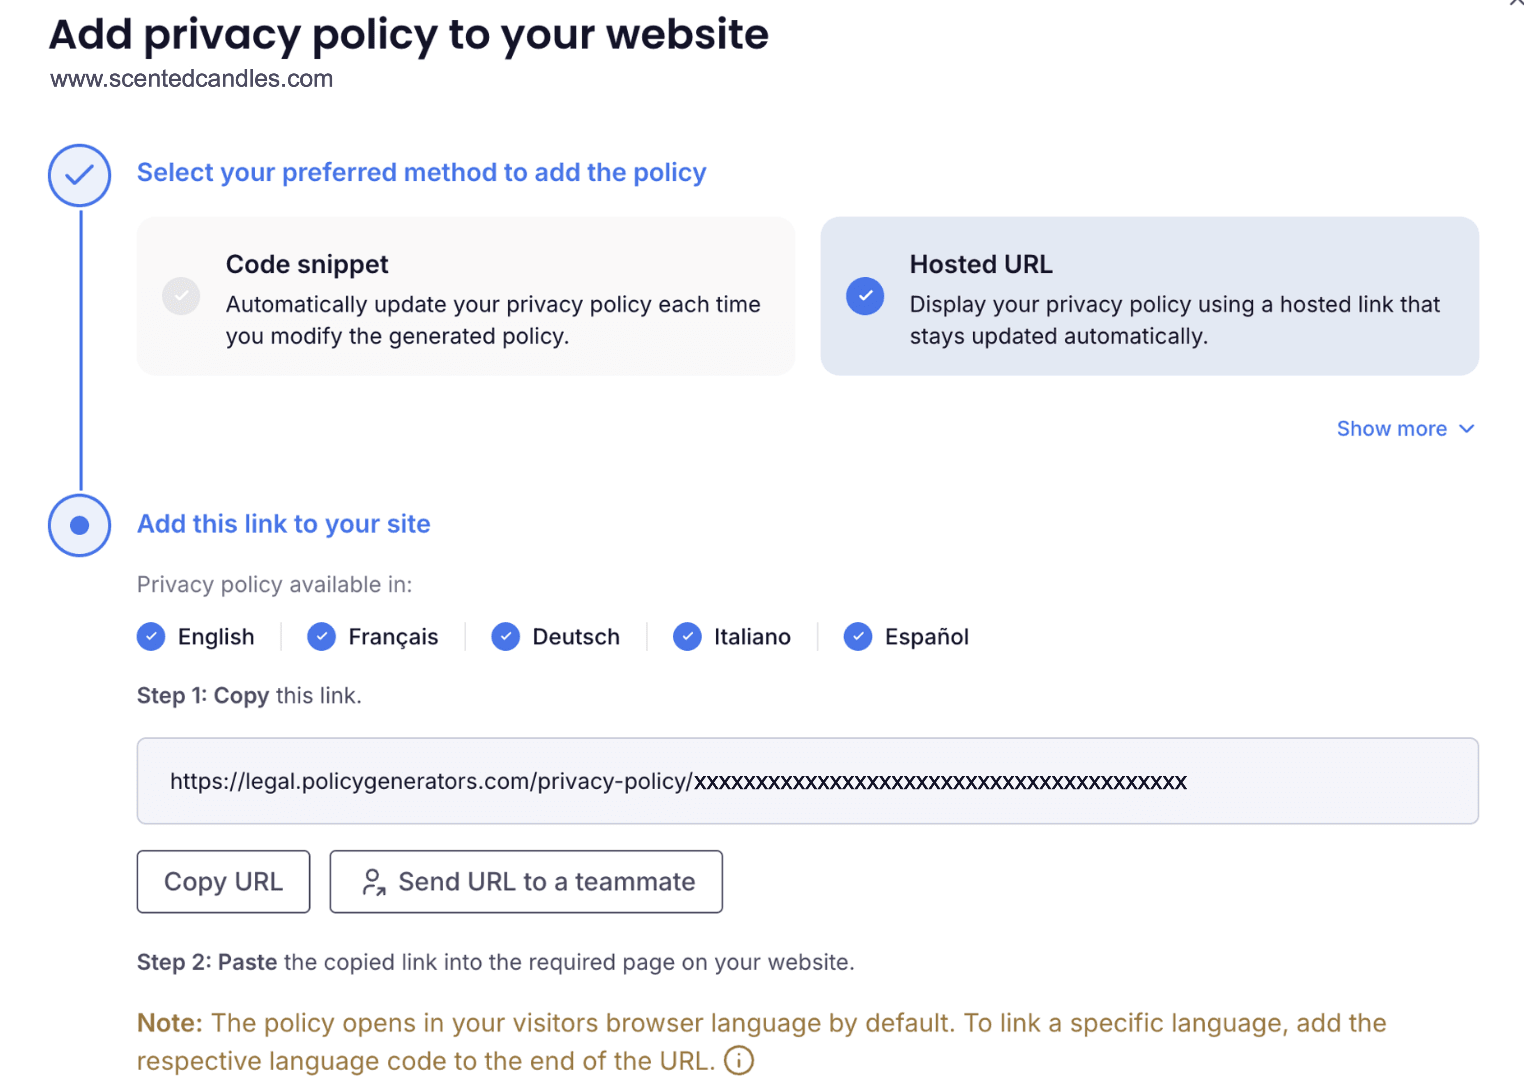
By default, the policy uses the visitor’s browser language. To set a specific language, add its code to the end of the URL. For example, /fr for French: https://legal.policygenerators.com/privacy-policy/xxxxxxxxxxxxxxxxx/fr
Tip
If someone else manages your website, click Send URL to a teammate to share the link with them.
Step 2: Add the link to Squarespace
These steps add the link to your site footer, though you can place it anywhere on your site.
- Log in to your Squarespace account.
- In My Dashboard, select your site.
- Open any page, then click Edit.
- Scroll to the footer, then click EDIT SITE FOOTER.
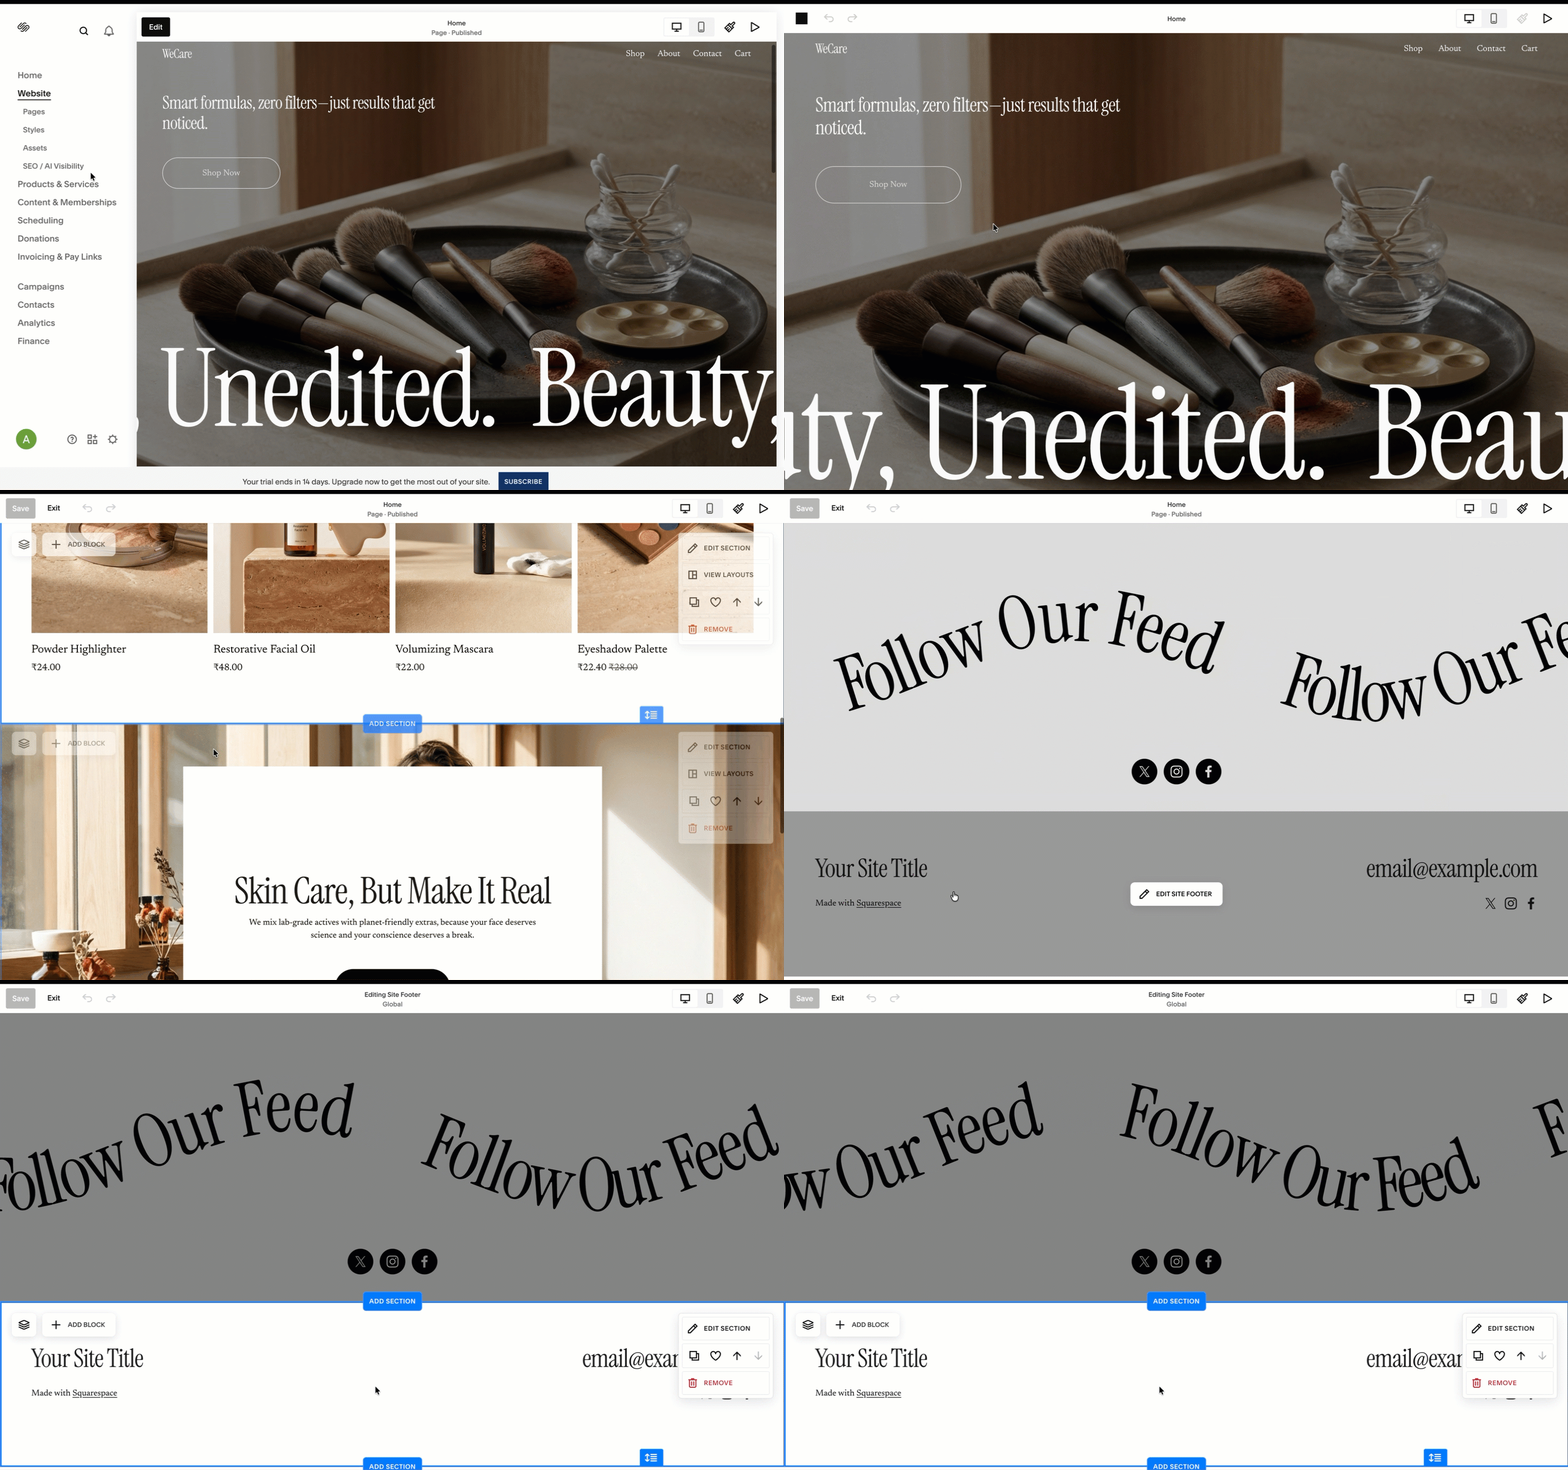
- Click + ADD BLOCK, select Text, then enter Cookie Policy.
- Select the text, click the Link icon, then paste the hosted URL.
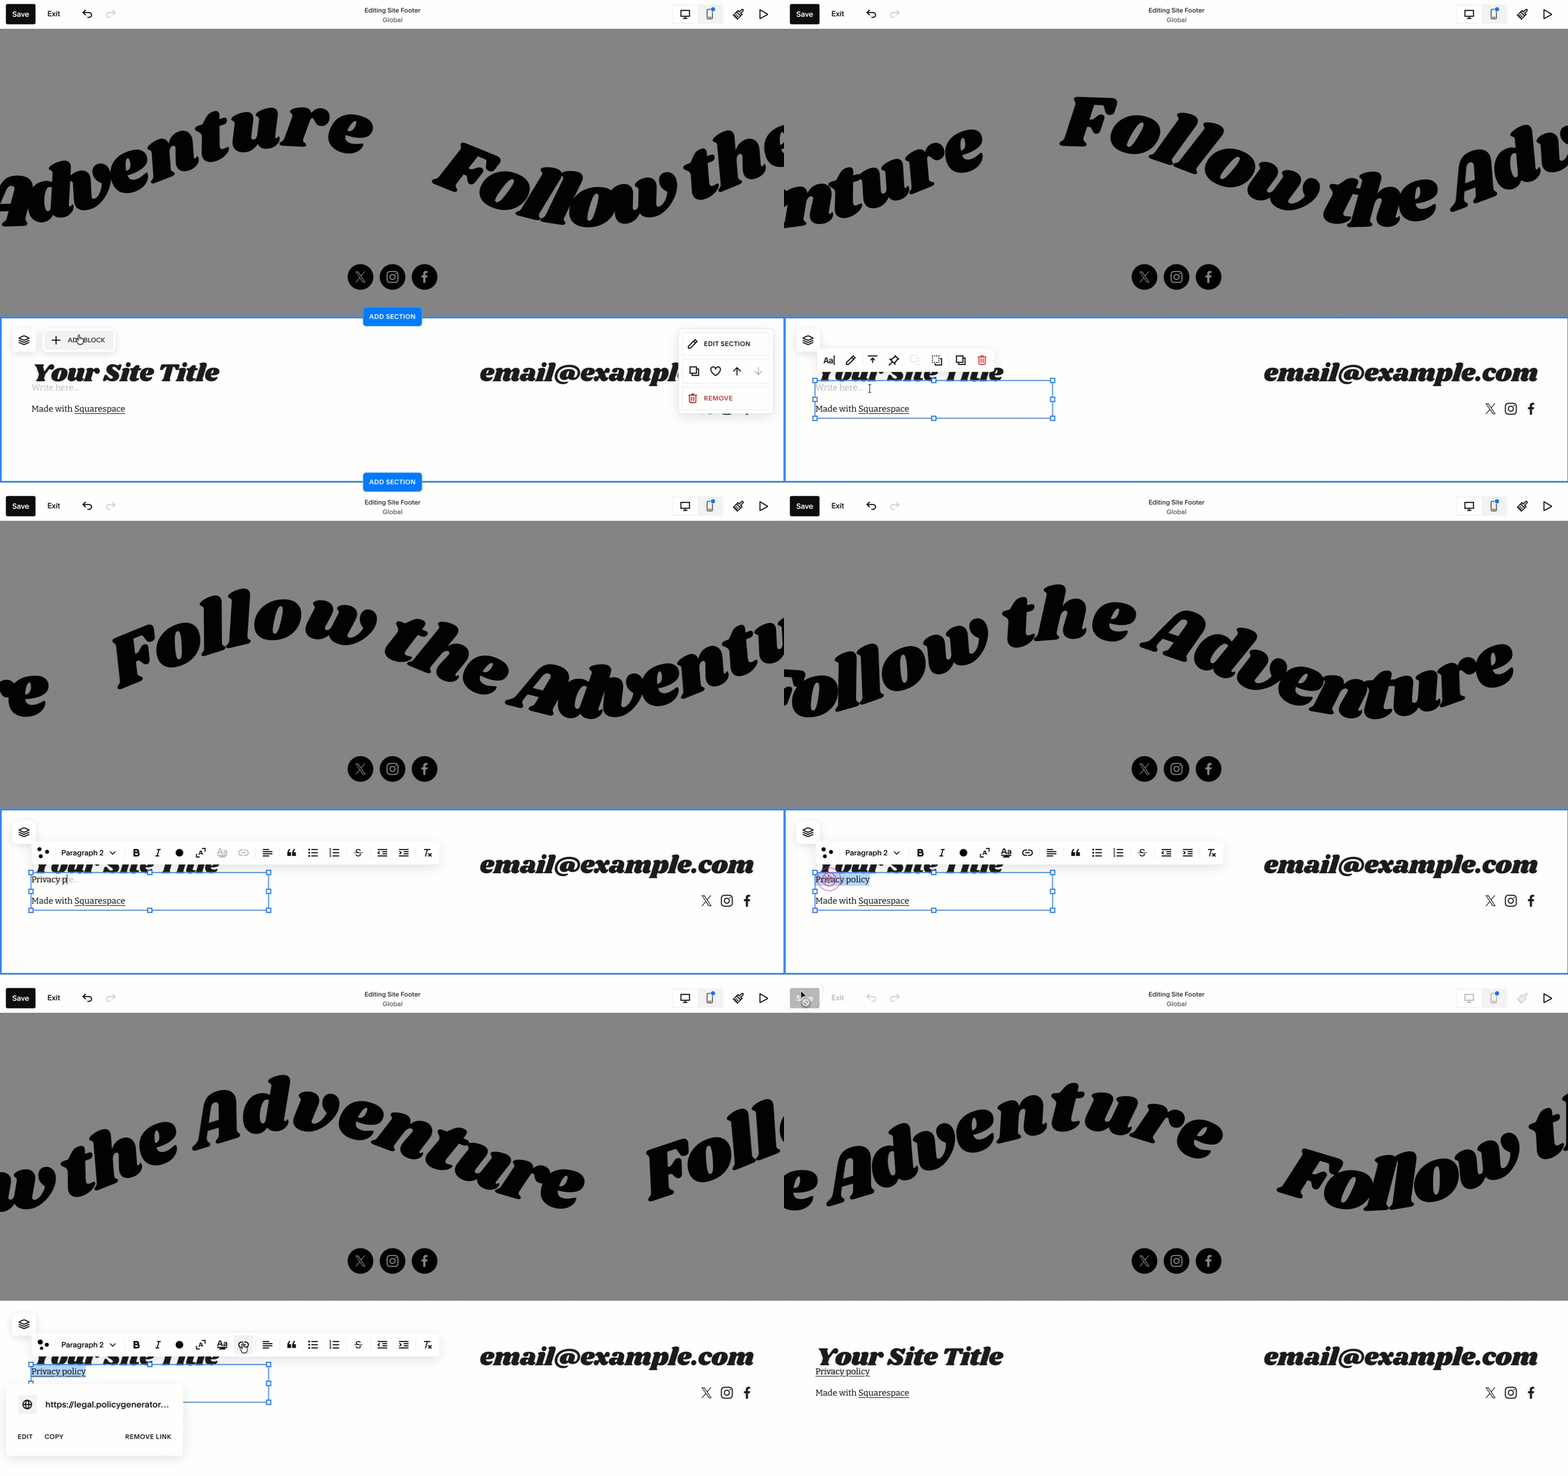
- Click Done, then click Save.
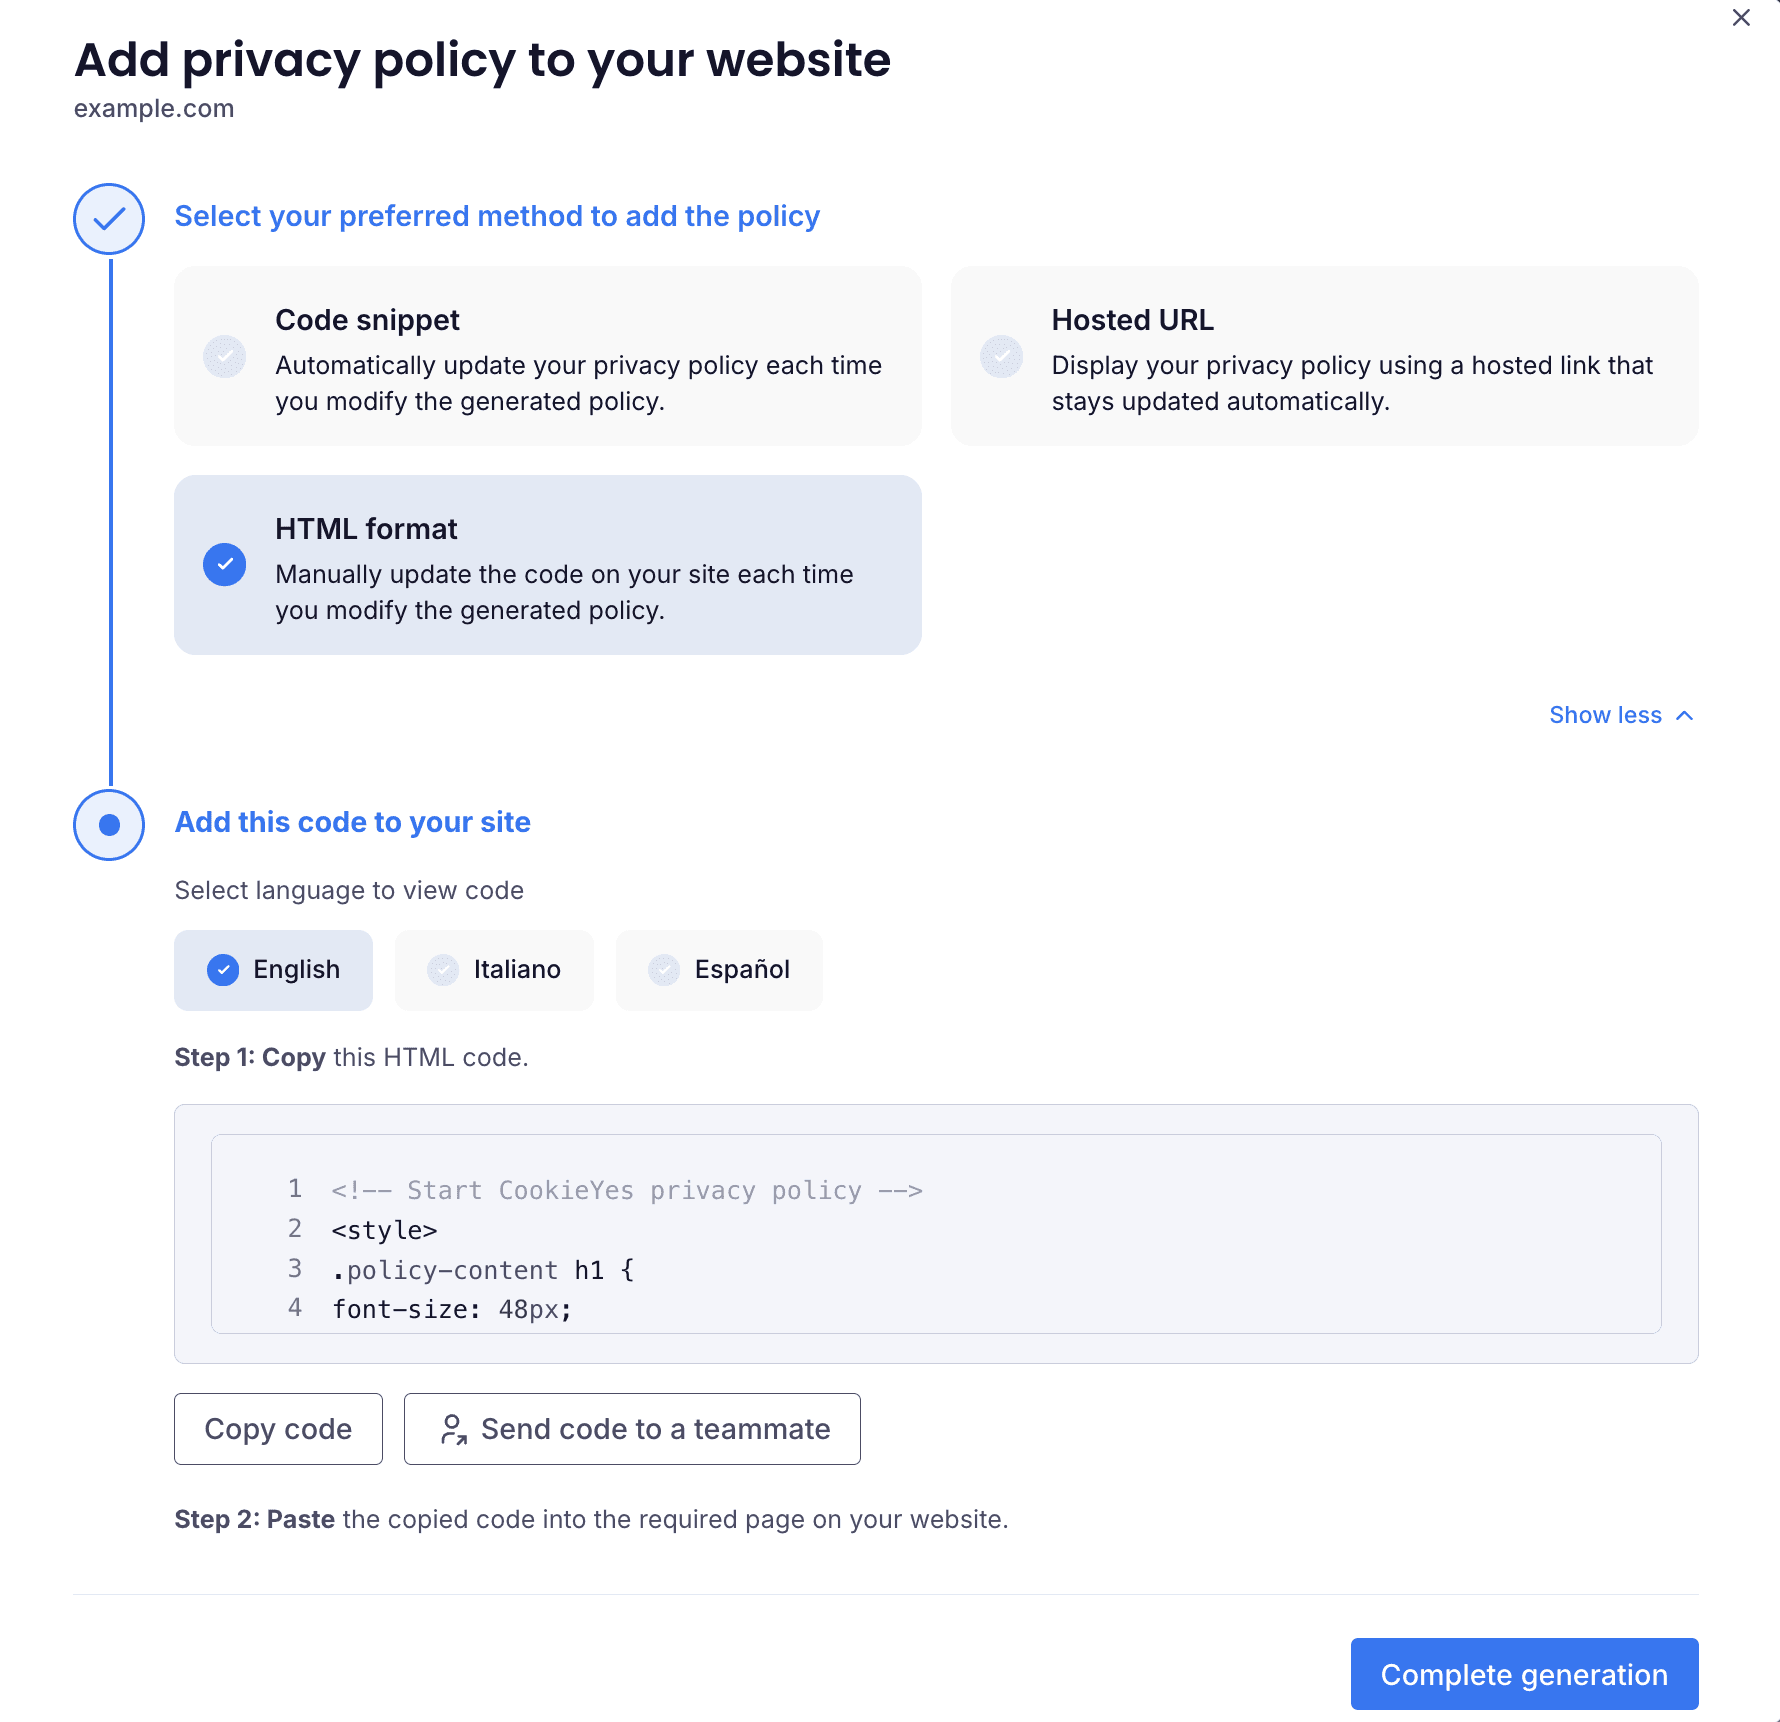
Adds the privacy policy as static HTML. You update the page manually whenever the policy changes.
Step 1: Copy the HTML
- In CookieYes, select HTML format.
- Select your preferred language.
- Click Copy code.
Step 2: Create a policy page in Squarespace
- Log in to your Squarespace account.
- In My Dashboard, select your site.
- In the side menu, click Pages.
- In the Pages panel, click the + icon, then select Blank Page.
- Enter Privacy Policy as the page name, then click Edit.
Step 3: Add the HTML
- In the page editor, click Add Section, then select Text.
- Select a text block for the page.
- Paste the HTML into the paragraph block.
- Click Done, then click Save.
Complete privacy policy generation
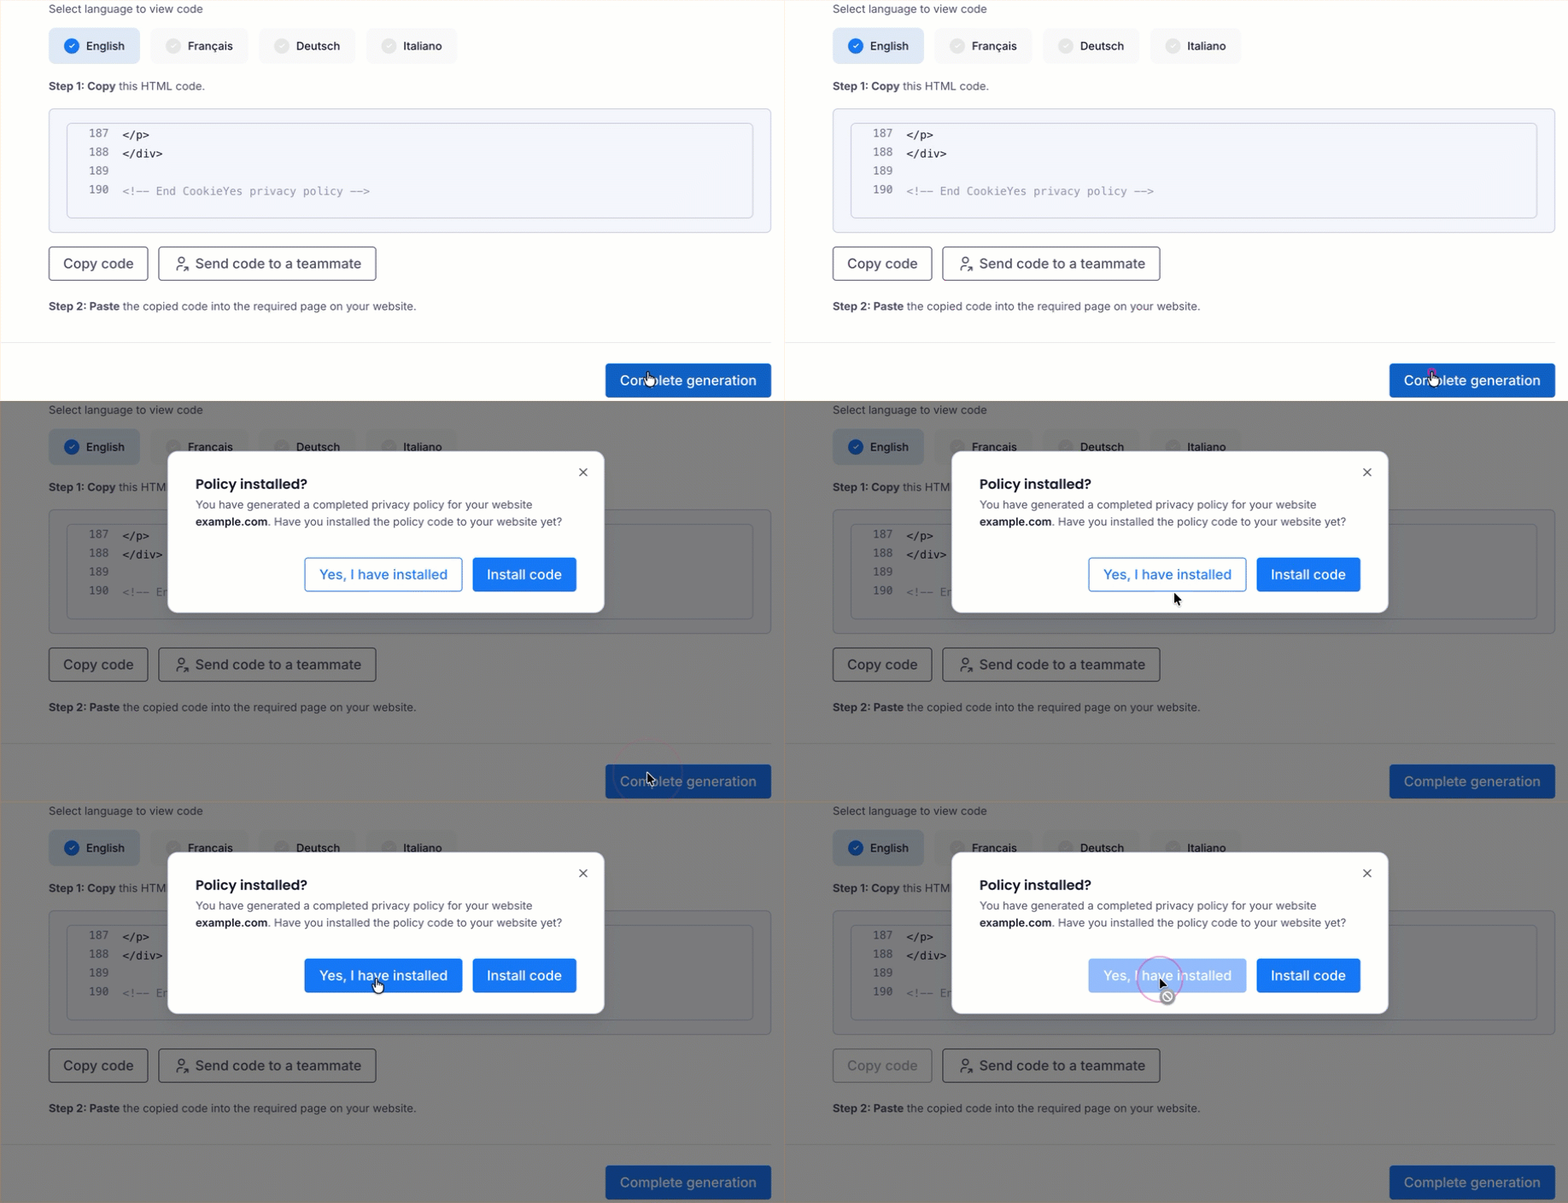
- Return to CookieYes and click Complete generation.
- In the popup, click Yes, I have installed.
Your privacy policy page will be live on your Squarespace website. You can then link your privacy policy to your website footer.
Frequently asked questions
Do I need to add a privacy policy to my Squarespace website?
Yes. You need a detailed privacy policy on your website to comply with regulations and be legally compliant. Several privacy regulations across countries require websites to have a comprehensive privacy policy, including the GDPR in EU & UK, CCPA in US, PIPEDA in Canada, LGPD in Brazil and so on. Not only is a privacy policy a legal requirement, but it is also a best practice to build transparency and confidence in your site.
Where should a privacy policy go on a website?
Privacy policies are usually linked on a website’s footer and is accessible from every page of the website. You should also link your privacy policy on important touchpoints where you collect personal information such as – sign up pages, checkout pages, forms etc.