
Google Consent Mode v2 Integration with CookieYes WordPress Plugin

Last updated on October 1, 2024

CookieYes is a Google-Certified CMP and integrates with Google Consent Mode v2.

The CookieYes WordPress plugin offers built-in support for Google Consent Mode v2, allowing WordPress website owners to integrate this privacy-focused feature from Google seamlessly. Google Consent Mode v2 enhances user privacy by ensuring that Google’s advertising cookies and associated vendor cookies are not read or written until the user consents. This guide provides step-by-step instructions on integrating Google Consent Mode v2 using our WordPress plugin.

If you haven’t already installed CookieYes on your WordPress site, install and setup the CookieYes WordPress Plugin by referring to our, guide.

Google Consent Mode v2 and its New Parameters

Google Consent Mode v2 introduces standardized consent banners and user preference controls, streamlining the process of obtaining explicit user consent. This update integrates user consent preferences with Google advertising services, allowing for campaign performance reporting and conversion tracking while respecting user privacy choices. The new version aims to simplify consent management for website publishers and advertisers while enhancing user privacy controls.

Two key new parameters have been added in Consent Mode v2:

  1. ad_user_data: Reflects the user’s consent for sharing data with Google’s ad services, with values “granted” or “denied” based on the consent banner choice. If denied, Google ads won’t collect identifiable user data.
  2. ad_personalization: Indicates if the user opted-in to ad personalization and remarketing based on consent UI preferences. A “denied” value turns off personalized ad functionality.

Video tutorial: GCM Integration with CookieYes WordPress Plugin

You can also follow the step-by-step instructions given below to easily integrate GCM v2 on your WordPress website.

How to integrate Google Consent Mode v2 in CookieYes?

Integrating Google Consent Mode v2 is a simple process, whichrequires plugin users to connectto the CookieYes WebApp to enable Google Consent Mode on their website.
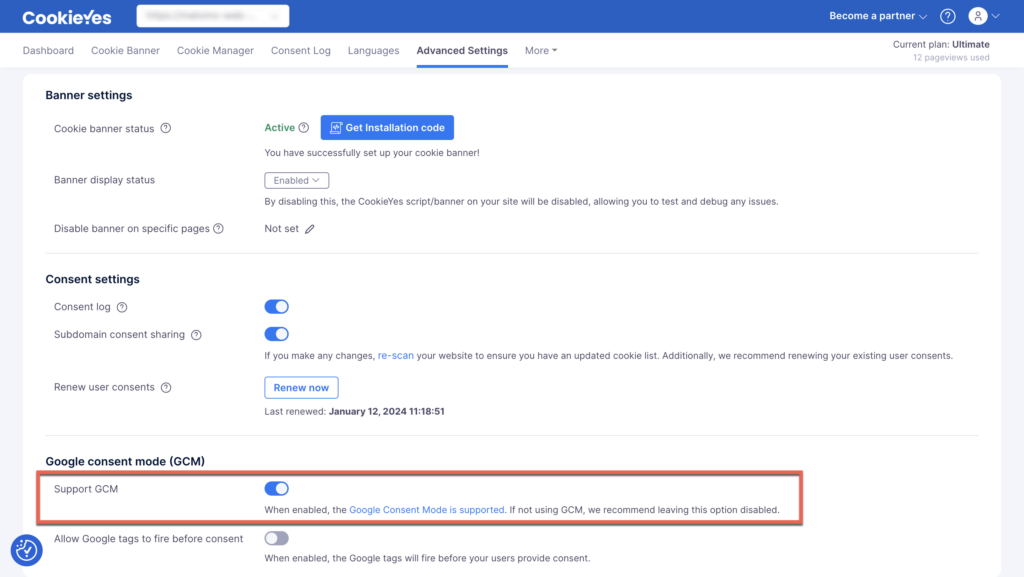
Enable the Support GCM feature on the CookieYes platform.

By default, this feature should be enabled, but if you have disabled it at any point, follow these steps to re-enable it:

  1. Log in to your CookieYes web app account.
  2. Navigate to CookieYes Dashboard > Advanced Settings.
  3. In Advanced Settings, toggle the button labelled “Support GCM”.


  4. To set up Advanced Consent Mode in GCM, toggle the button (to the right) labelled “Allow Google tags to fire before consent”.

Enabling only the Support GCM option implements basic functionality, firing only allowed tags based on user consent. The Allow Google tags to fire before consent option, when activated, ensures Google tags fire even before the user consents to the banner. This uses cookieless pings and collects only essential data for behavioural and conversion modelling to fill the gaps in your data. 

Help Guide

Please refer to the Basic vs Advanced Consent Mode v2 Documentation for detailed information on the Basic and Advanced Consent Mode v2 in CookieYes.

Integrate Google Consent Mode v2

There are two methods to integrate Google Consent Mode v2 with the CookieYes plugin:

  1. Using the CookieYes Plugin Interface
  2. Using a Custom Consent Mode Script

Method 1: Using CookieYes Plugin Interface (Recommended)

Note: For existing users who have implemented GCM using the custom script

Before proceeding, you must delete the custom script from your site that was manually added during the implementation. The script to be removed is shown in the image below.

Delete the custom script

Failure to remove this script may result in conflicts with the new implementation.

Step 1: Activate GCM  in the CookieYes Plugin.
  1. Login to your WordPress account.
  2. Navigate to CookieYes Dashboard > Google Consent Mode (GCM).
  3. Toggle the button (to the right) labelled “Enable Google Consent Mode (GCM)” to enable the GCM.
  4. In the Heads Up! Modal, click the Enable GCM button.
Enable GCM in WordPress
Step 2:Configure GCM Setting.

Default Consent Settings

The Default Consent State will determine the behaviour of your tags before consent. By default:

  • The necessary category is set to “Granted.”
  • All non-necessary categories are set to “Denied.”
  • The geographical region is set to “ALL.”
Default Consent Setting

Editing Default Consent Settings

You can customize the Default Consent State based on your requirements and set the geographical region. To modify the Default Consent Settings:

  1. Click the Edit icon.
  2. In the modal:
    • Select Granted/Denied for each cookie category based on your requirements.
    • Set the Region using ISO 3166-2 codes for the specific regions you intend to Geo-target. (Use “All” for global targeting)
  3. Click the Save Change button.

Adding Region-Specific Default Consent Settings

To create a new Default Consent State for users in different geographical regions:

  1. Click the + New region button.

  2. Choose consent states for each category.
  3. Enter the ISO 3166-2 region code.
  4. Click the Save Change Button.

Other settings

Other consent setting
  • Wait for update: Enter a value in milliseconds to signal Google’s tags to wait for an update. By default, the value is 2000.
  • Pass ad click information through URLs: URL passthrough enables the transmission of event and session-based analytics, including conversions, without using cookies, ensuring that important ad click data is maintained as users navigate your site.
  • Redact ads data: When enabled with Advertisement Cookies consent disabled, this feature removes advertising identifiers from outgoing requests and routes ad traffic through cookie-less domains.
Step 3:Publish Change.

Click the Publish Changes button to apply your settings.

Publish Changes in wordpress.
Step 4:Add the gtag/GTM Script.

If your website already has Google Tag Manager installed, ensure that the GTM script is positioned directly below the wp_head() function. If not, obtain the Google Tag Manager script for your website and place it immediately below the wp_head() function.

 Google Tag Manager Script

Method 2: Using Custom Consent Mode Script

Step 1:Add Custom Script to Website Header.

Copy the script below and paste the custom script directly above the wp_head() function in the website header.

<script>
    window.dataLayer = window.dataLayer || [];
    function gtag() {
        dataLayer.push(arguments);
    }
    gtag("consent", "default", {
        ad_storage: "denied",
        ad_user_data: "denied", 
        ad_personalization: "denied",
        analytics_storage: "denied",
        functionality_storage: "denied",
        personalization_storage: "denied",
        security_storage: "granted",
        wait_for_update: 2000,
    });
    gtag("set", "ads_data_redaction", true);
    gtag("set", "url_passthrough", true);
</script>

Note

The values of ads_data_redaction and url_passthrough in the code are changeable as per your requirements. e.g.

gtag("set", "ads_data_redaction",false);
 gtag("set", "url_passthrough",false);

For more detailed information, please refer to the Google Developer Documentation.

2. Add the custom script directly above the wp_head() function in the website header, as shown below.

Step 2:Add the gtag/GTM script.

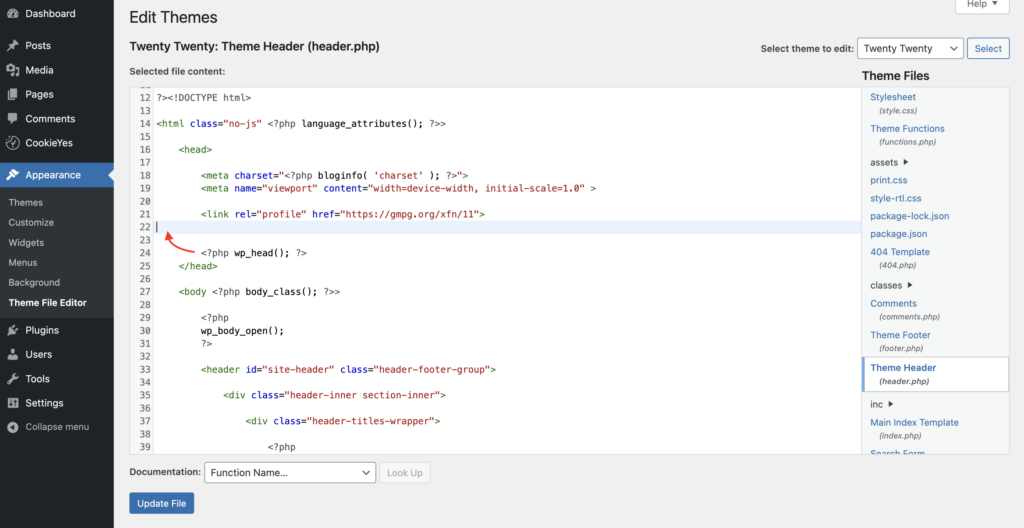
If your website already has Google Tag Manager installed, ensure that you position the GTM script directly below the Custom Consent Mode Script and above the wp_head() function.

If GTM is not installed on your website, follow the below steps:

  1. Sign Up/ Create a Google Tag Manager Account and set up a container.
  2. Navigate to the Google Tag Manager Dashboard and click on the Container ID in the top navigation Panel.
  3. Copy and paste the GTM script between the custom script and the wp_head() function. Additionally, ensure to insert the <noscript> element immediately after opening the <body> tag.

    GTM Script
Step 3:Ensure the order of the scripts .

Ensure that the scripts are loaded in the following order for proper functionality:

  1. Custom Consent Mode script
  2. gtag / GTM script
  3. CookieYes script

Maintaining this sequence is essential for the correct operation of the functionality.

Note

Do not add CookieYes script again from the CookieYes Webapp. The wp_head() function already executes this action.

Verify Integration

To verify GCM integration on your website,

  1. Navigate to Advanced Settings in the CookieYes Dashboard.
  2. Click the Check Now button against Check GCM status. If the configuration is correct, you will see a success message stating, ‘No error detected’. If you encounter any error after running this check, refer to our GCM Troubleshooting Guide to resolve them and check again.

To further confirm the setup is correct, follow the steps in our Verification Documentation.

Google Consent Type

CookieYes CMP maps all seven Google consent types into 4 categories: 

Google consent typeCookieYes consent typePurpose
ad_storageadvertisementTo enable advertisement cookies.
analytics_storageanalyticsTo enable analytics cookies.
functionality_storagefunctionalTo enable functional cookies for website functionality and settings.
personalization_storagefunctionalTo enable functional cookies for user personalization.
security_storagenecessaryTo enable necessary cookies for website security and protection, user UI preferences, etc. Such cookies do not require consent.
ad_user_dataadvertisementTo enable advertisement cookies to set consent for sending personal data to Google core platform service.
ad_personalizationadvertisementTo enable advertisement cookies to use data for ad personalisation such as remarketing.

Conclusion

With the completion of these steps, you have successfully integrated Google Consent Mode v2 using the CookieYes CMP WordPress plugin. This implementation ensures proper handling of user consent preferences and enables Google Consent Mode v2 functionality on your WordPress site. The plugin now manages consent data collection, including modeled conversions, while maintaining compliance with privacy regulations. Remember to periodically review your settings to ensure ongoing compliance and optimal functionality.

For further assistance, our dedicated GCM support team are here to assist you.

Have more questions?

Reach out to us and we'll answer them.

Contact us