Configure CookieYes settings in Shopify
Last updated on October 7, 2026
On this page
The quick setup gives you a working banner. Everything beyond that is configured from the CookieYes app in your Shopify admin.
If you have not installed the CookieYes app yet, see how to install and set up CookieYes in Shopify.
This guide covers the settings on each page of the app, from the banner's regions and appearance to your cookie list, consent records, languages, and integrations.
CookieYes dashboard
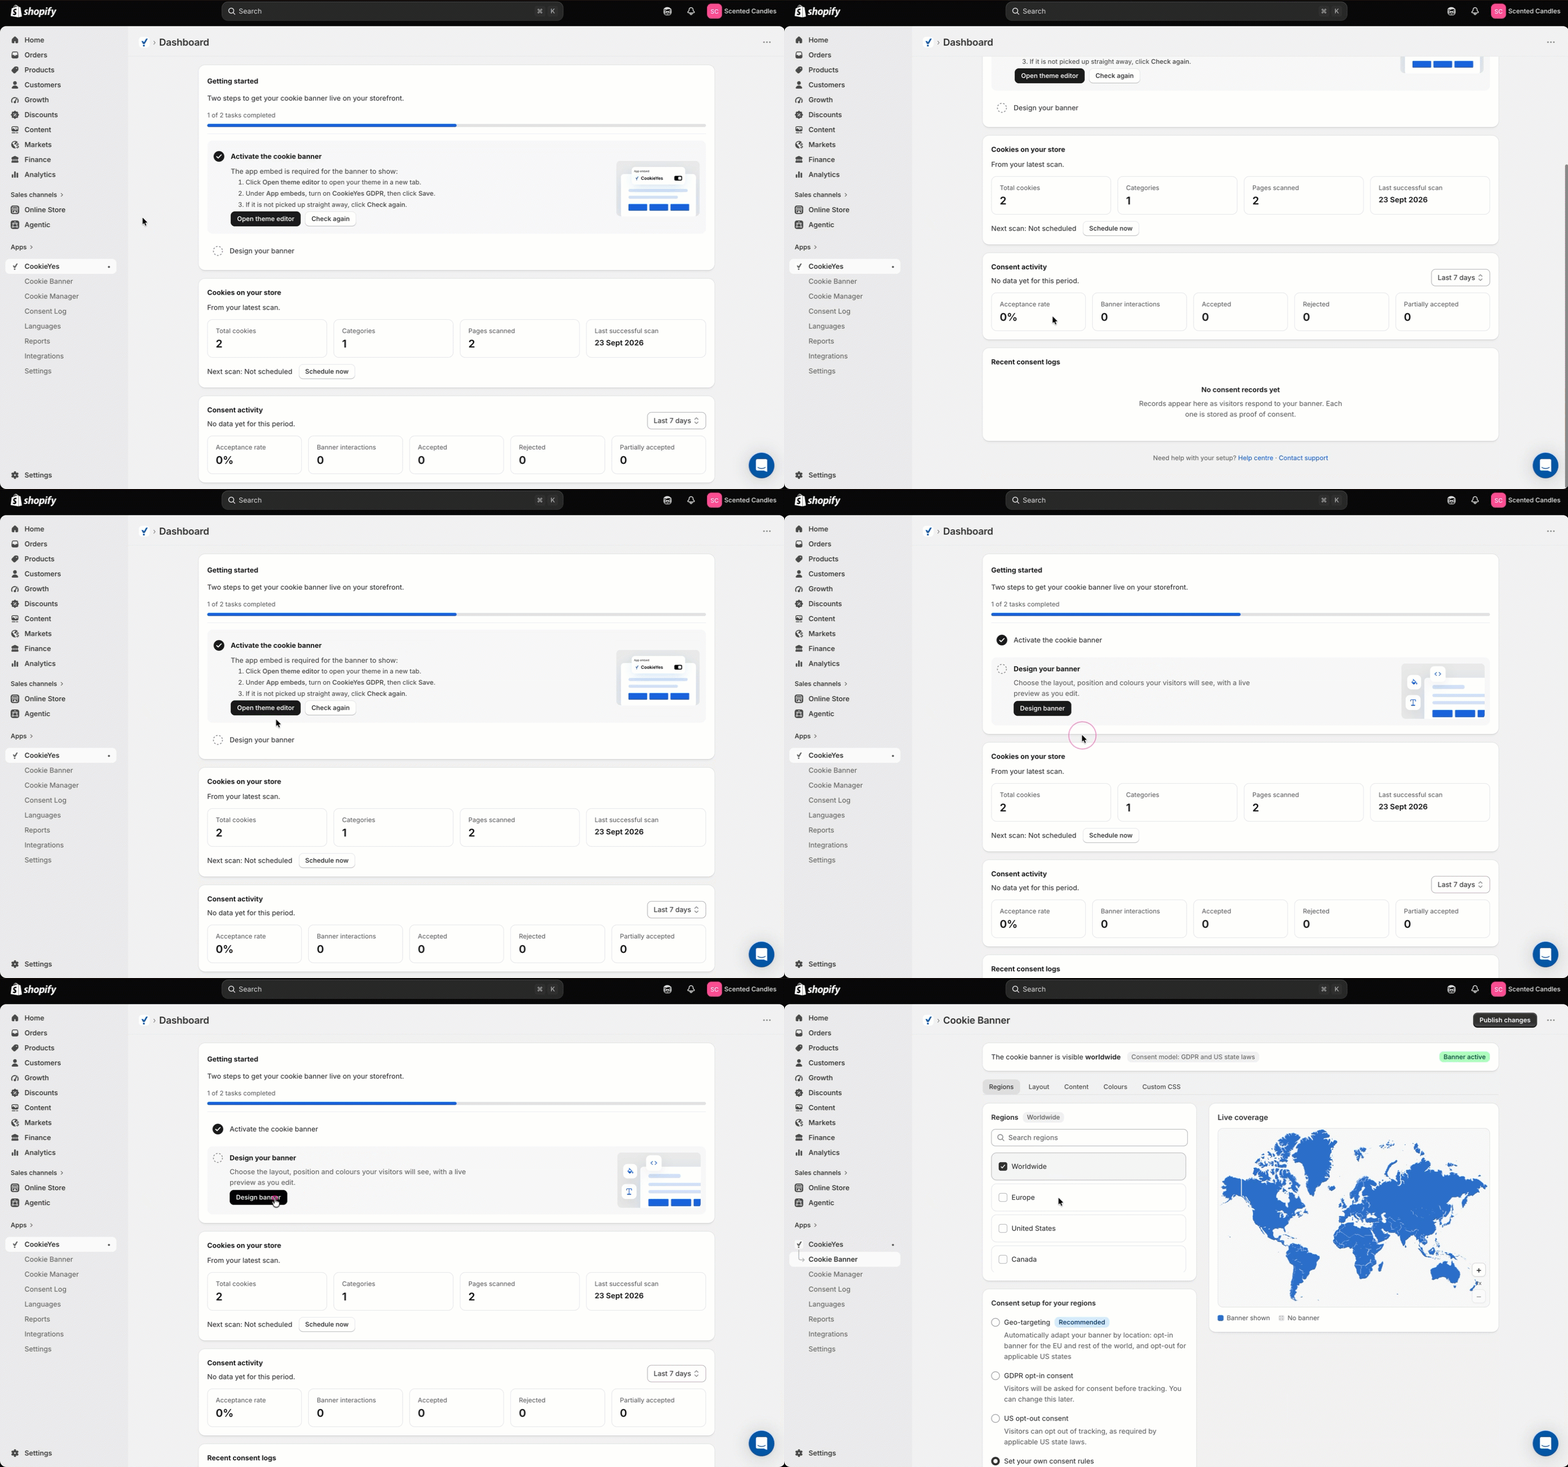
CookieYes opens the app dashboard in your Shopify admin. The dashboard has two views.
On your first visit, the dashboard shows the Getting started card. It lists two tasks:
- Activate the cookie banner is marked complete if you turned on the app embed during onboarding. If you skipped that step, follow the instructions on the card to turn on the embed, then click Check again.
- Design your banner opens the Cookie Banner page, where you configure the banner shown on your storefront.
Once the banner is active, the dashboard shows the status card in place of Getting started. It reports the regions where your banner is visible and the consent model in use, with three cards showing the state of App embed, Auto-blocking, and Google Consent Mode v2. Click Check again to refresh the status.
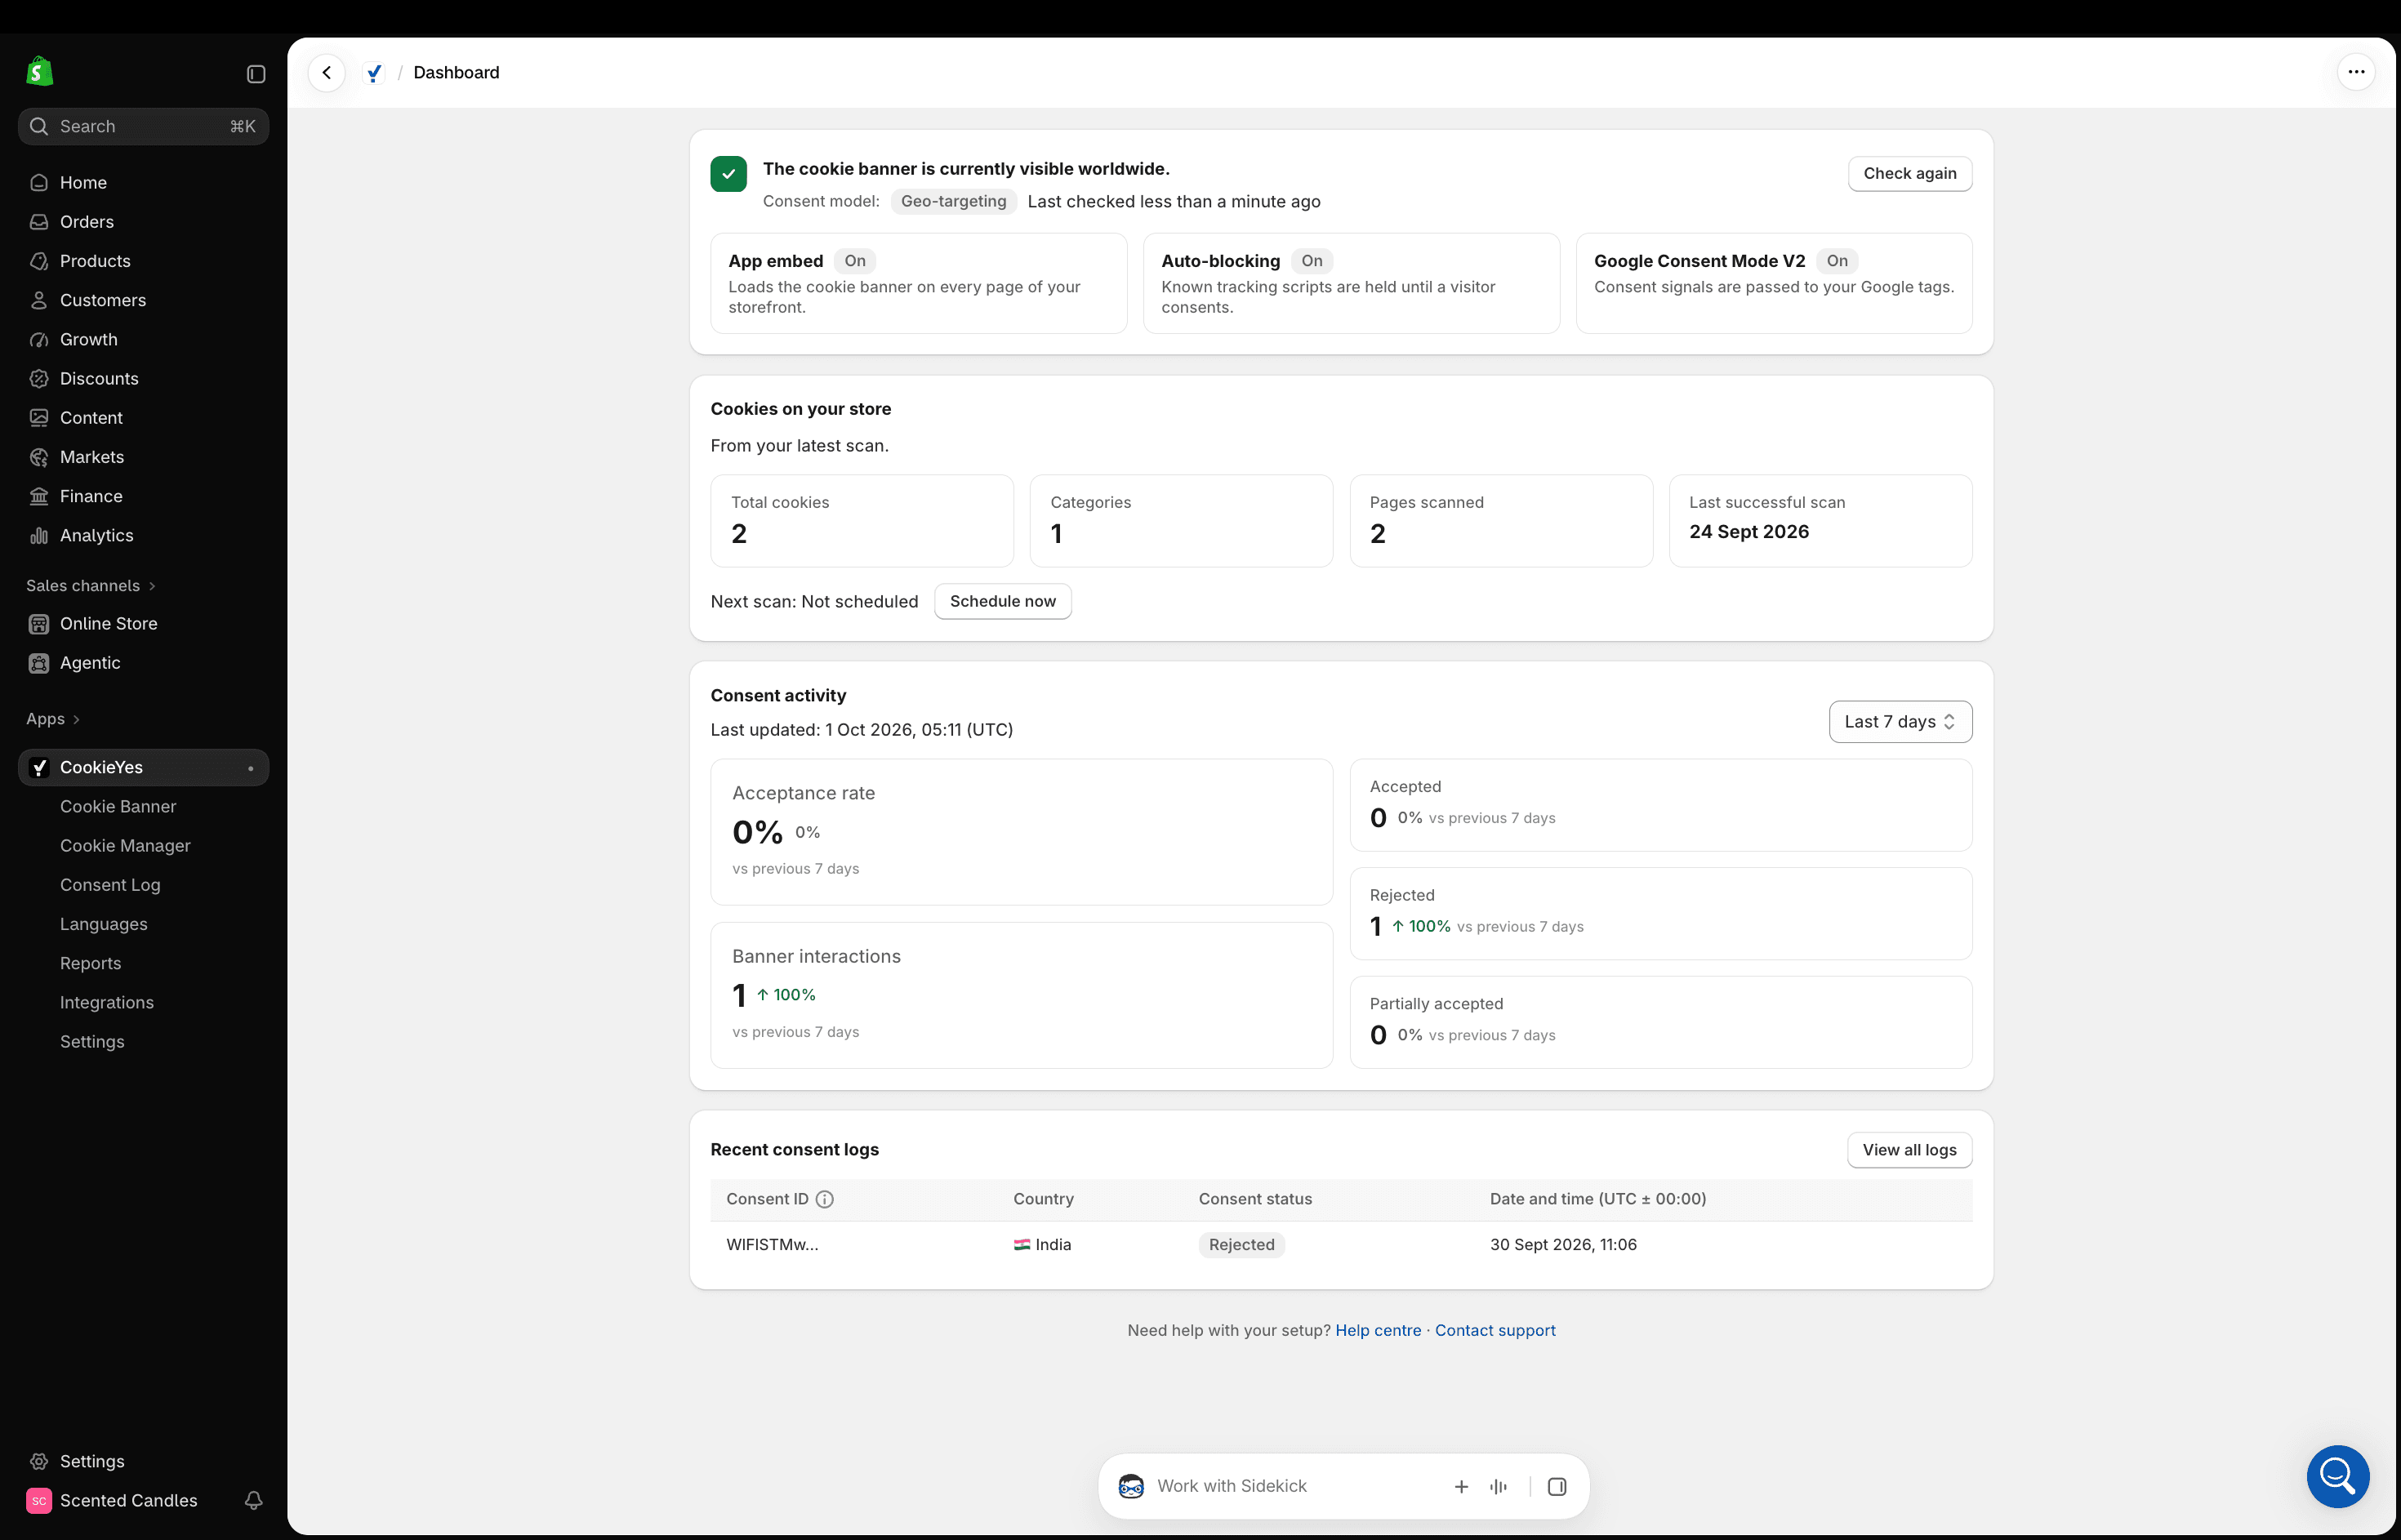
Cookies on your store shows the results of your latest scan. Click Schedule now to set up recurring scans, or open Cookie Manager to review and edit your cookie list.
Consent activity reports the acceptance rate and a breakdown of banner interactions. Use the date filter to change the reporting period.
Recent consent logs lists individual consent records as visitors respond to your banner. Each record serves as proof of consent and can be downloaded.
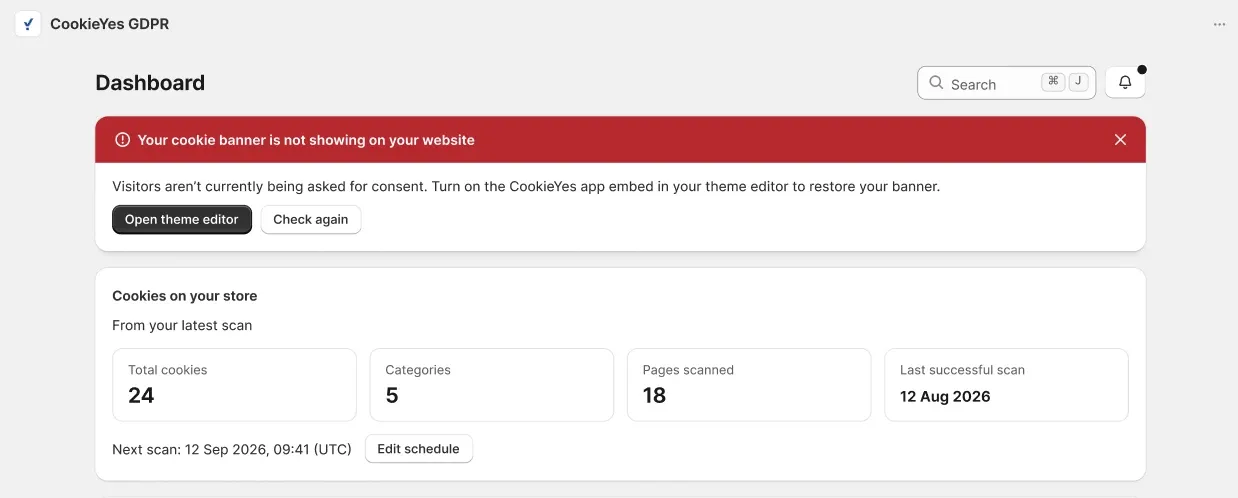
If the app embed is turned off, the dashboard shows an alert that your banner is not visible. Click Open theme editor to turn the embed back on, then click Check again.
Cookie Banner
In the CookieYes app, select Cookie Banner. Configure your banner across five tabs: Regions, Layout, Content, Colours, and Custom CSS.
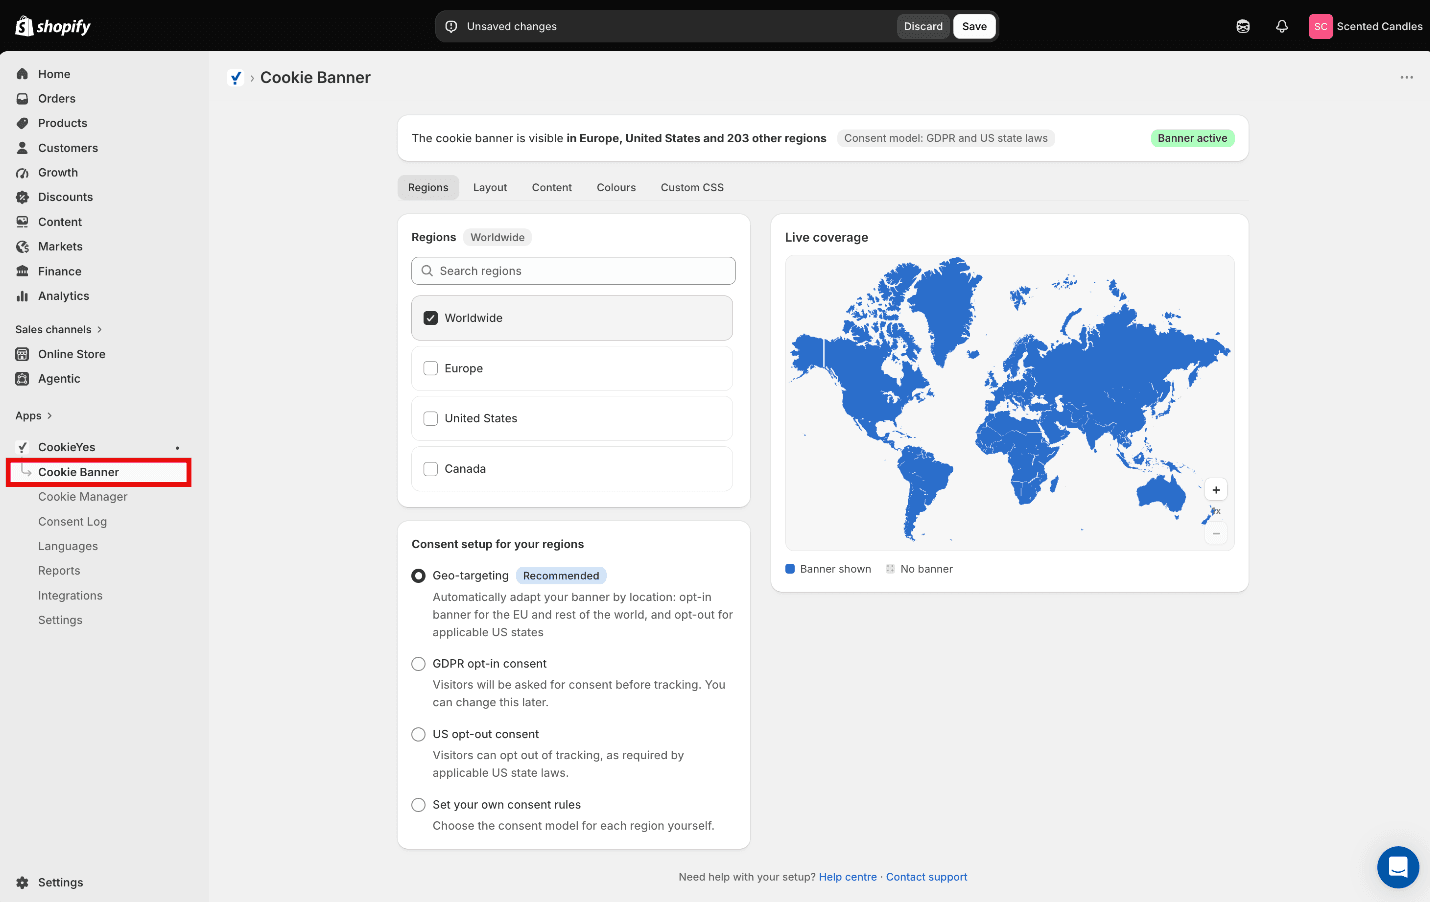
A Banner active badge confirms your banner is live, or an amber badge prompts you to turn on the app embed.
Regions
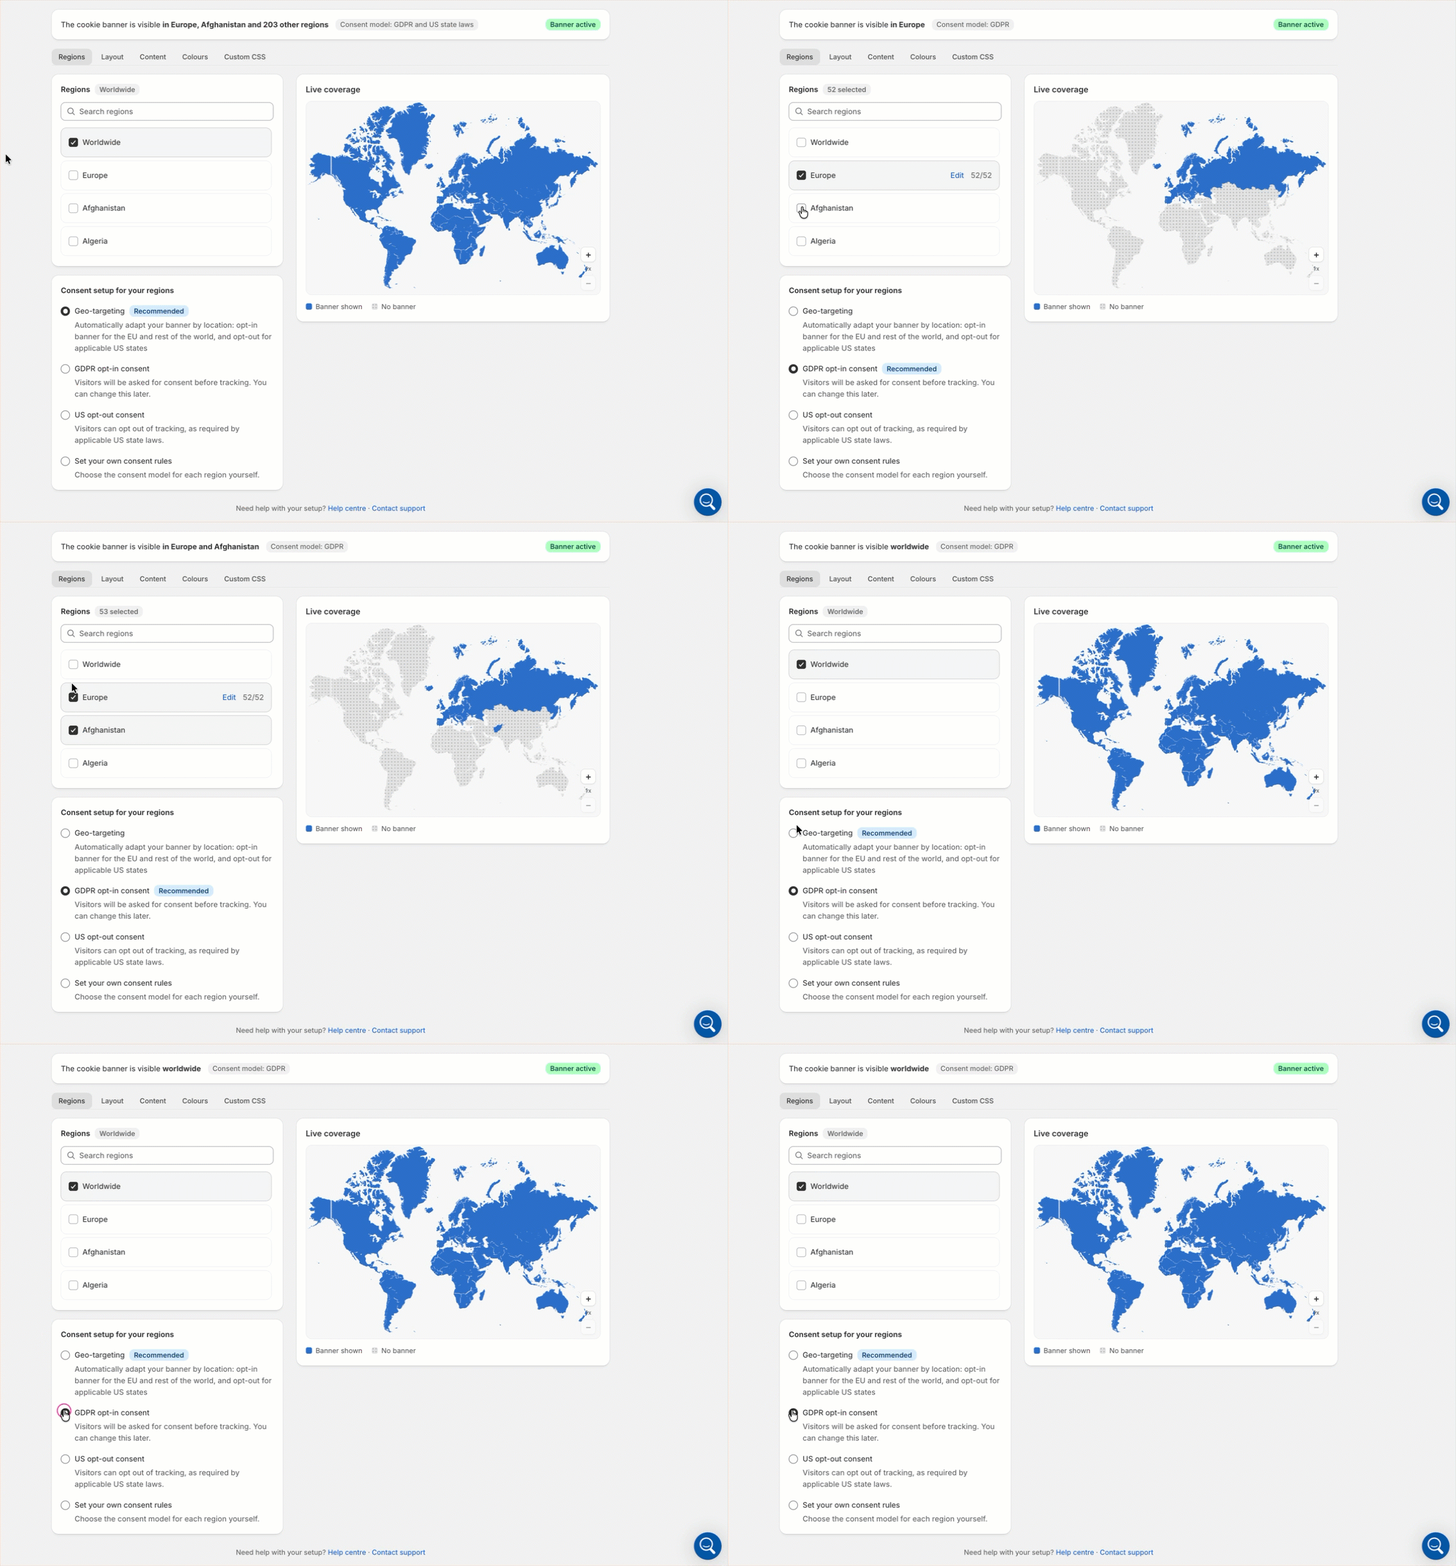
Set where your banner appears and which consent rules apply.
- Under Regions, select the regions your store serves. Select Worldwide to cover all visitors, or search for a specific country.
- Under Consent setup for your regions, select a consent model: Geo-targeting, GDPR opt-in consent, US opt-out consent, or Set your own consent rules. Select Set your own consent rules to set the consent model for each region yourself.
- Click Save.
The Live coverage map highlights the regions where your banner is shown.
Layout
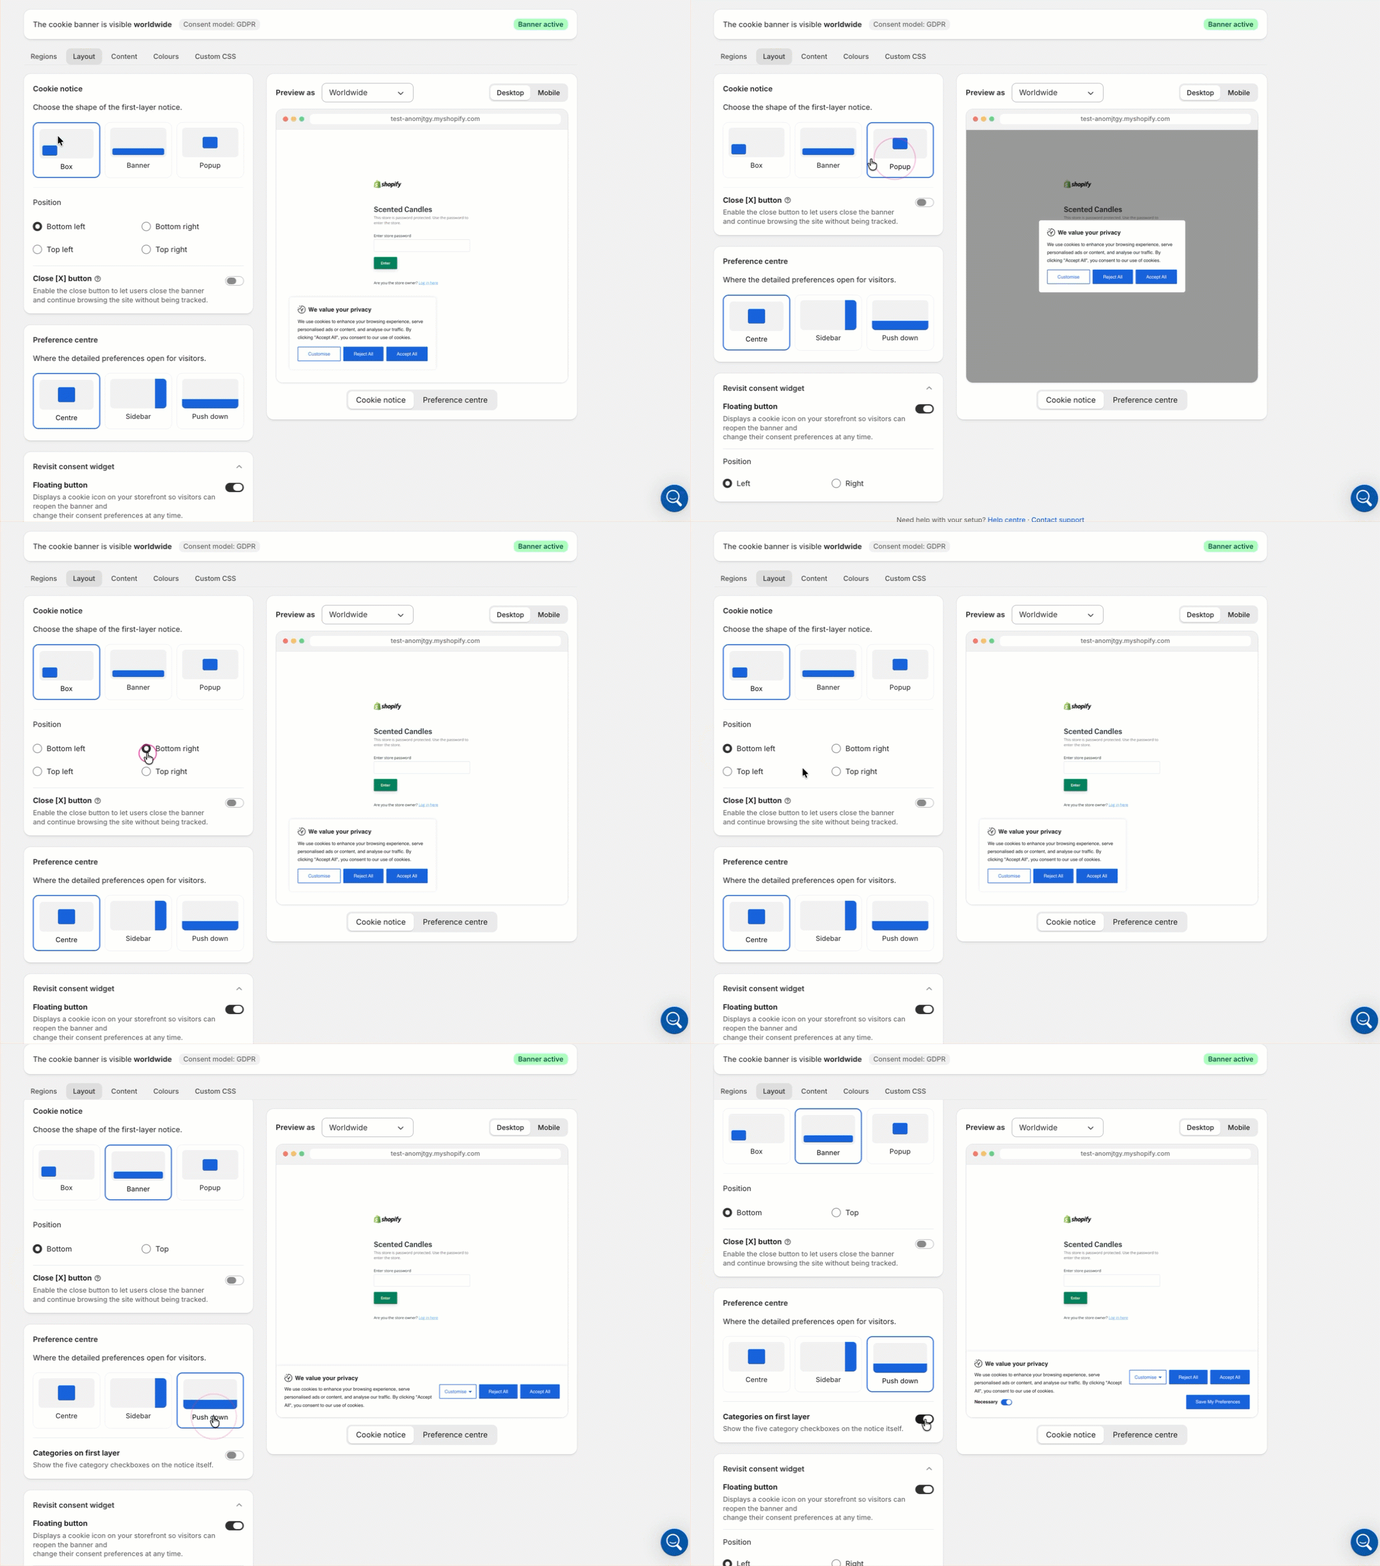
Set the shape and position of the cookie notice, the preference centre, and the revisit consent button.
- If your regions require more than one banner, select the banner you want to edit under Customise.
- Under Cookie notice, choose a shape (Box, Banner, or Popup) and set the Position of the cookie banner. Turn on Close X button to show a close control on the banner.
- Under Preference centre, choose where the second layer opens: Centre, Sidebar, or Push down. Push down is available only for the Banner cookie notice. Selecting it adds the Categories on first layer toggle, which you can turn on to show the category toggles on the cookie banner itself.
- Under Revisit consent button, turn on Floating button and set its Position to Left or Right. Visitors use this button to change their consent at any time.
- Click Save.
Use Preview as to check the banner for a specific region, switch between Desktop and Mobile, and use the Cookie notice and Preference centre tabs to review both layers.
Content
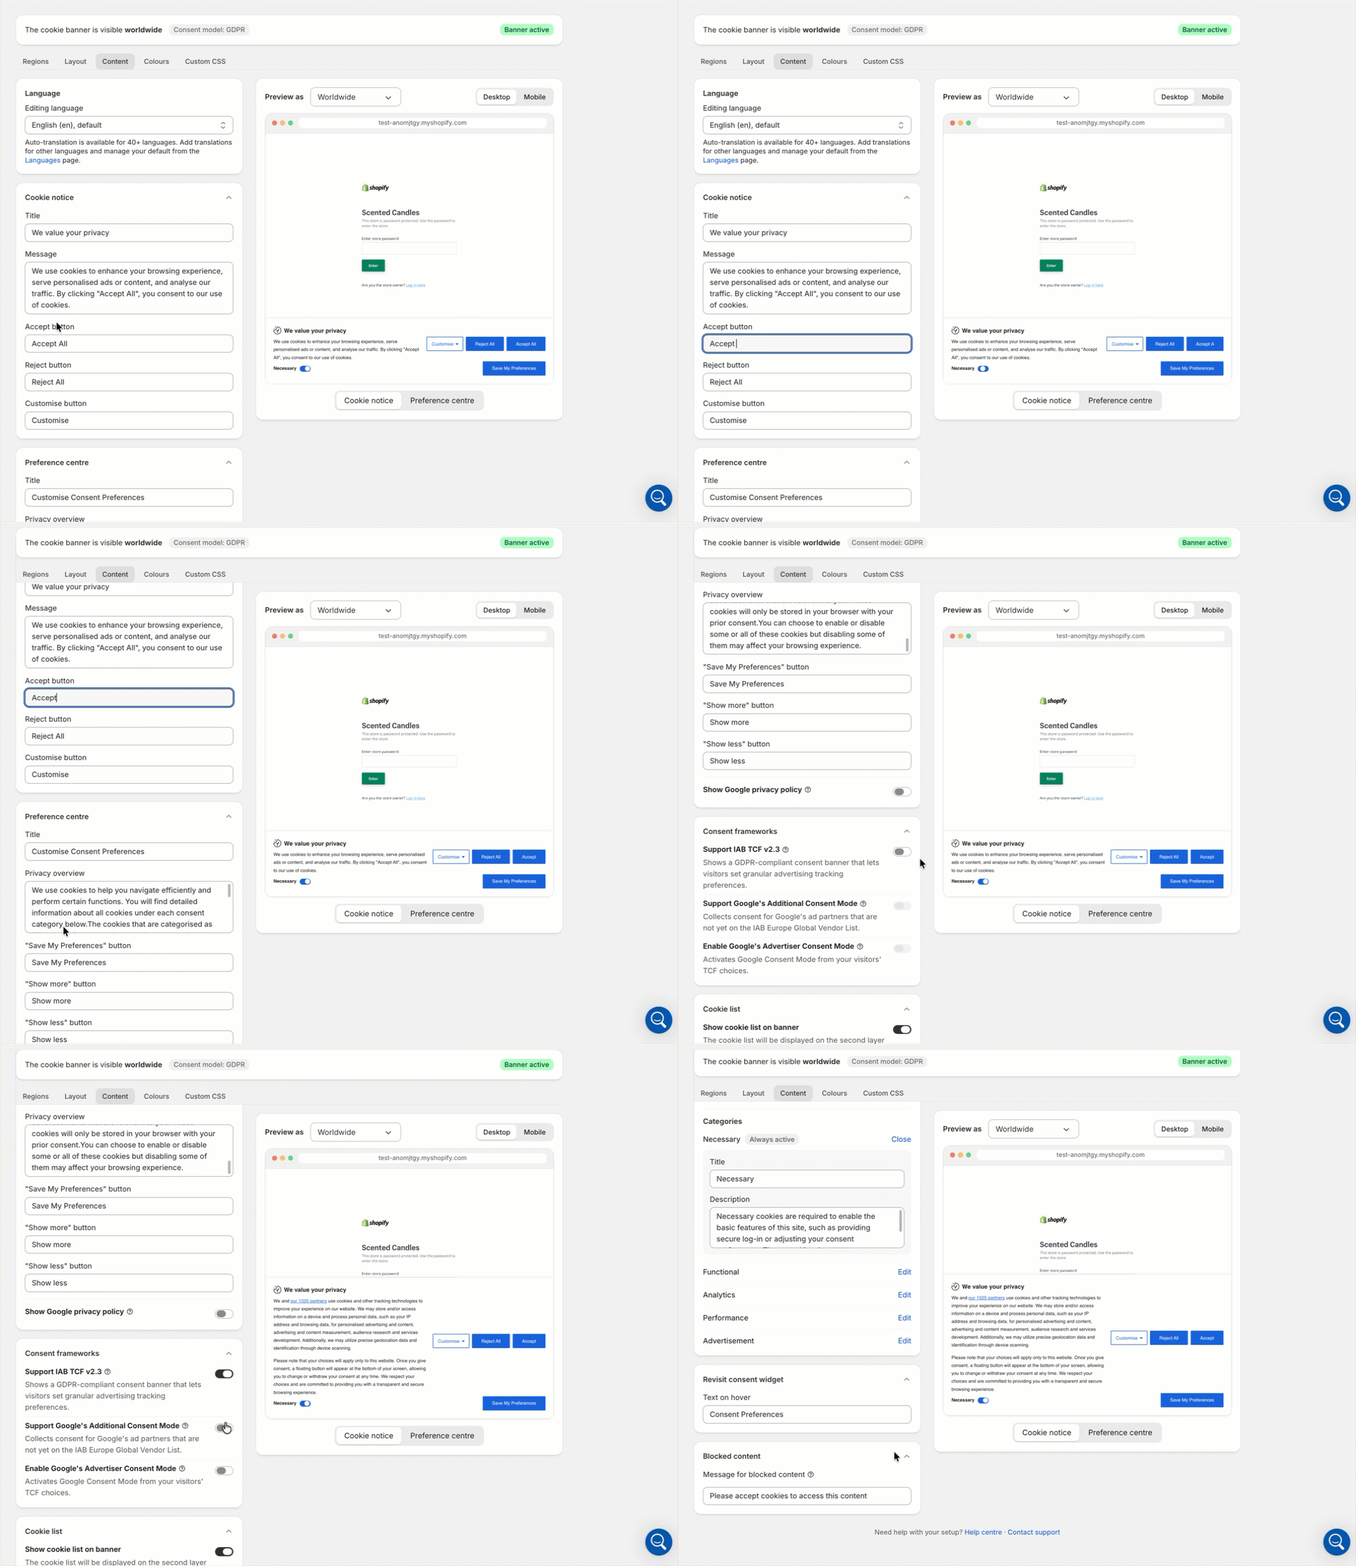
Edit the text shown on the banner, in the preference centre, and in the cookie list.
- If your regions require more than one banner, select the banner you want to edit under Customise. Each banner has its own text.
- Under Language, select the language you are editing. Activated languages are translated automatically. To add a language, go to Languages.
- Under Cookie notice, set the Title, Message, and the labels for the Accept, Reject, and Customise buttons.
- Under Preference centre, set the Title, Privacy overview, and the button labels. Turn on Show Google privacy policy if Google services set cookies on your store.
- Under Categories, click Edit next to a category to change its title and description. Categories appear in a fixed order, and Necessary stays active.
- Under Consent frameworks, turn on Support IAB TCF v2.3 to pass consent to advertising partners through the IAB Transparency and Consent Framework. The Support Google's Additional Consent Mode and Enable Google's Advertiser Consent Mode toggles extend this to Google ad partners and tags, and both require IAB TCF.
- Under Cookie list, turn on Show cookie list on banner to add the full cookie table to the preference centre. Edit the column headings and labels as needed.
- Under Revisit consent button, set the Text on hover.
- Under Blocked content, set the Alt text for blocked content. This appears in place of embedded content held until a visitor consents.
- Click Save.
Colours
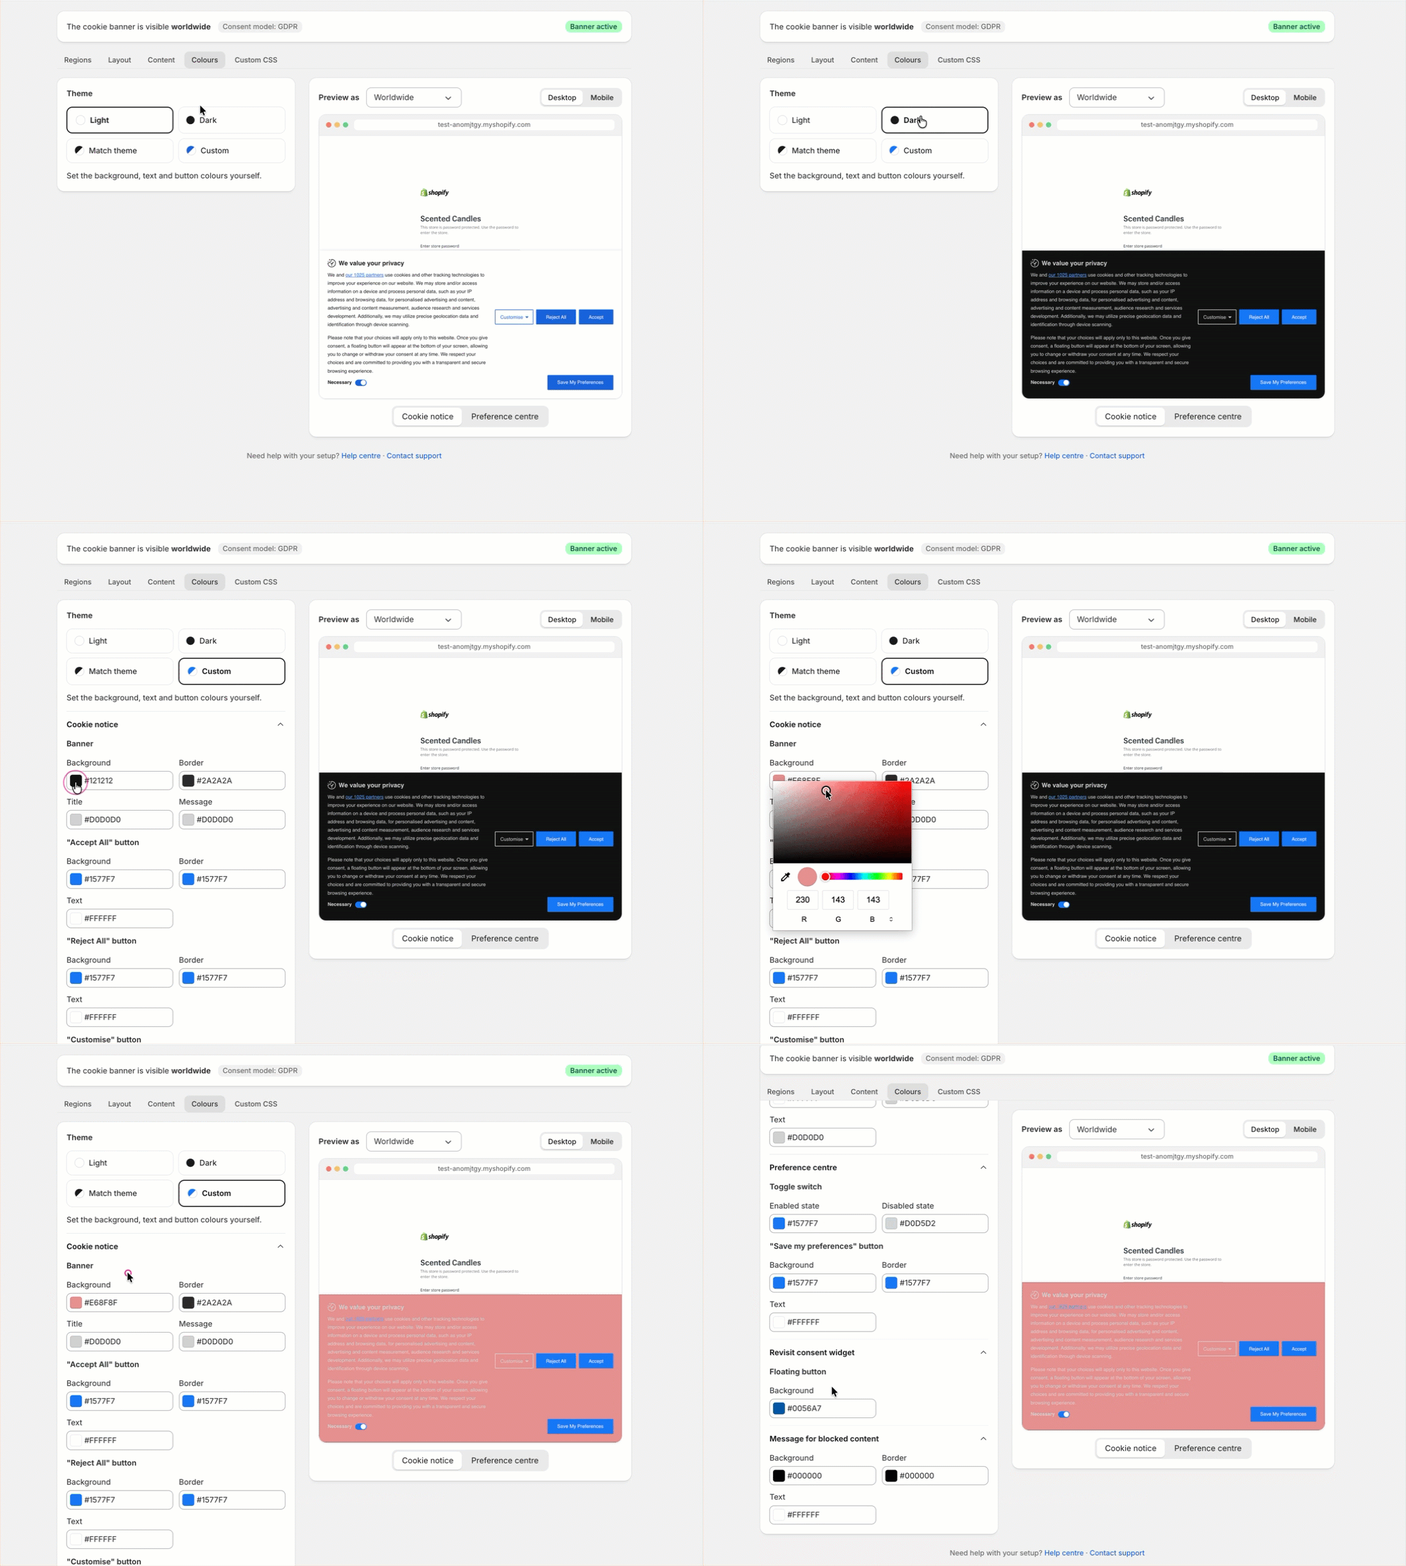
Set the theme and the individual colours used on the cookie banner.
- If your regions require more than one banner, select the banner you want to edit under Customise.
- Choose a theme:
- Light: light background with dark text
- Dark: dark background with light text
- Match theme: takes its colours from your website theme
- Custom: set the colours yourself
- If you selected Custom, set the colours for the Cookie notice, Preference centre, Revisit consent button, and Blocked content. Enter a hex value, or click the swatch to pick a colour.
- Click Save.
Check the preview as you work, and switch between Desktop and Mobile to confirm the banner reads well on both.
Custom CSS
Fine-tune the banner beyond the options on the Colours tab. Your CSS applies only to the cookie banner, not to your website theme.
- If your regions require more than one banner, select the banner you want to edit under Customise.
- Enter your CSS in the Custom CSS field.
- Click Save.
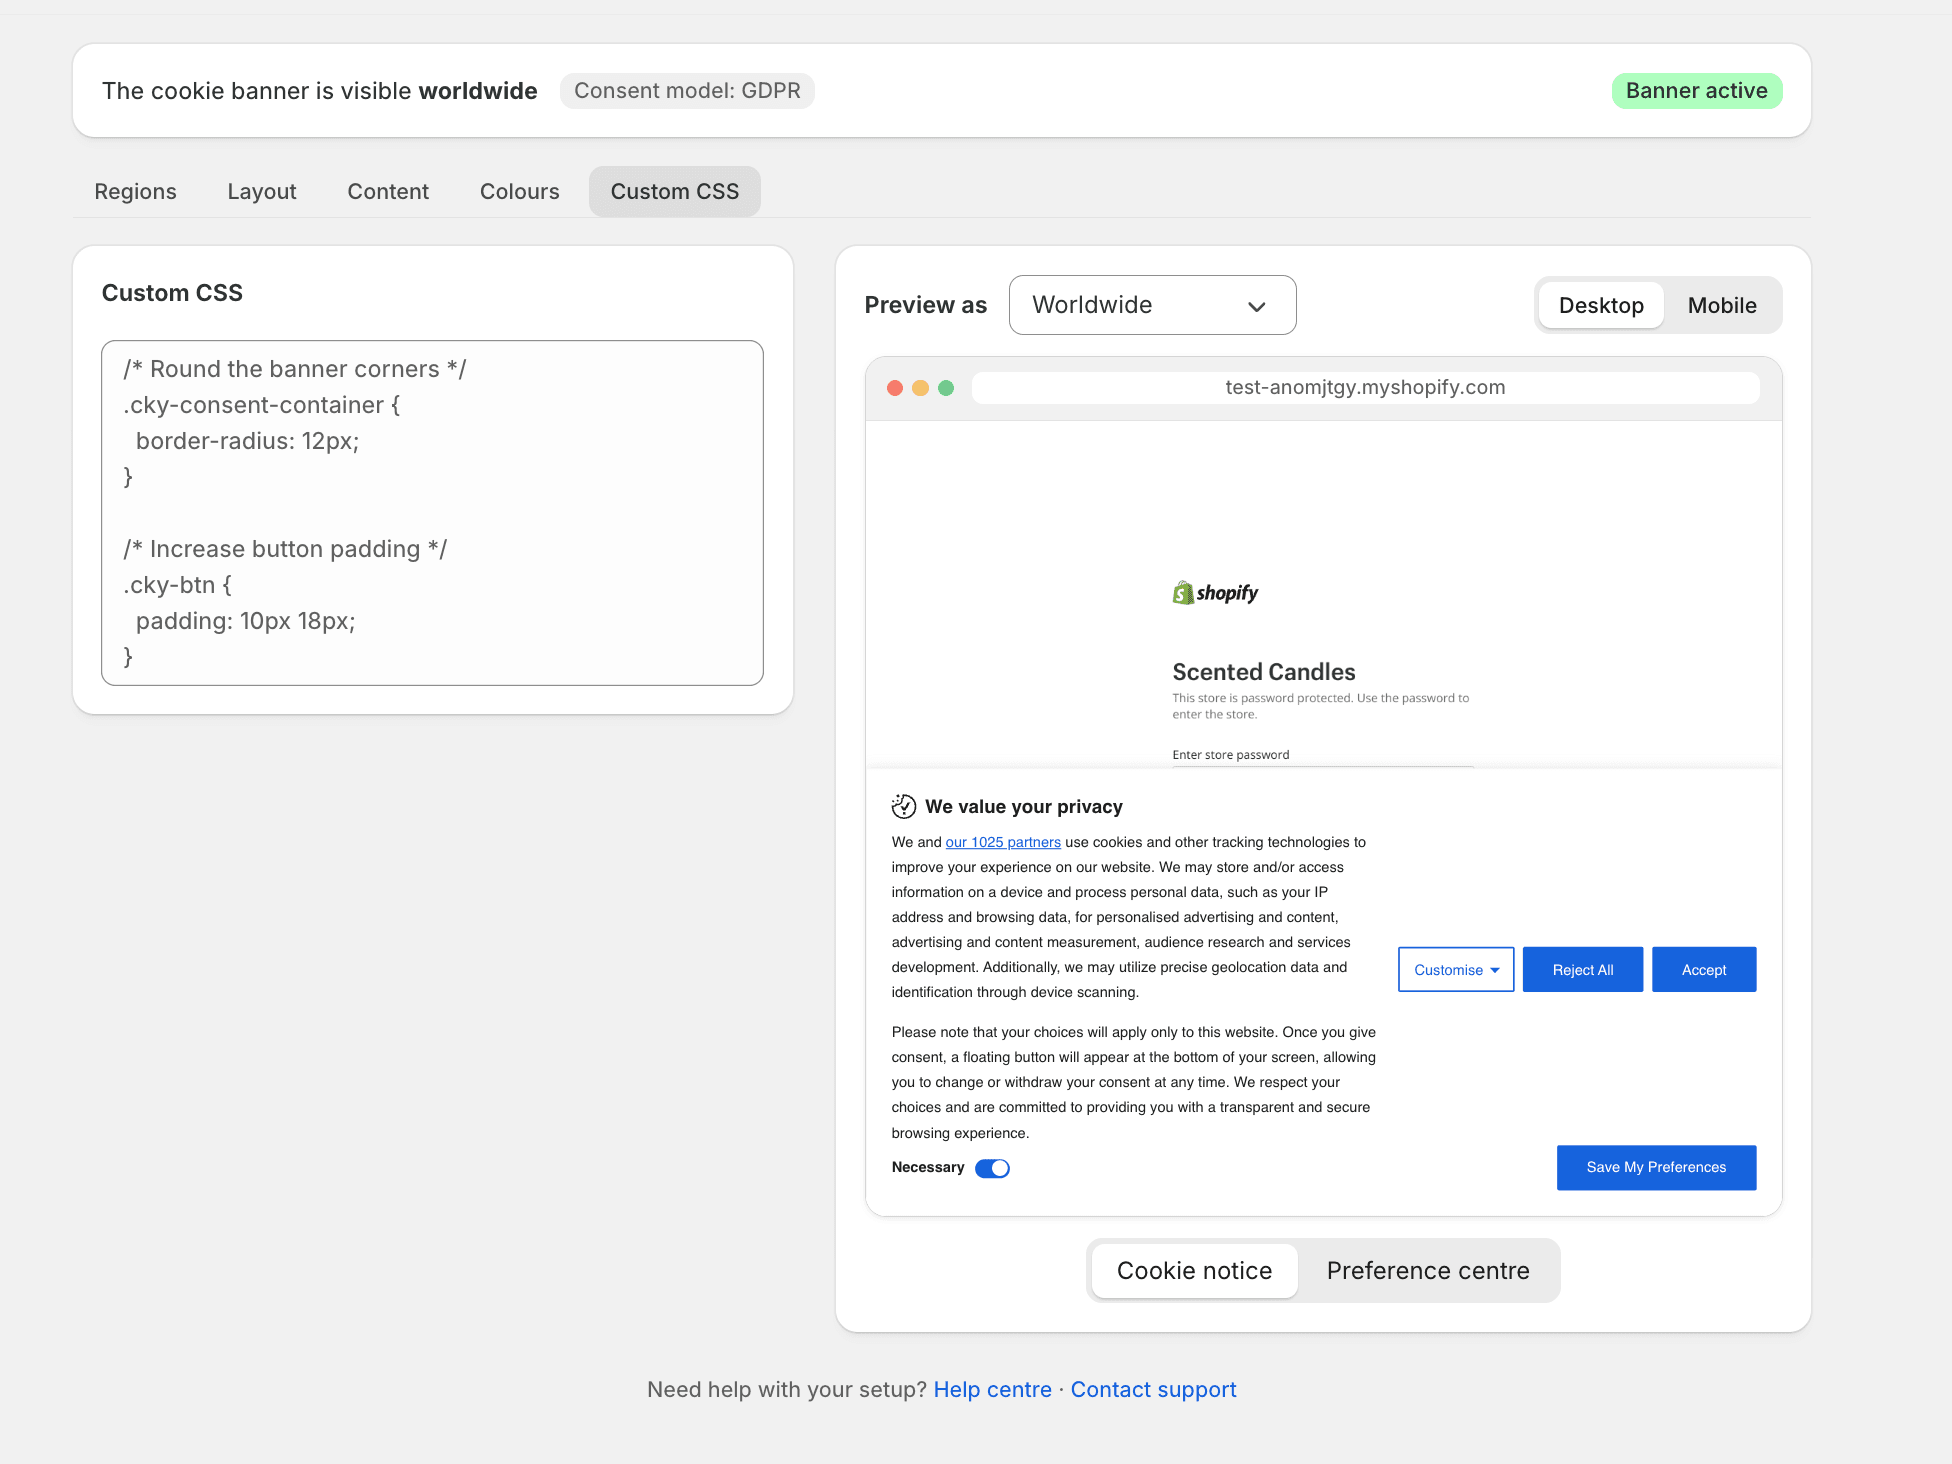
Click Publish changes to make your edits live.
Cookie Manager
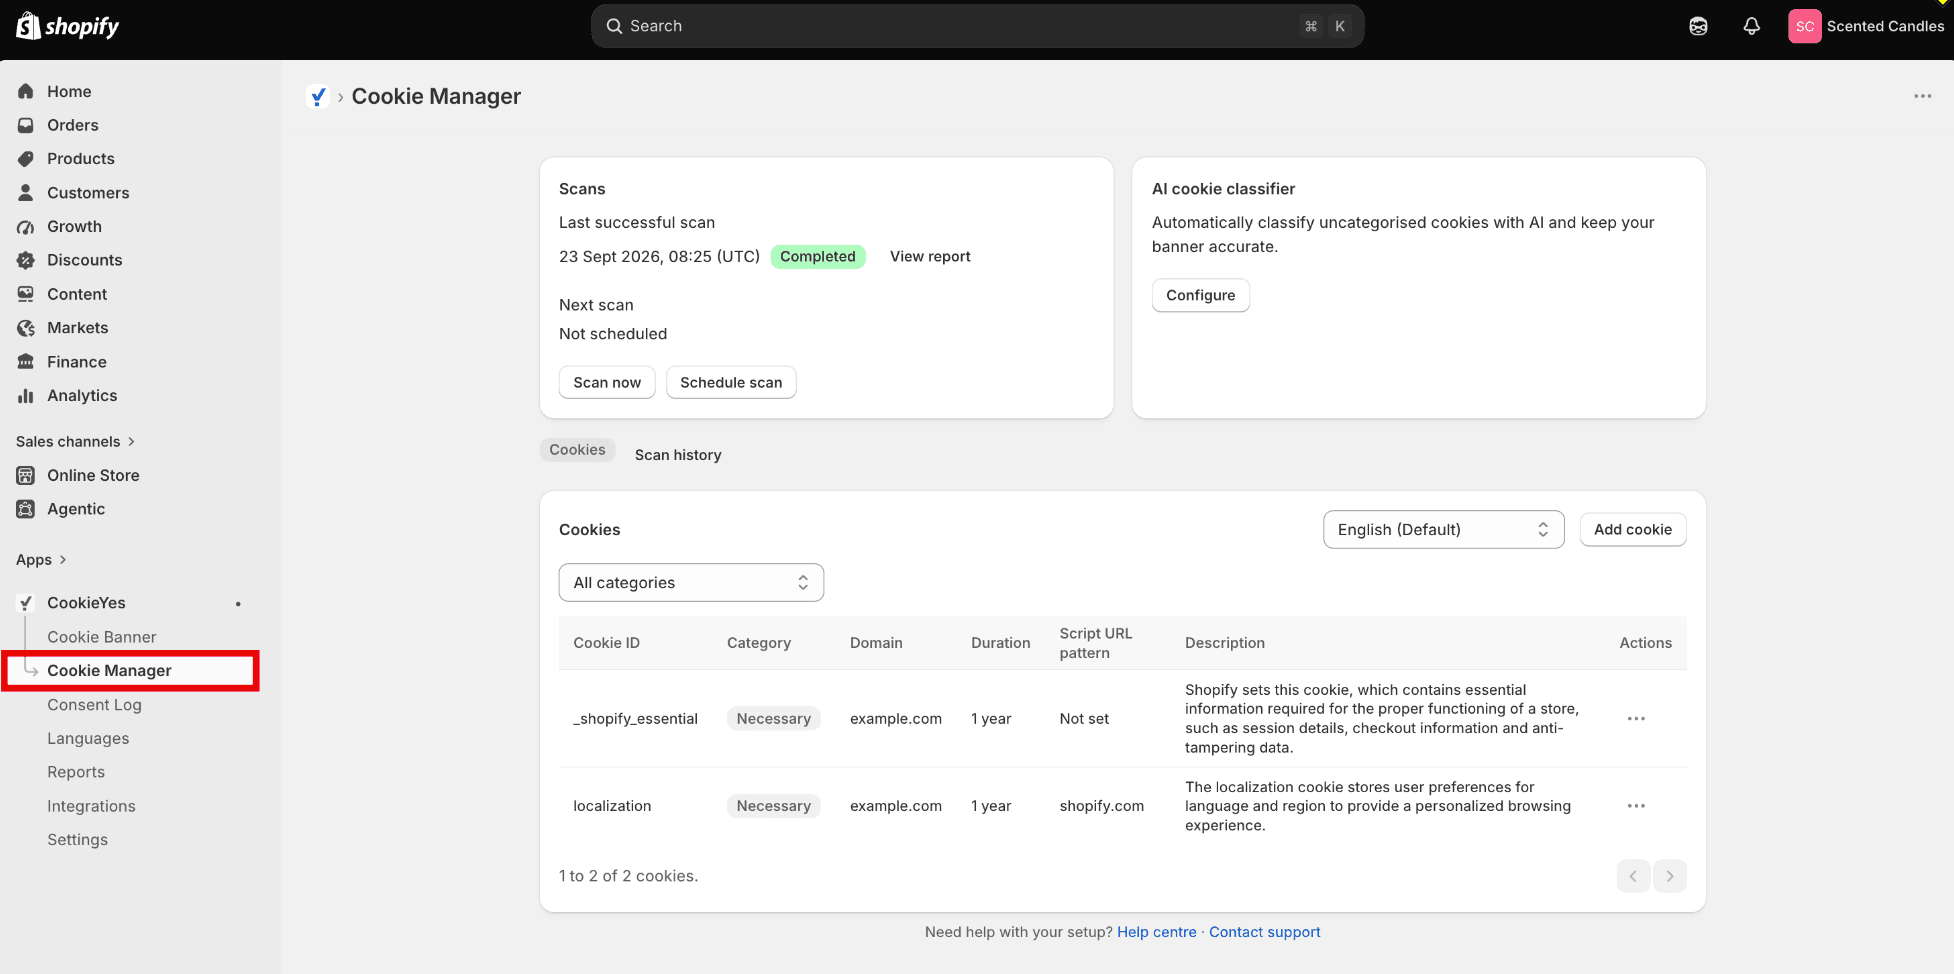
In the CookieYes GDPR app, select Cookie Manager to review the cookies found on your store and check your scan history.
Under Scans, click Scan now to run a fresh scan, or Schedule scan to set up recurring scans. Run a scan whenever you add or remove a third-party tool. For more, see scan your website. Under AI cookie classifier, click Configure to sort uncategorised cookies automatically.
The Cookies tab lists each cookie with its category, domain, duration, and description. Filter by category, or click Add cookie to add one the scanner did not detect. For more, see add a cookie to the cookie audit table.
Consent Log
The consent log records each visitor's consent choice as proof of consent. Each record shows the consent ID, consent status, and the date and time.
To turn it on, go to Settings in the CookieYes app and turn on Consent log.
To view your records, select Consent Log in the CookieYes app. Use the search bar to find a specific record, or click Export as CSV to download the full log.
You can also download the proof of consent for each consent. For more details, see download the proof of consent.
Languages
Show your cookie banner and preference centre in your visitors' own languages.
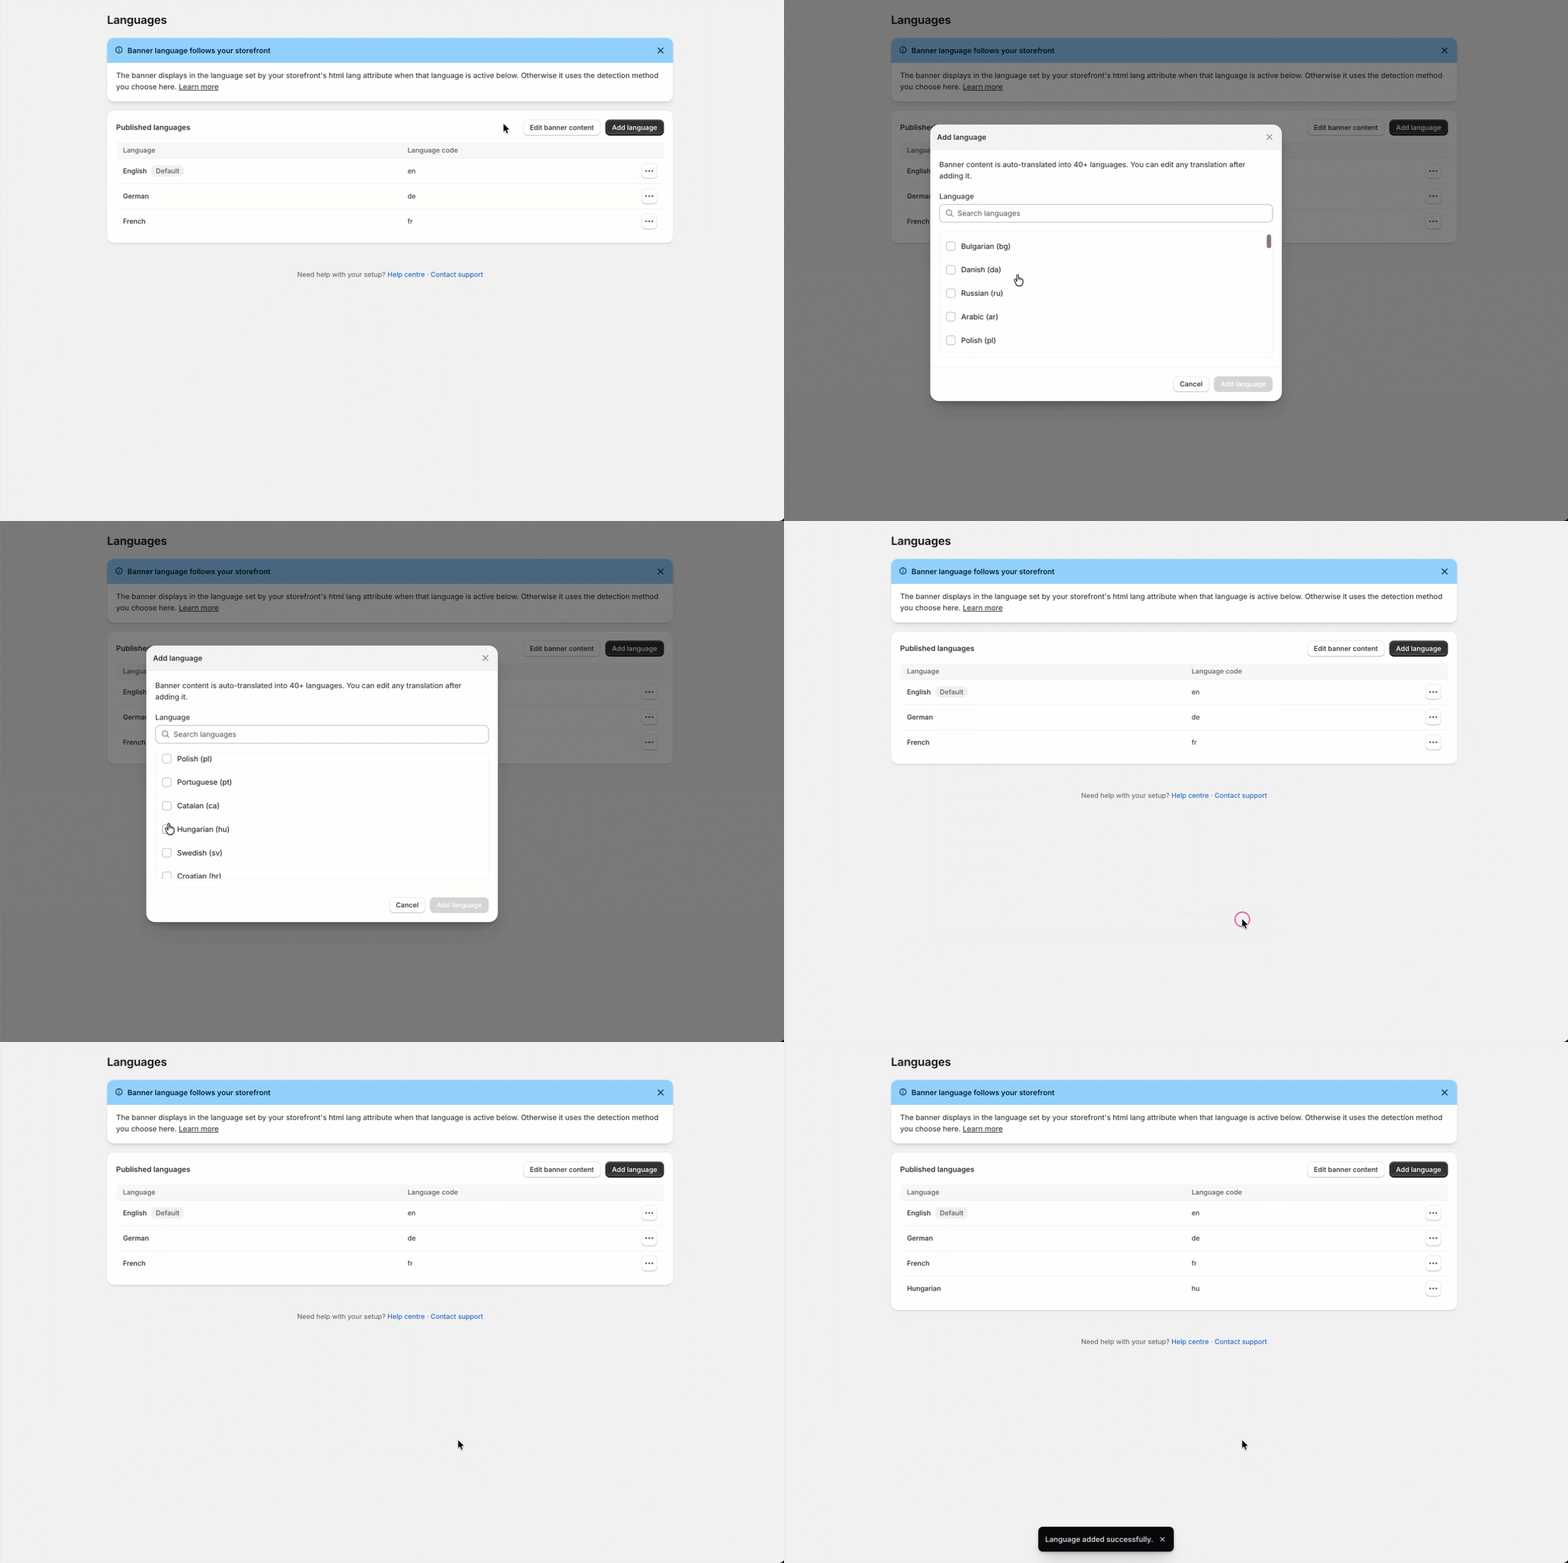
In the CookieYes app, select Languages.
To add a language:
- Click Add language.
- Select a language from the list.
- Click Add language.
The language is added and translated automatically. Use the options menu next to a language to set it as the default or remove it.
To edit the text for a language, click Edit banner content. This opens the Content tab on the Cookie Banner page, where you can edit one language at a time.
Reports
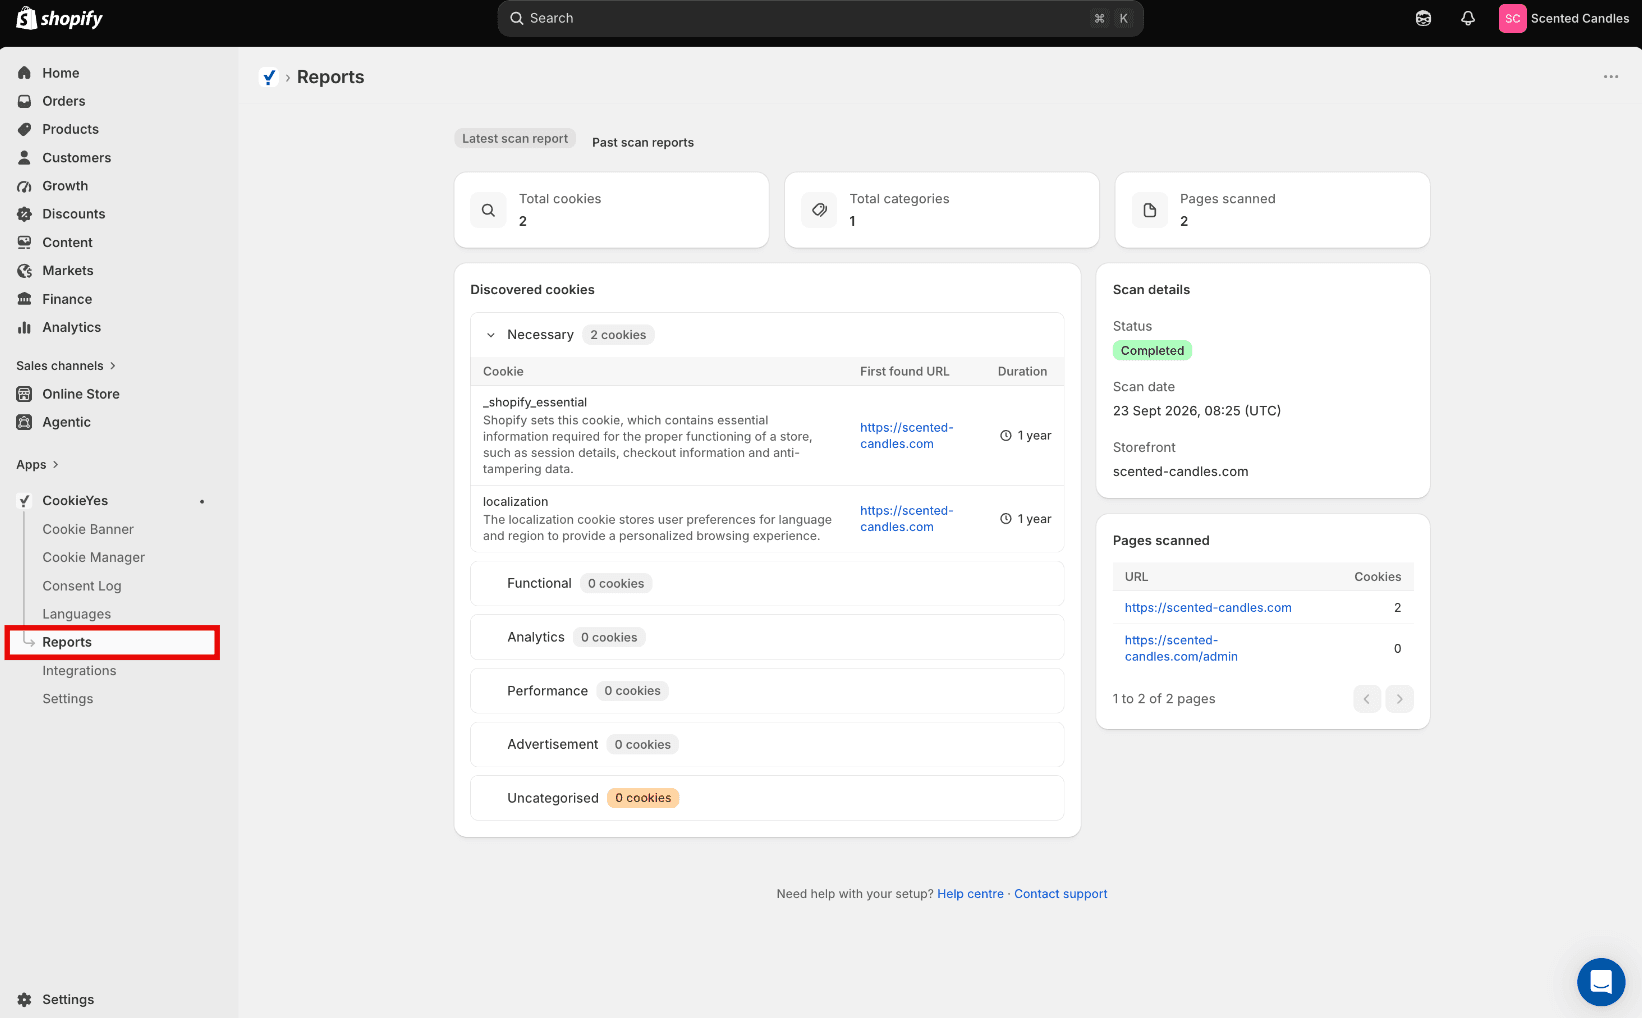
In the CookieYes app, select Reports to review what the scanner found on your store. Use Latest scan report for the most recent scan, or Past scan reports for earlier ones.
The report shows the total cookies found, the categories they fall into, and the number of pages scanned. Under Discovered cookies, expand a category to see each cookie, where it was first found, and how long it lasts. The panels on the right show the scan status, date, and storefront, along with the pages included. Cookies under Uncategorised could not be matched automatically. Assign them to a category in Cookie Manager so visitors see accurate information in the preference centre.
Integrations
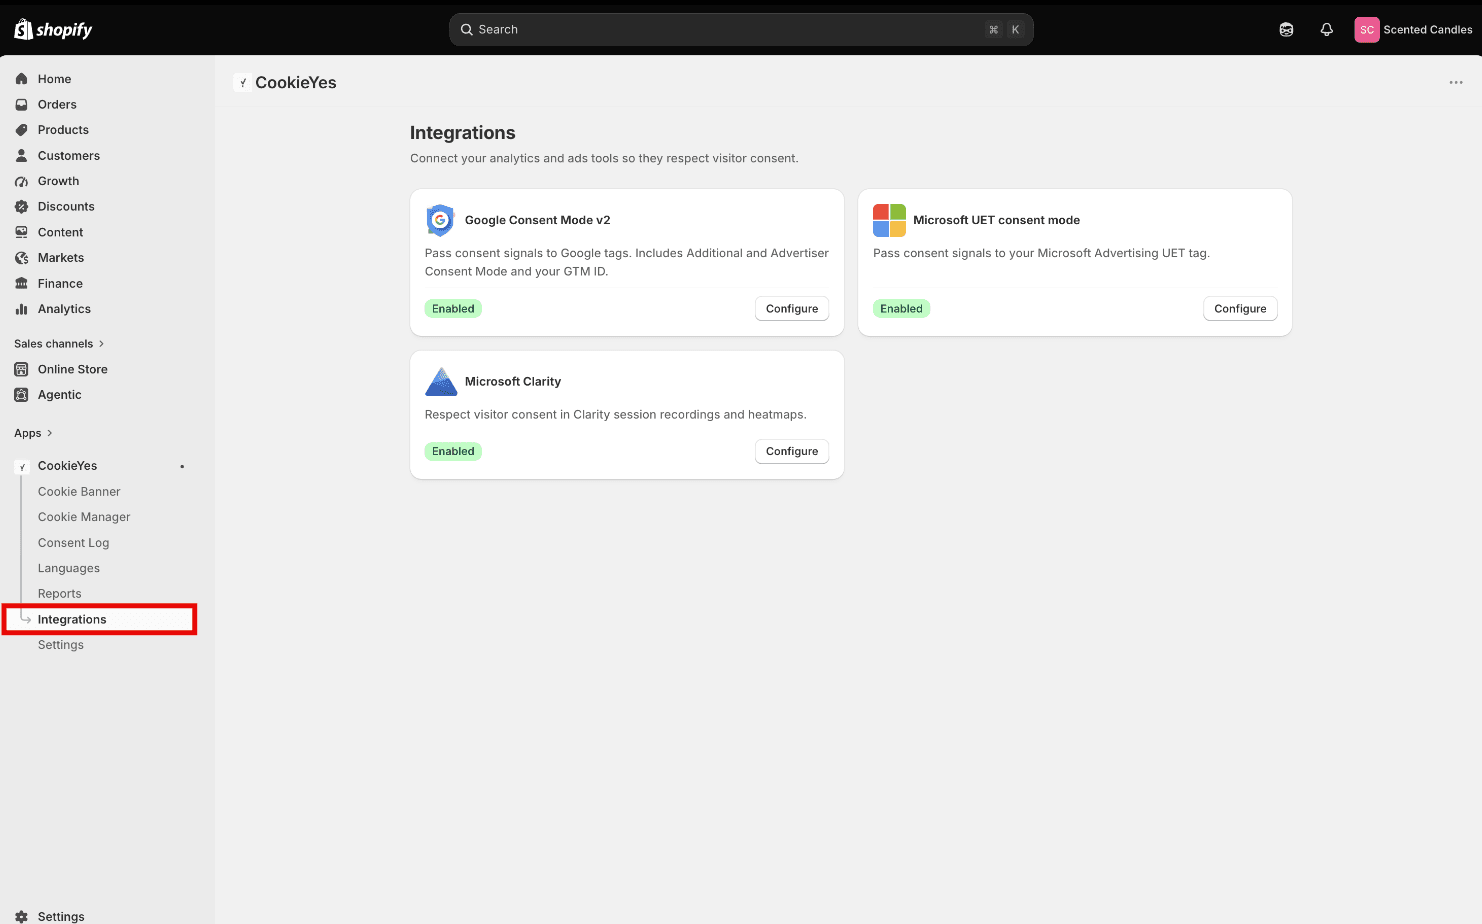
In the CookieYes app, select Integrations to connect your analytics and advertising tools, so they respect each visitor's consent choice.
The page lists the available integrations, each on its own card showing whether it is enabled. Click Configure on a card to set up that integration or change its settings.
Settings
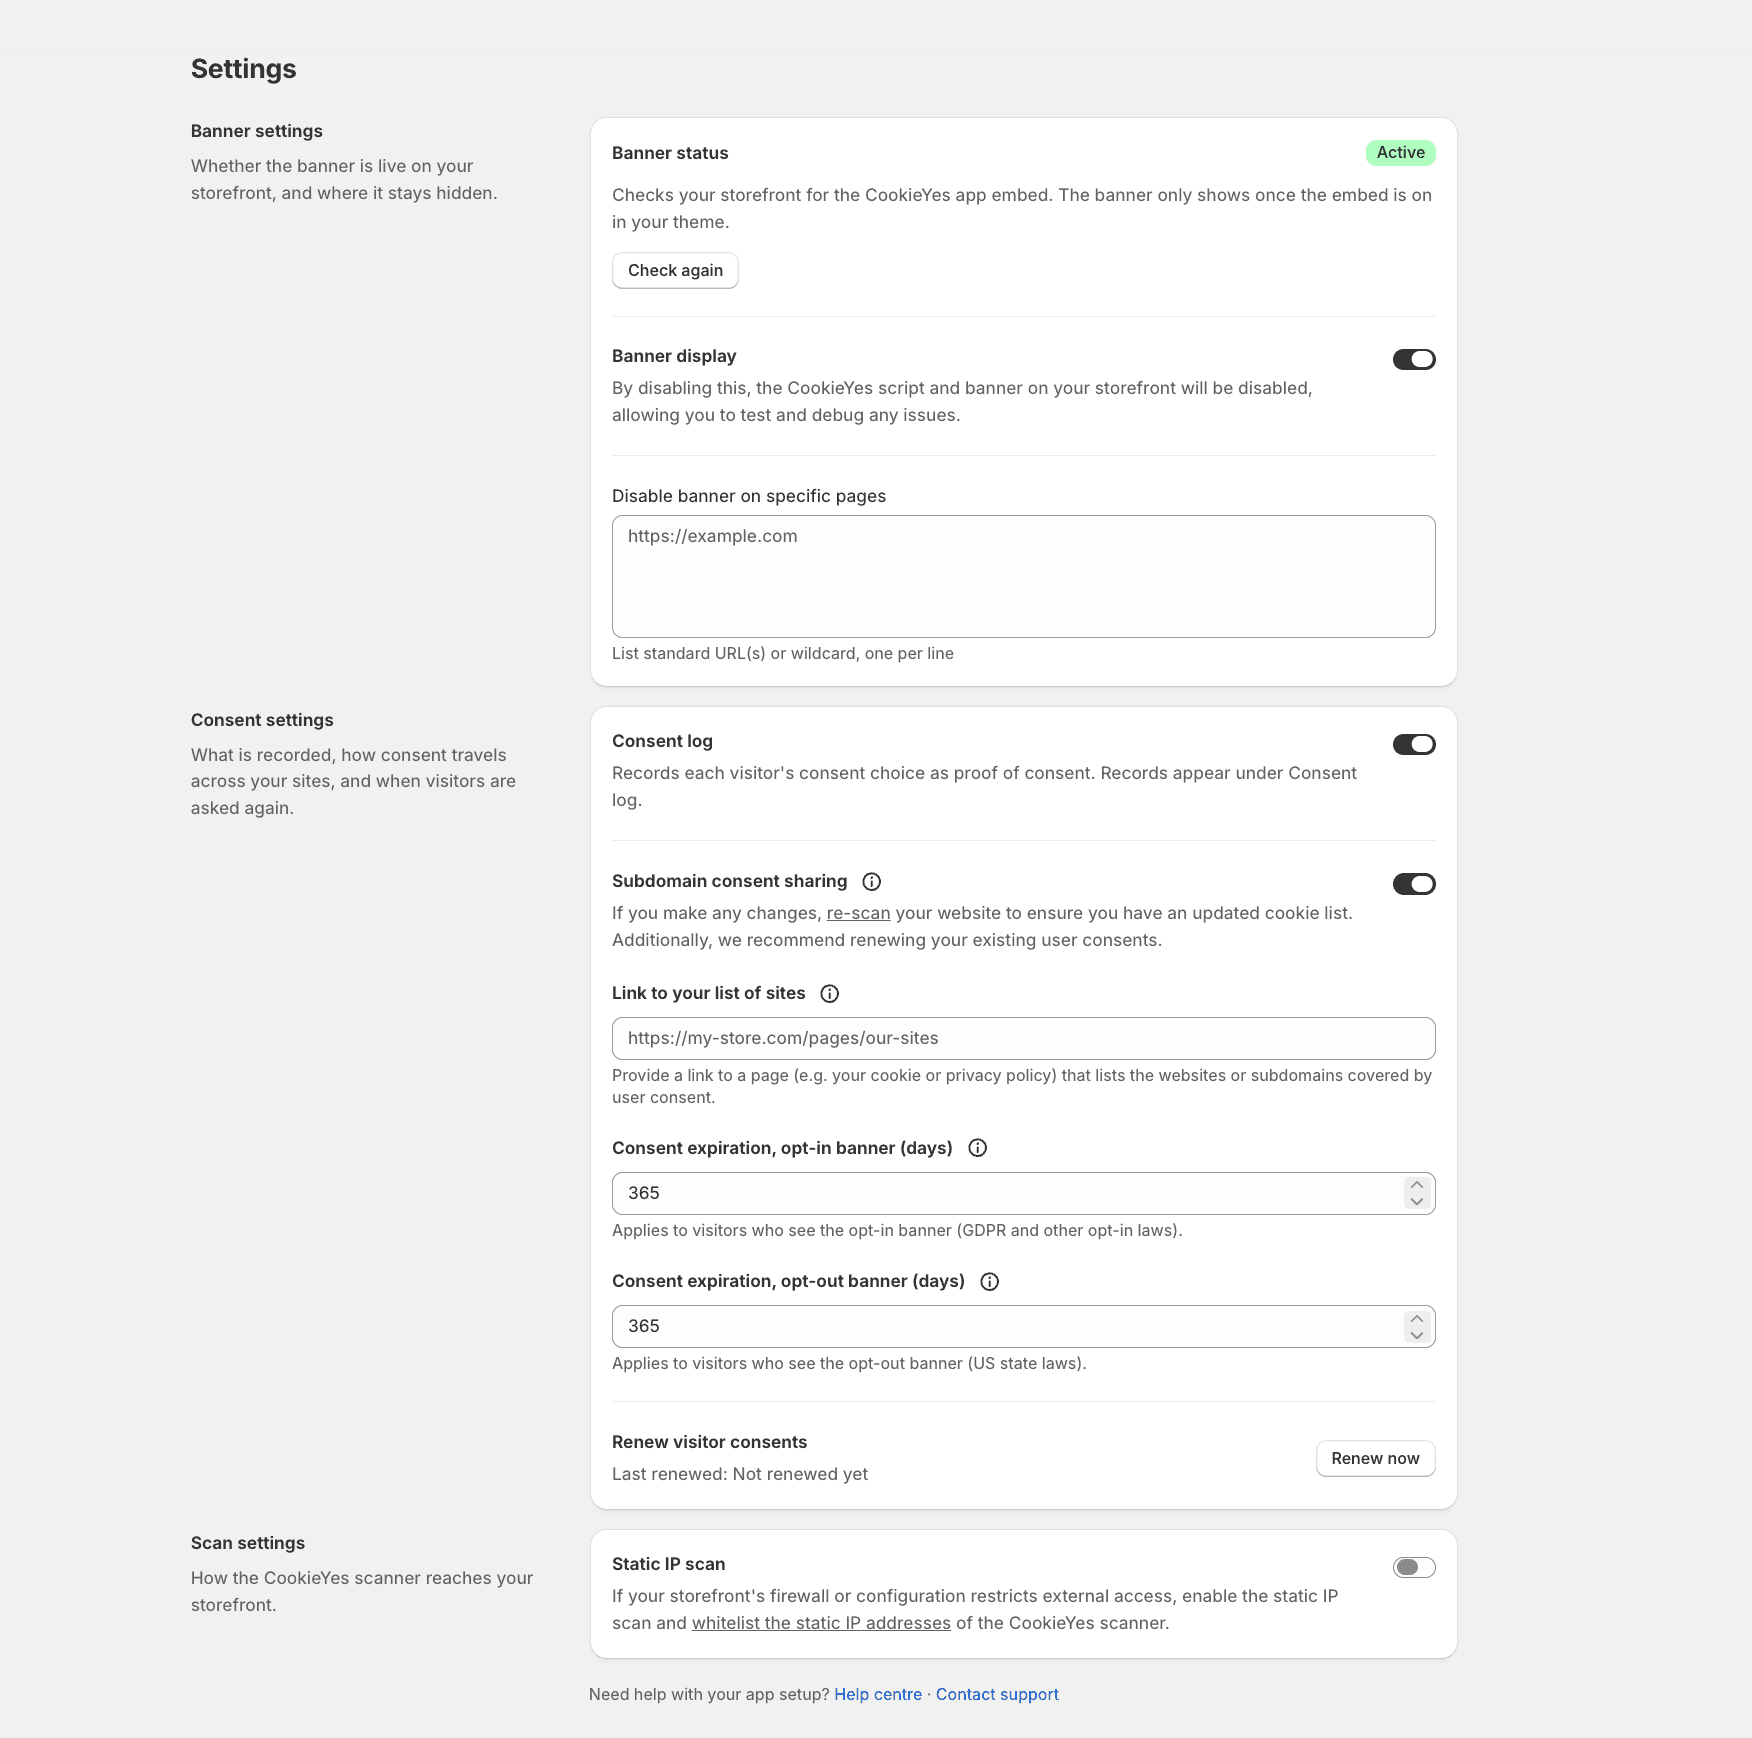
In the CookieYes app, select Settings to control whether the banner is live, what consent is recorded, and how the scanner reaches your store.
Banner settings
Banner status shows whether the banner is live. The banner appears only once the app embed is turned on in your theme. If the status is not Active, turn on the embed in the Shopify theme editor, then click Check again.
Turn off Banner display to remove the CookieYes script and banner while you test or debug. No consent is collected while it is off.
Under Disable banner on specific pages, list the pages where the banner should not appear. Enter one URL or wildcard per line.
Consent settings
- Consent log: records each visitor's consent choice as proof of consent
- Subdomain consent sharing: applies a visitor's consent across your subdomains, so they are asked only once
- Link to your list of sites: links to a page listing the sites and subdomains the consent covers, such as your cookie policy
- Consent expiration: how long consent lasts on the opt-in and opt-out banners. The default is 365 days for each.
- Renew visitor consents: click Renew now to clear existing consents and ask every visitor again. Do this after changing your cookie categories or adding new tracking.
Scan settings
Turn on Static IP scan if your storefront's firewall restricts external access, then allow the CookieYes scanner's static IP addresses on your firewall.
Your banner is now configured, and CookieYes records every visitor's consent as your store runs. If you are facing issues with your cookie banner, contact technical support.