CookieYes MCP Server
Last updated on July 14, 2026
On this page
Overview
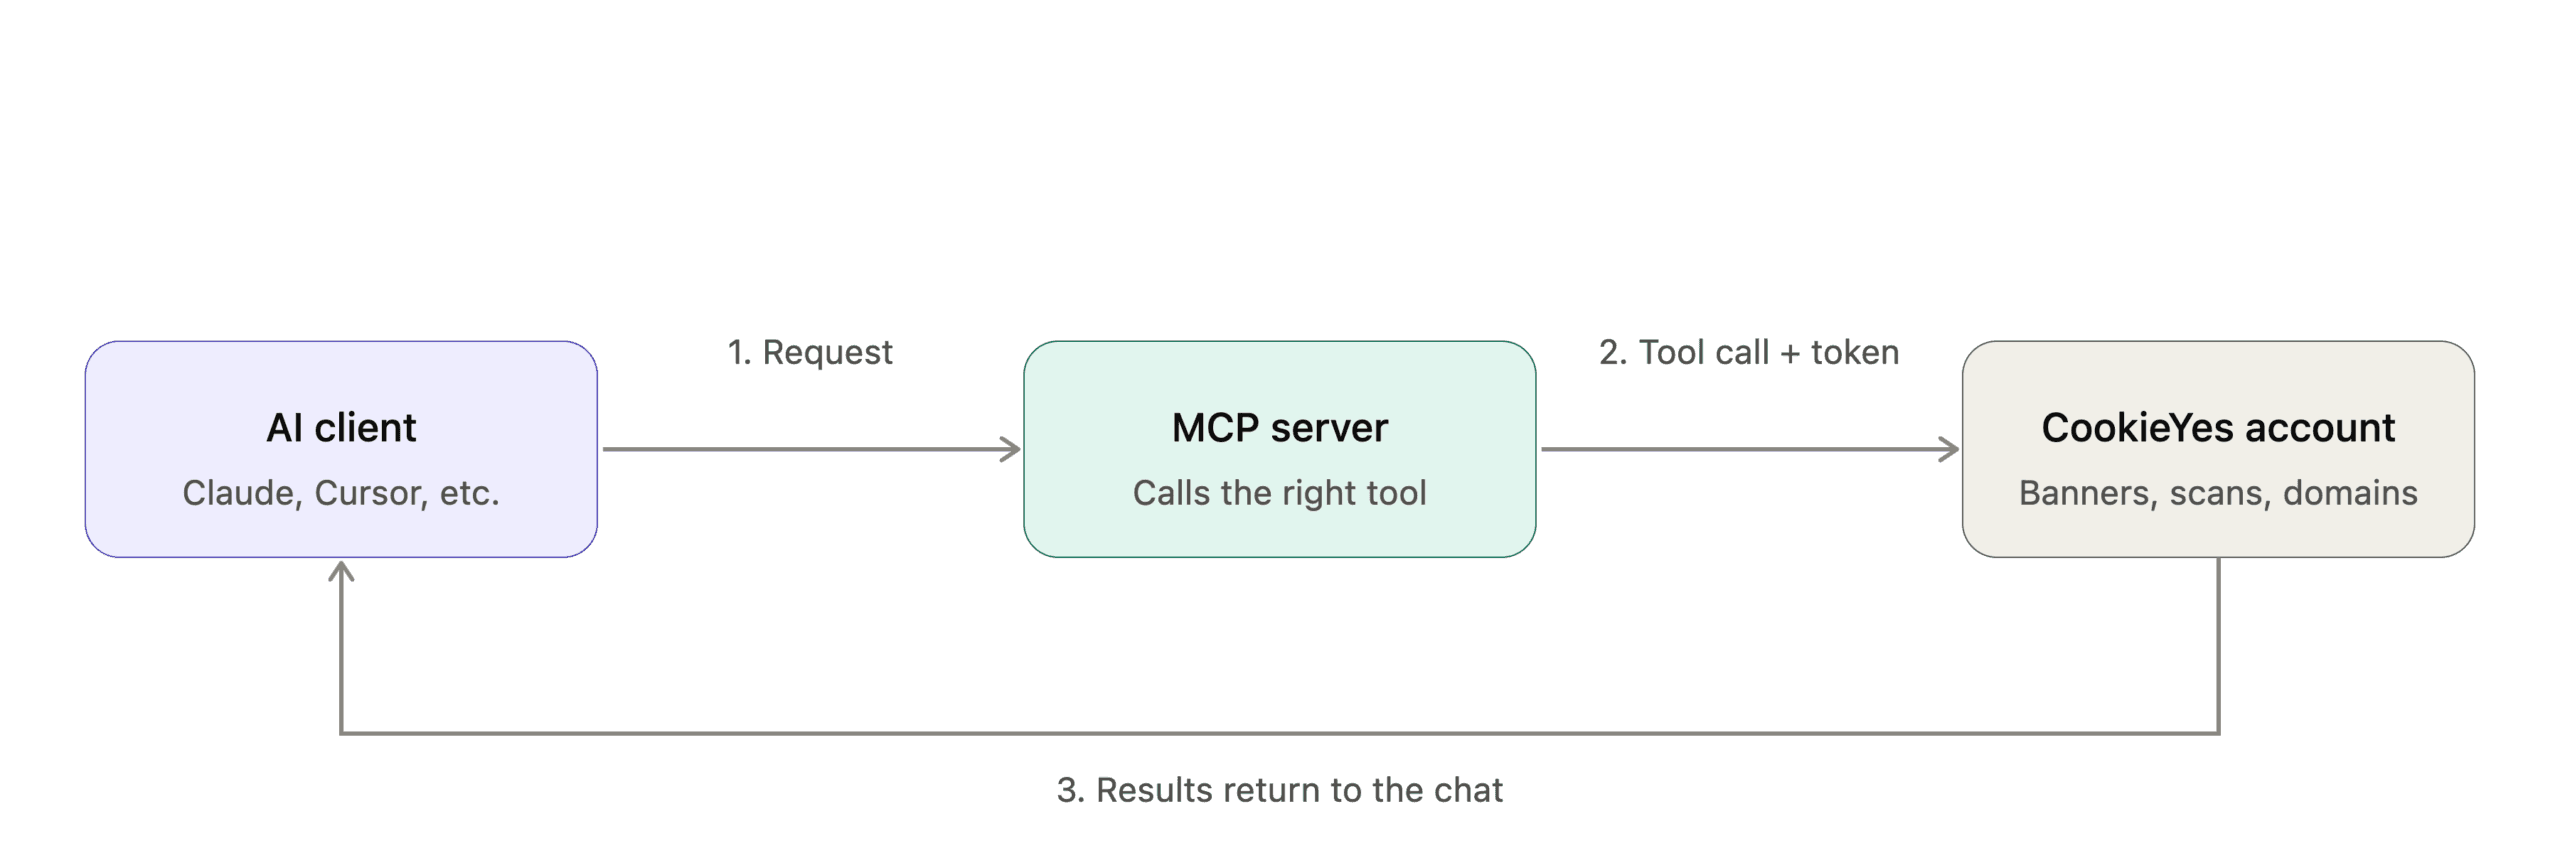
The Model Context Protocol (MCP) is an open standard that lets any AI assistant talk to an external service through a shared set of tools. The CookieYes MCP Server is our hosted server: your AI client (Claude, ChatGPT, Cursor, VS Code, and more) connects over HTTP, and it relays your requests to your CookieYes account.

What can you do with CookieYes MCP?
- Monitor: Check banner status, verify configuration, and retrieve a list of banners across your domains.
- Implement: Retrieve and validate banner embed codes for any domain.
- Customise: Update banner colours, position and layout to match your website's design.
- Scan: Trigger cookie scans, detect cookies in use and review scan results.
- Manage: List all domains in your account and perform actions scoped to a specific domain.
See the Tools section below for the full set of tools behind these actions.
Before You Begin
Make sure you have these before you start:
- MCP endpoint:
https://app.cookieyes.com/mcp - A CookieYes account: sign up if you don’t have one.
- MCP access enabled: the account owner must turn on the Enable OAuth-based access toggle for connecting the account to the AI client.
- A supported client: any AI assistant or IDE.
Connecting to the CookieYes MCP Server
Follow these steps to connect your AI tool to your CookieYes account. This includes authentication, permission authorisation and connection confirmation.
Choose your client below and follow the client-specific steps to add the CookieYes MCP server.
1. Open your Claude Code terminal interface.
2. Add the server with the HTTP transport:
claude mcp add --transport http cookieyes https://app.cookieyes.com/mcpclaude mcp add --transport http cookieyes https://app.cookieyes.com/mcp
3. If prompted with This command requires approval. Do you want to proceed?, type y and press Enter.
4. Initiate the login workflow by running the following command in a new terminal:
! claude mcp login cookieyes! claude mcp login cookieyes
1. Open the MCP servers settings panel and click + Add server in the Servers section.
2. In the Connect to a custom MCP window, switch the protocol from STDIO to Streamable HTTP.
3. In the URL field, enter
https://app.cookieyes.com/mcphttps://app.cookieyes.com/mcp
4. In the Name field, assign a name (e.g., cookieyes-mcp), then click Save.
5. Click Authenticate.
1. Open Settings (Ctrl+, / Cmd+,).
2. Go to Tools & Integrations > MCP Tools.
3. Click Add Custom MCP (or New MCP Server).
4. Add the following to mcp.json:
{
"mcpServers": {
"cookieyes-mcp": {
"url": "https://app.cookieyes.com/mcp"
}
}
}{
"mcpServers": {
"cookieyes-mcp": {
"url": "https://app.cookieyes.com/mcp"
}
}
}Note: Cursor calls MCP tools in Agent mode. Switch to Agent mode using the dropdown next to the model selector
1. In your Claude account, click the Customize icon in the left sidebar, then select Connectors.
2. On the Connectors page, click the + (Add) icon in the top-right corner.
3. In the modal that opens, provide CookieYes MCP Server in the Name field and https://app.cookieyes.com/mcp in the URL field.
4. Click Connect to start the connection.
Note: In Advanced settings, ensure Developer mode is toggled on before you begin.
- Go to Settings.
- In the modal that opens, select Apps from the sidebar.
- Click Create app.
- Provide a name in the Name field and paste the MCP URL
https://app.cookieyes.com/mcpin the Connection link field. - Select I understand and want to continue.
- Click Create.
Cloudflare AI Playground
- Open the Run settings panel on the right side of the Cloudflare AI Playground dashboard.
- In the MCP Servers section, click + Add.
- In the input box, enter the server URL:
https://app.cookieyes.com/mcp - Click the save icon next to the server URL field.
- Click the Authenticating… button.
GitHub Copilot CLI
- In your terminal, type
/mcp addand press Enter to open the configuration wizard. - In the configuration wizard:
- Name: provide a unique identifier as the server name.
- Server Type: use the arrow keys to select 3. SSE (Server-Sent Events).
- URL: paste
https://app.cookieyes.com/mcp - Leave the remaining optional fields as default, then press Enter to submit.
- Press Enter to start authentication.
opencode
1. Create opencode.json in the project root with the MCP server config:
{
"mcp": {
"cookieyes": {
"type": "remote",
"url": "https://app.cookieyes.com/mcp"
}
}
}{
"mcp": {
"cookieyes": {
"type": "remote",
"url": "https://app.cookieyes.com/mcp"
}
}
}2. Run OAuth authentication to connect the server: opencode mcp auth cookieyes
Visual Studio Code (VS Code)
- Open Command Palette (Ctrl+Shift+P / Cmd+Shift+P).
- Run MCP: Add Server.
- Choose HTTP/Remote Server.
- Paste your MCP URL: https://app.cookieyes.com/mcp
If you configure VS Code by editing mcp.json directly, use this format:
{
"servers": {
"cookieyes": {
"type": "http",
"url": "https://app.cookieyes.com/mcp"
}
}
}{
"servers": {
"cookieyes": {
"type": "http",
"url": "https://app.cookieyes.com/mcp"
}
}
}Windsurf
1. Open the command palette, search for Cascade MCP Registry, and select Devin: Cascade MCP Registry.
2. Click Edit config to open mcp_config.json.
3. In your mcp_config.json, paste your server configuration:
{
"mcpServers": {
"cookieyes-mcp": {
"url": "https://app.cookieyes.com/mcp"
}
}
}{
"mcpServers": {
"cookieyes-mcp": {
"url": "https://app.cookieyes.com/mcp"
}
}
}4. Save the file. The marketplace refreshes and lists your server under Installed with a Connect (or Error) status.
5. Click Connect next to cookieyes-mcp, then click Open in the modal that appears.
Zed Editor
- Open your project in Zed.
- In the agent chat sidebar, click the gear or plug icon in the top header to open the MCP configuration dropdown.
- Select Add Custom Server.
- Switch the configuration tab from Local to Remote.
- In the configuration editor, change the
some-remote-serverkey tocookieyesand set theurlvalue tohttps://app.cookieyes.com/mcp. - Remove the optional
authandheadersobjects from the definition. - Click Add Server in the bottom-right corner.
- Click Authenticate.
After you start the connection, you're redirected to the CookieYes authentication flow (the same for all clients). Log in or sign up, review the permissions, and click Allow. Once you see Your CookieYes account is now connected, return to your client.
Permissions & Access
The CookieYes MCP server uses OAuth 2.1 with PKCE to connect your client to your CookieYes account. When you connect, CookieYes issues your client a secure, scoped access token that it uses for all tool calls. Your CookieYes password and sensitive data such as personal information (PII), consent logs, and cookie values are never shared.
To check whether MCP access is enabled for your account, click the profile menu and go to Organisations & Sites. If MCP is enabled, an MCP enabled badge appears on the page. Any user can view this status, but only the account owner can change it (see Manage MCP Access below).

The account owner controls MCP access for the whole account using the Enable OAuth-based access toggle under profile menu > MCP access. Turning it on allows AI clients to connect; turning it off restricts access.

You can also revoke an AI client's access at any time, from either side:
From CookieYes: open profile menu > MCP access, find the client in the Connectors list, click Disconnect, and confirm.
From the client: remove the connection in the client's own settings.

Tools
The CookieYes MCP Server gives your AI assistant a set of tools to interact with your account. Tools are either read-only (retrieve data, no changes made) or write (create, update, or trigger actions). Your AI assistant will ask for confirmation before running any write tool, where the client supports it.
| Category | Tool | Type | Description | Example Prompts |
|---|---|---|---|---|
| Domains & Setup | list_domains | Read-only | List all websites in your CookieYes account | – Show all my sites. – Which of my sites have an inactive banner? |
| get_website_details | Read-only | Get detailed configuration for a specific domain. | – List my website details. – Show me the details for example.com. |
|
| get_embed_code | Read-only | Get the JavaScript install code for your site | – Give me the installation code for my site. – How do I install CookieYes? |
|
| Banner Management | list_banners | Read-only | List all consent banners configured on a domain | – Show me all my banners. – Which banners are active on my site? |
| get_banner_status | Read-only | Check if your cookie banner is live and active | – Is my banner live? – Is the installation code added to my site? |
|
| update_banner_colours | Write/delete | Update banner theme and colours | – Change my banner on example.com to dark theme. – Set the accept button to navy blue. |
|
| update_banner_layout | Write/delete | Change banner layout, position, and preference center style | – Move my banner to the bottom right – Change my banner position to top left. |
|
| Compliance & Scanning | get_scan_results | Read-only | View latest cookie scan results by category | – What cookies are on my site? – Show me all third-party trackers on example.com. |
| get_compliance_status | Read-only | Check which privacy laws and geo-targeting are enabled | – Is my site GDPR compliant? – What regulations am I covered for? |
|
| trigger_cookie_scan | Write/delete | Start a new cookie scan on your domain | – Run a new scan on my site – Scan my website for cookies. |
Security & Privacy Considerations
The CookieYes MCP server exposes both read-only tools (which retrieve data) and write tools (which change your banner configuration or trigger scans). Access is managed using OAuth 2.1 with PKCE, and only limited configuration data is available to the server. Sensitive data such as personal information, consent logs, and cookie values is never exposed.
Note
Most MCP clients, such as Claude, ask you to approve each tool call before it runs. Keep this enabled and review every call, especially write tools, which can modify your account. We also recommend connecting only verified clients or custom clients you trust. Remember that an account owner must enable MCP access before any client can connect.
For more details, refer to the privacy policy:👉 Privacy Policy - CookieYes
If you need help with setup or troubleshooting, contact CookieYes support:👉 Contact - CookieYes
Use Cases
User prompt: “Is my banner active?”
What happens:
- The server retrieves the banner installation and display status.
- Returns whether the banner is active or inactive.
- Suggests retrieving the install code if the banner is not detected.
User prompt: “Scan my site for cookies”
What happens:
- The server checks scan availability for the selected domain.
- Requests confirmation (if required) before starting the scan.
- Initiates a cookie scan.
- Returns scan status (e.g., queued or in progress).
- Allows you to retrieve results once the scan is complete.
User prompt: “Change my banner to dark theme”
What happens:
- If multiple domains exist, you’re prompted to select a domain.
- The server validates the requested change.
- Asks for confirmation before applying the update.
- Updates the banner configuration.
- Applies changes immediately and makes them visible on your website.
User prompt: “Check my GDPR configuration”
What happens:
- The server retrieves the consent template and geo-targeting settings.
- Returns the applicable regulations (e.g., GDPR, CCPA).
- Confirms banner installation status.
- Includes a note that this is a configuration check, not legal advice.
User prompt: “Which of my sites have inactive banners?”
What happens:
- The server retrieves all domains in your account.
- Returns banner status for each domain.
- Highlights domains with inactive or missing banners.
- Allows you to select a domain for further actions.
Frequently Asked Questions
CookieYes MCP Server is a hosted server that lets AI assistants and IDEs (Claude, ChatGPT, Cursor, VS Code, and more) securely access your CookieYes account through the Model Context Protocol (MCP). It relays your natural-language requests to a defined set of tools, so you can manage cookie consent and compliance without opening the dashboard.
Not quite. The MCP server is the single hosted service that any MCP-compatible client connects to. "Connector" is Claude's own term for how it adds an MCP server, so in Claude you connect to the CookieYes MCP Server as a connector. Other clients (Cursor, VS Code, and others) connect to the same server through their own MCP settings.
Yes. Access uses OAuth 2.1 with PKCE, so your CookieYes password is never shared, and only limited configuration data is available to the server, sensitive data such as personal information, consent logs, and cookie values is never exposed. Most clients also ask you to approve each tool call before it runs, and an account owner must explicitly enable MCP access before any client can connect.
Yes. It's available on all CookieYes account types, including the Free plan, with no paid subscription required to connect. Some tools have plan-based usage limits, though, for example, the number of cookie scans you can trigger per domain per month increases on paid plans.
The CookieYes MCP server is granted secure, limited access to specific configuration data from your account, only what is required to support the integration.
What the MCP server can access:
- Domain-level configuration: banner status and settings for your connected domains.
- Your domains and banner configurations: layout, position, colour settings, and compliance template.
- Cookie scan metadata and results: Pages scanned, total number of cookies and total scripts identified in your last scan.
What the MCP server cannot access or process:
- Personal data (PII), consent logs, or visitor data: individual consent records are never exposed.
- Cookie values, session data, or user identifiers: only metadata is returned, never the actual cookie values.
- Legal content: your cookie policy text, banner heading, or any legal copy is blocked.
- Billing information, account credentials, or team data: payment details, passwords, and team member information are never accessible.
No. The CookieYes MCP server currently operates in English only.