Configuration Guide for AccessiYes Accessibility Widget
Last updated on May 7, 2026
Overview
The AccessiYes Accessibility Widget is a no-code accessibility solution designed for WordPress websites, enabling site owners to offer user-facing accessibility controls with minimal effort. It supports compliance with key global accessibility regulations, including the ADA (Americans with Disabilities Act), the European Accessibility Act (EAA) and the WCAG (Web Content Accessibility Guidelines). This configuration guide provides a step-by-step walkthrough of the plugin’s dashboard and features. It covers how to navigate the interface, enable or disable the widget, set the display language, customise the widget’s appearance and position, link to an accessibility statement and optimise settings to align with accessibility compliance standards.
Accessing the Dashboard
To begin configuring the AccessiYes Accessibility Widget, log in to your WordPress admin panel. From the sidebar menu, navigate to AccessiYes. This will open the widget dashboard, which is divided into two main tabs:
- Customise Widget – Manage the visual appearance, position, icon and language of the widget.
- Statement – Generate and manage your website’s accessibility statement.
- Settings – Control device visibility, link your accessibility statement and manage general behaviour.
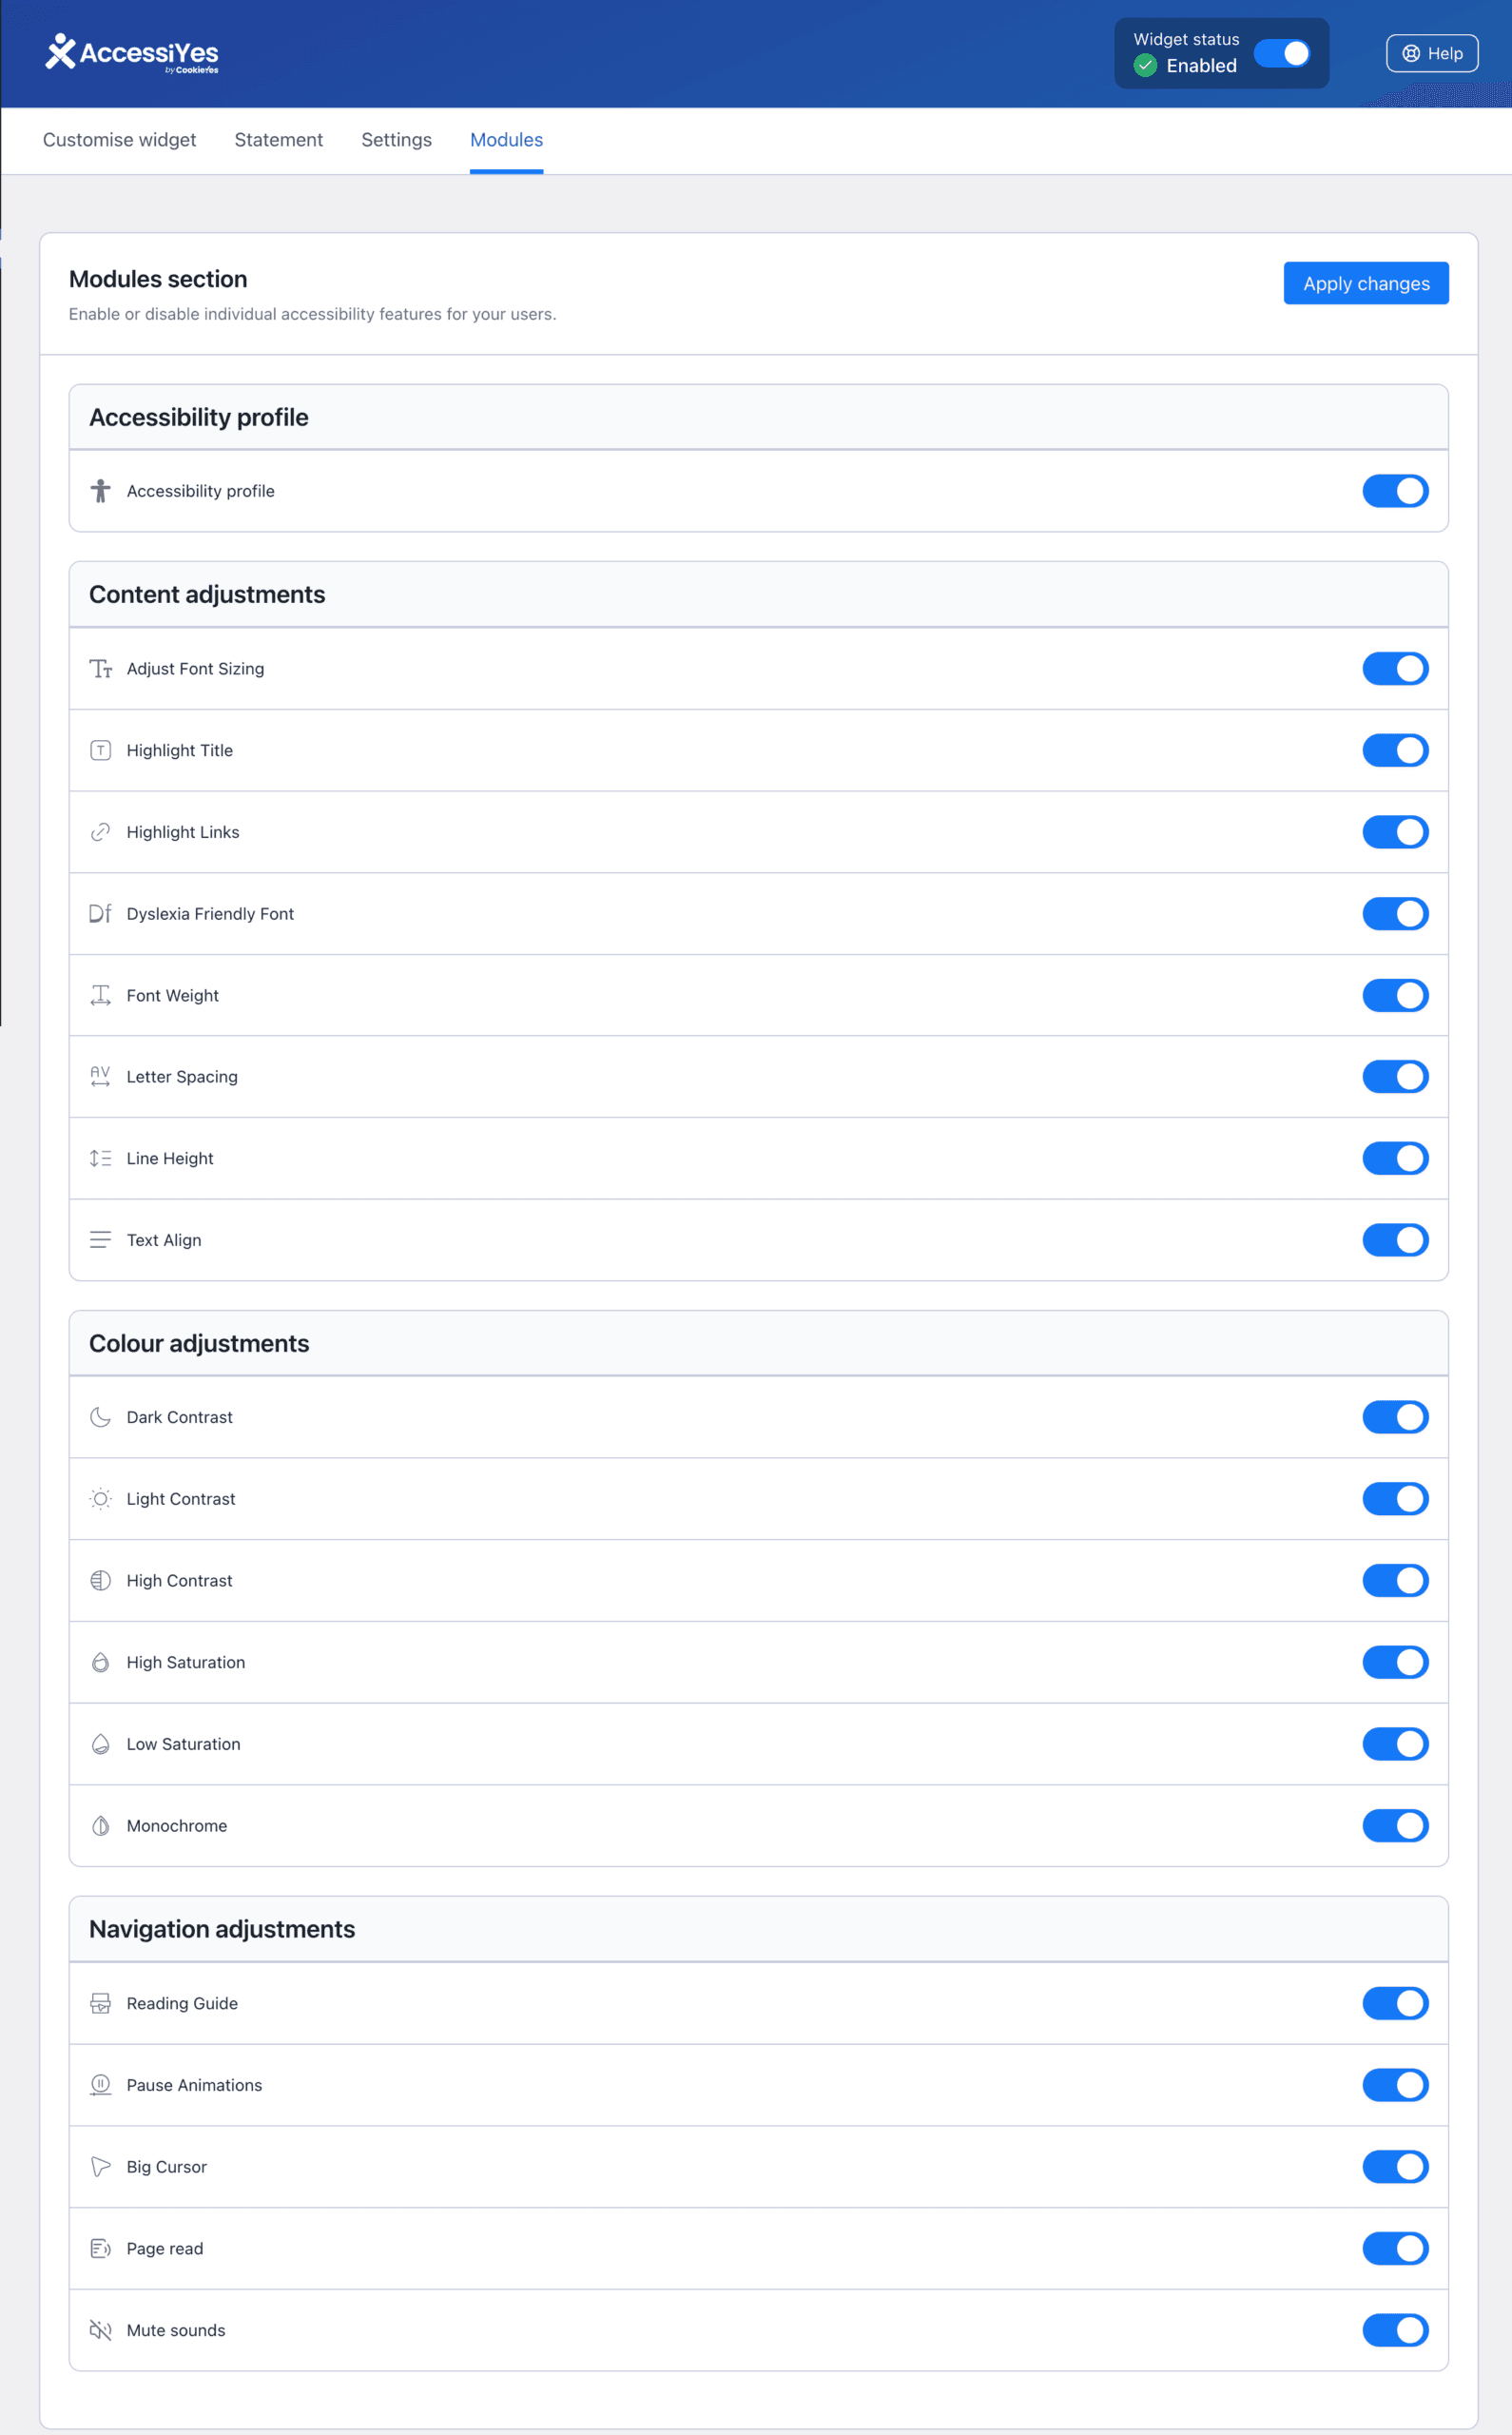
- Modules – Enable or disable individual accessibility features based on what you want to provide for your website users.
Widget Status
At the top-right corner of the plugin dashboard, you’ll find the Widget Status toggle. This functions as a global enable/ disable toggle for the accessibility widget.
- When Enabled, the widget will be active across your site based on the desktop and mobile settings configured in the Settings tab.
- When Disabled, the widget will not be displayed on any device, regardless of individual settings.

Always verify the widget is set to Enabled after changes, especially before pushing updates live, to ensure users can access the accessibility tools.
Customise Widget Tab
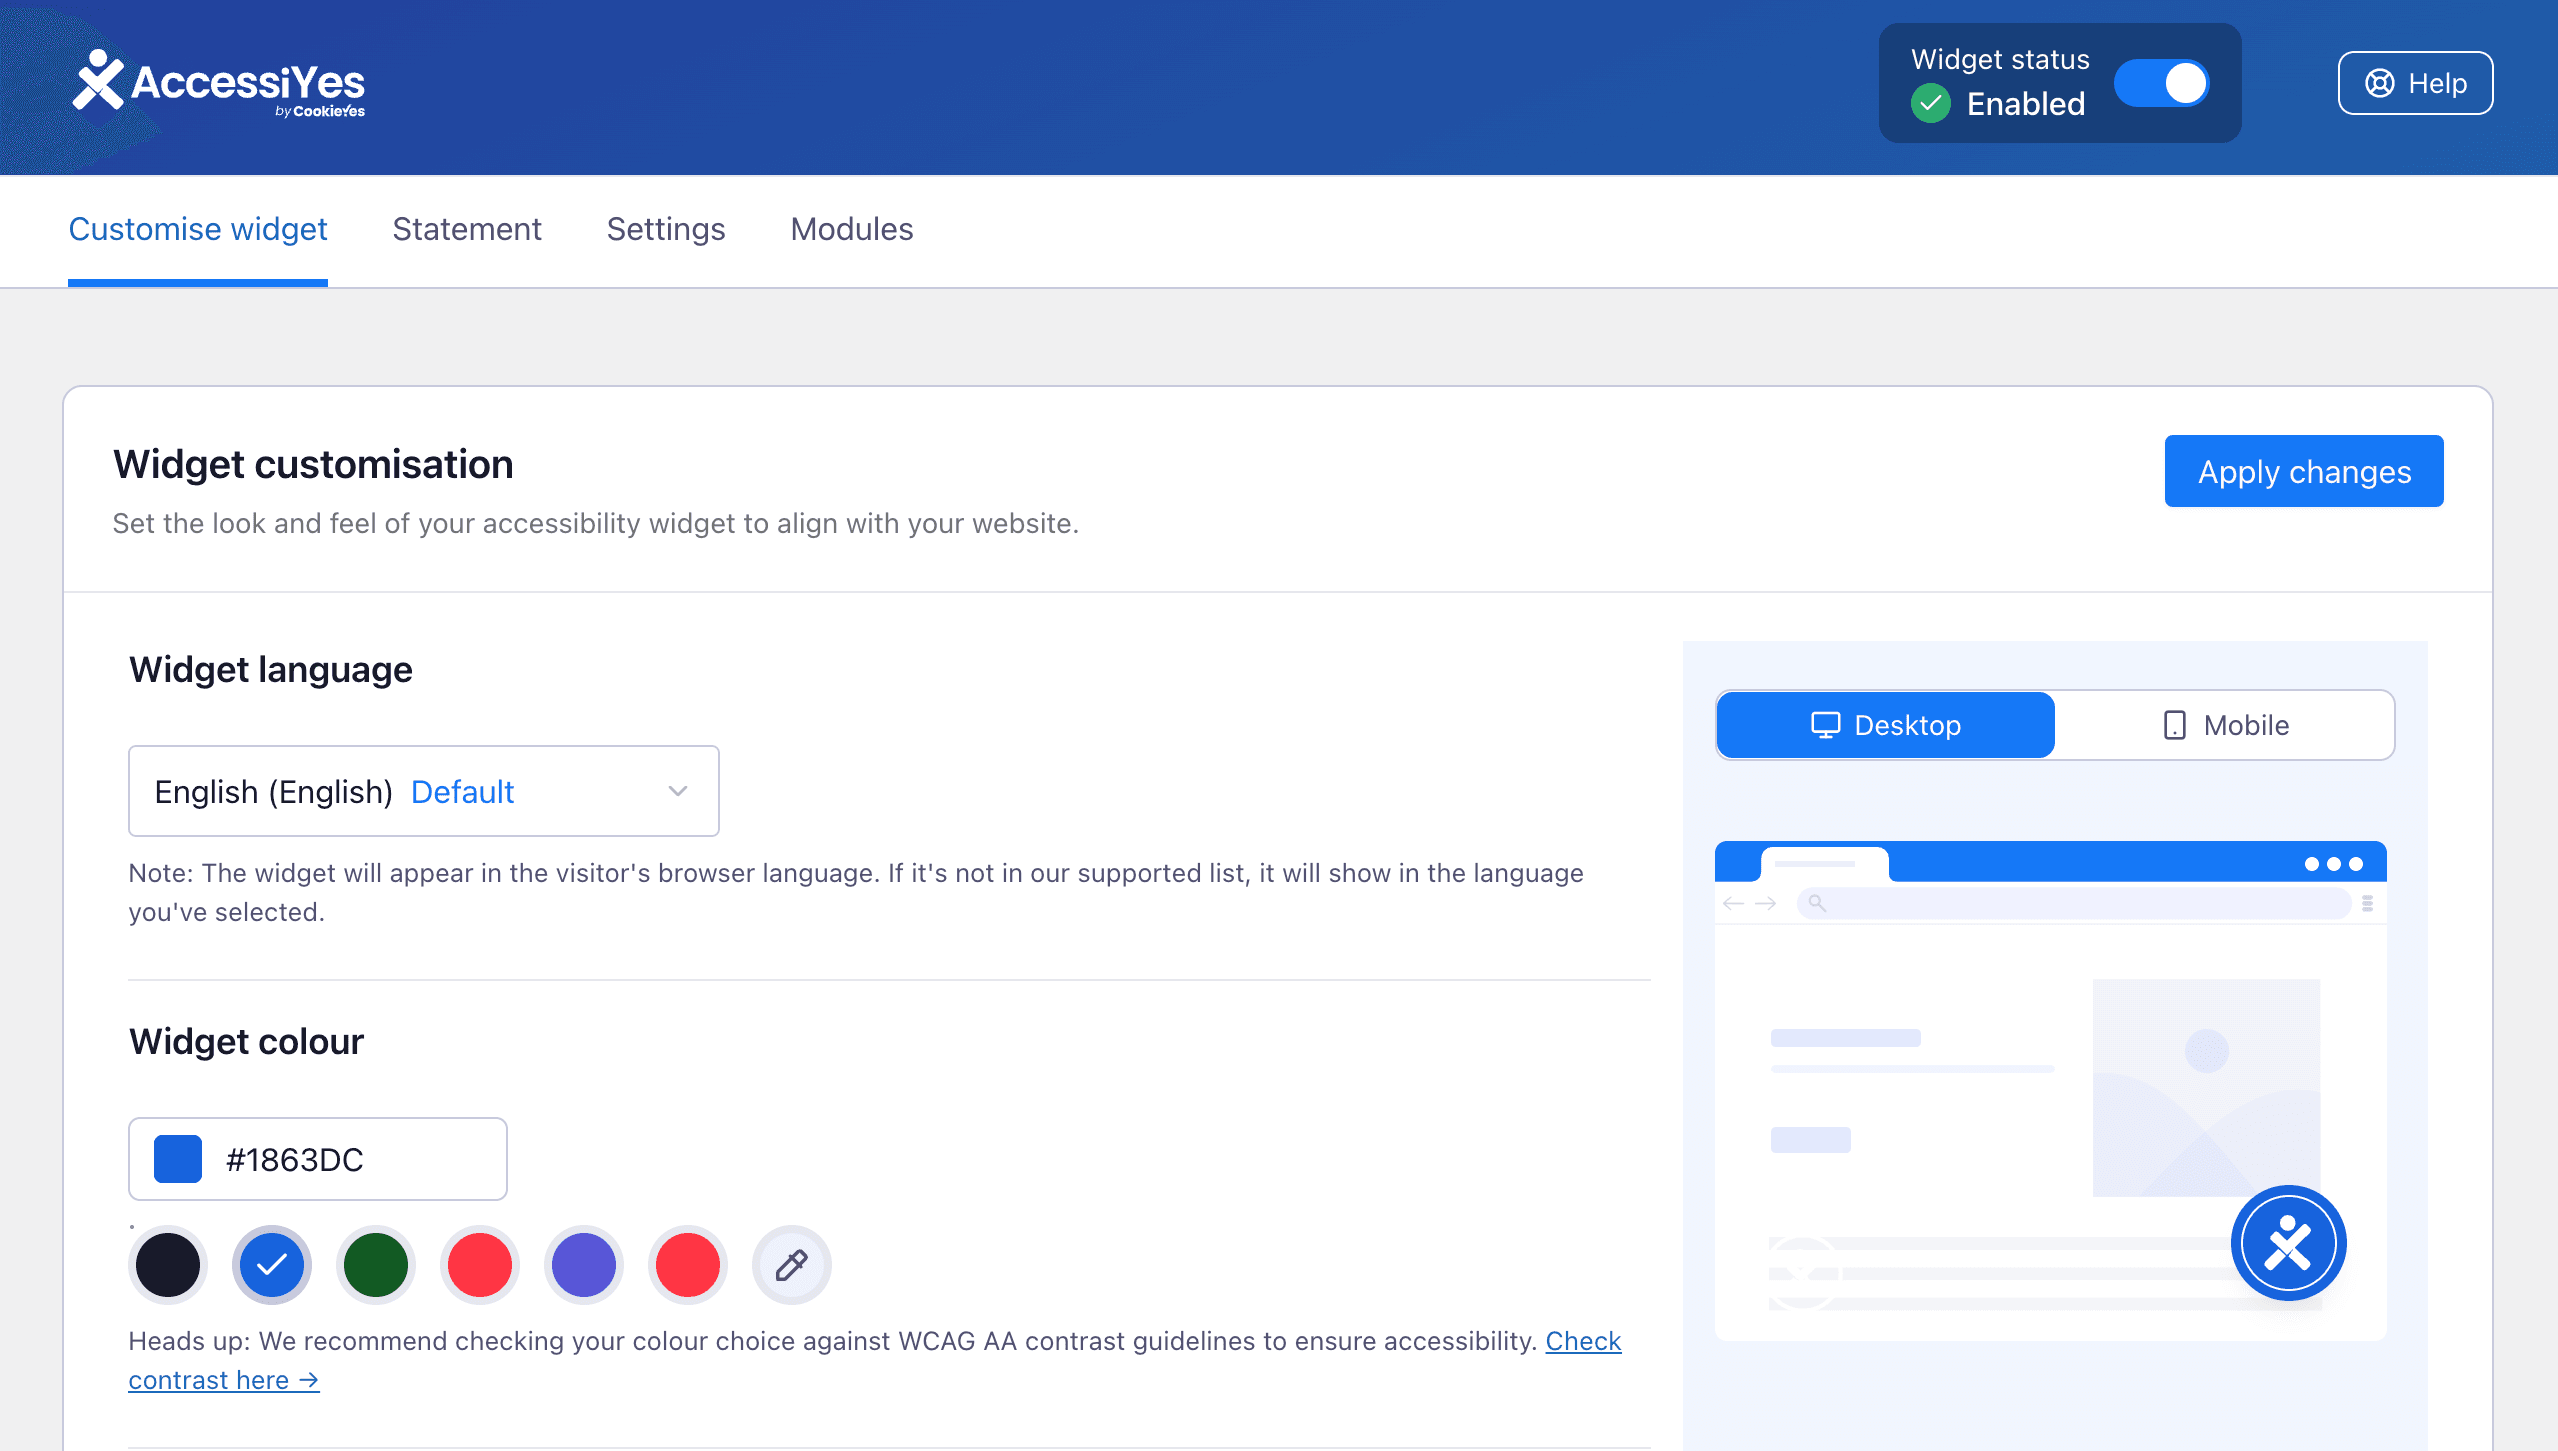
The Customise Widget tab allows you to configure the visual presentation, language, icon, and positioning of the AccessiYes Accessibility Widget. These settings define how the widget appears to end users and ensure that it aligns with your site’s accessibility and branding goals.
Widget Language
The Widget Language setting allows you to select the fallback language for the widget interface using the dropdown menu.
When the widget loads, it first checks the site language configured in WordPress:
- If the site language is supported by AccessiYes, the widget will automatically display in that language.
- If the site language is not supported, the widget will fall back to the language you selected in the widget settings.
For instance, if your site is set to Spanish (which isn’t supported by the widget), and you’ve selected English as the fallback, the widget will be displayed in English.
The fallback language does not override a supported site language—it is only used when the site’s language is unsupported by AccessiYes.
Widget Colour
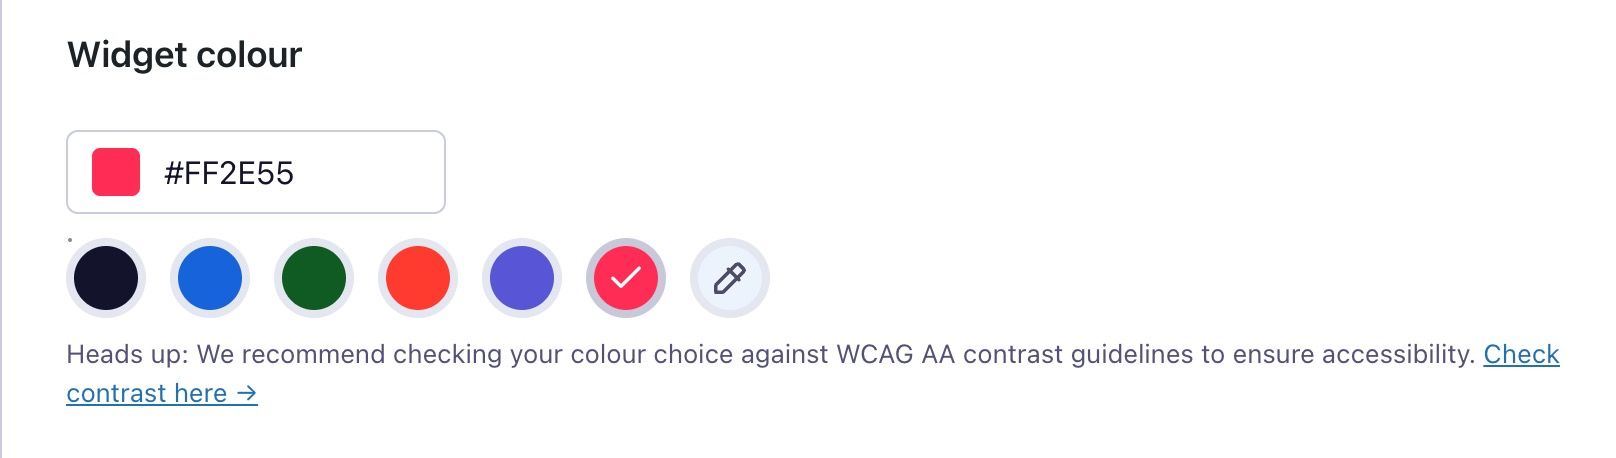
The Widget Colour setting allows you to personalise the appearance of the accessibility widget to align with your site’s branding while ensuring sufficient contrast for readability.

You can choose the widget’s colour using either:
- Predefined Colour Options: Click one of the preset colour swatches provided for quick selection.
- Custom Colour Picker: To apply a custom colour, click the edit icon next to the colour swatches. This opens a colour picker tool where you can either manually adjust the colour or enter a specific hex code or RGB values for precise control.
- Use high-contrast combinations to support users with low vision or colour blindness.
- You can cross-check your selection using the WebAIM Contrast Checker.
Warning: A widget that blends too closely with the background or doesn’t meet accessibility standards may make key controls difficult to locate or use for some users.
Widget Icon
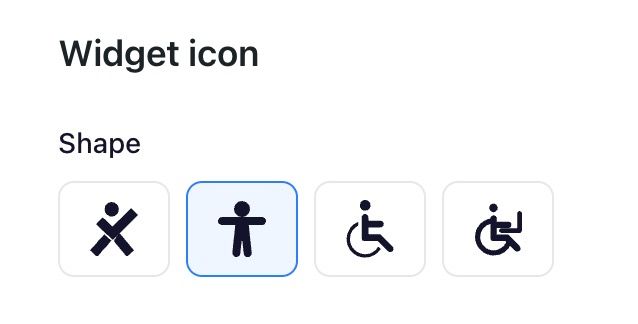
The Widget Icon setting allows you to customise the visual symbol that represents the accessibility widget on your site. This icon serves as a key entry point for users seeking accessibility options, so it’s essential that it’s both recognisable and inclusive.
You can choose from four icon shapes:

In addition to shape, you can adjust the size of the icon to suit your site’s layout and visibility preferences:
- Small
- Medium
- Large
These size options allow you to maintain balance with other interface elements without compromising visibility or usability.
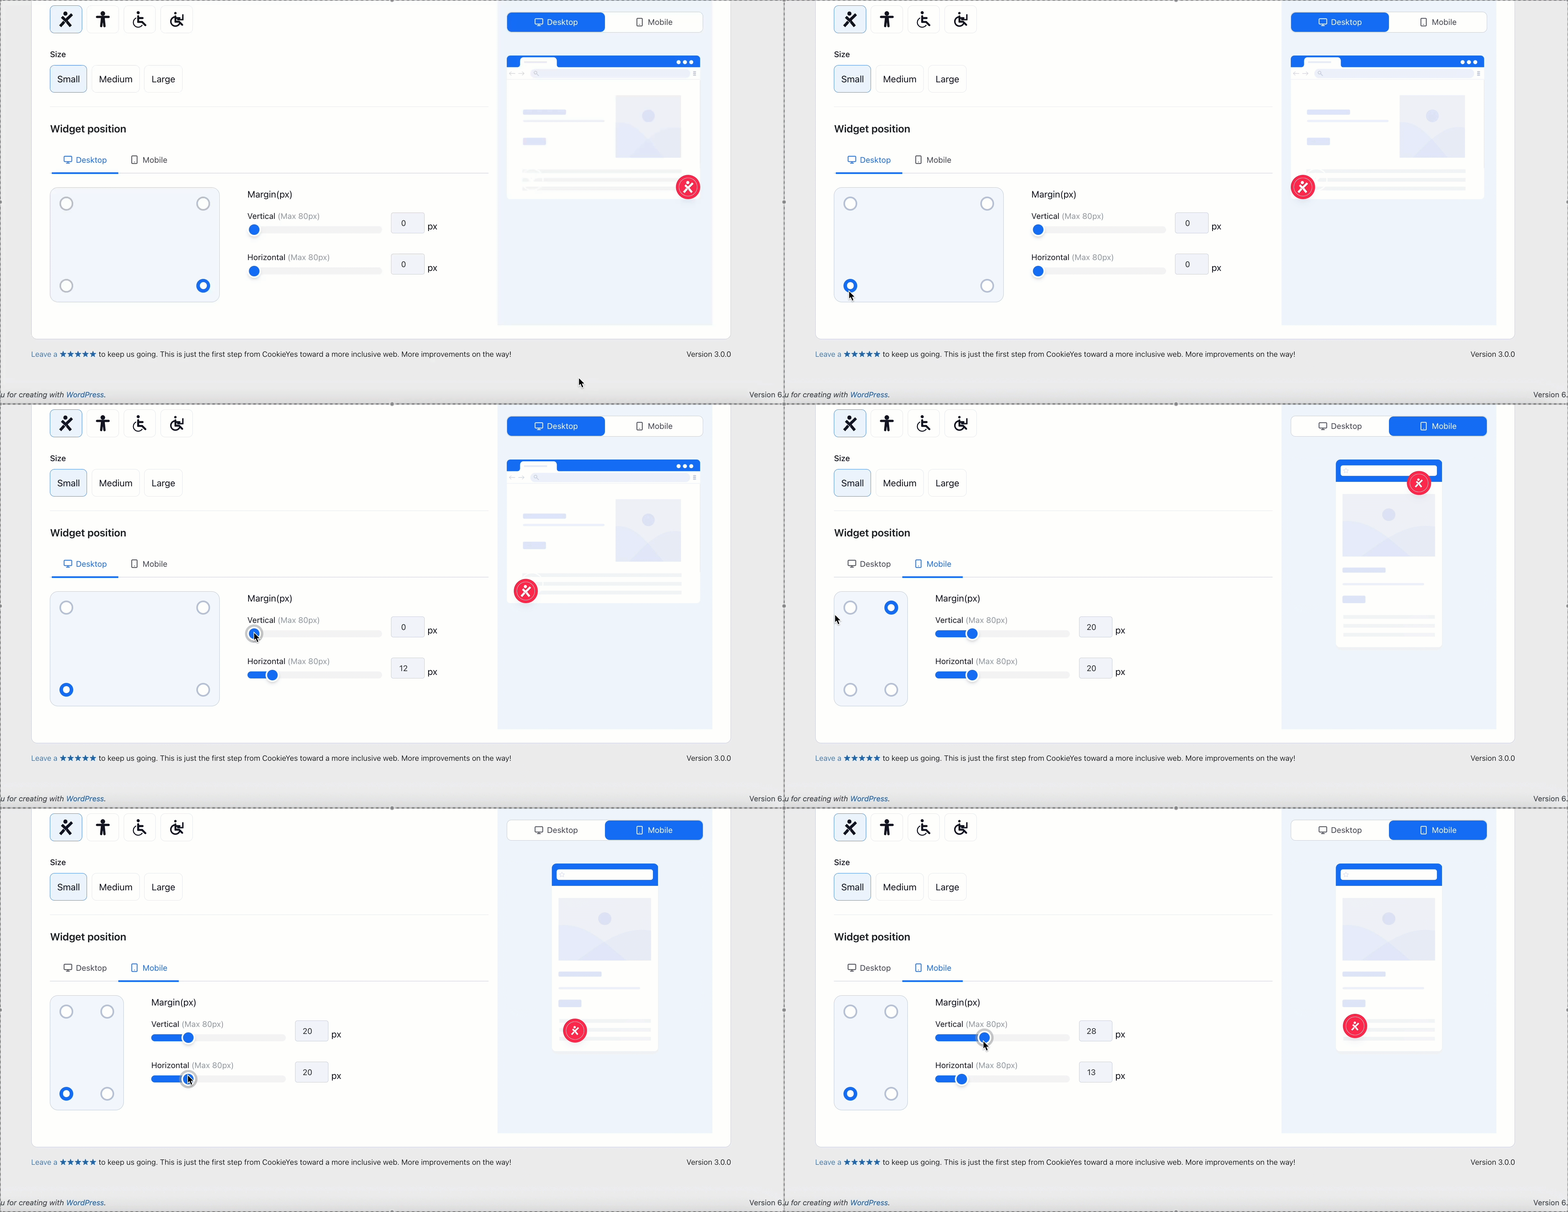
Widget Position
The Widget Position setting allows you fine-tune where the widget appears on the screen. This ensures it remains visible and accessible without interfering with key user interface elements.
You can independently configure positioning for both desktop and mobile devices, providing flexibility to accommodate various layouts.
Positioning Controls:
- Vertical Margin: Set the distance from the top or bottom edge of the screen (range: 0–80px).
- Horizontal Margin: Set the distance from the left or right edge of the screen (range: 0–80px).
You can choose any corner of the screen—top-left, top-right, bottom-left, or bottom-right—then use the sliders to precisely adjust the widget’s placement within that quadrant.

After adjusting the position, test the widget on various screen sizes using screen readers and keyboard navigation. Make sure it does not obscure or overlap with other fixed elements, such as chat buttons, sticky headers, or footers.
Statement Tab
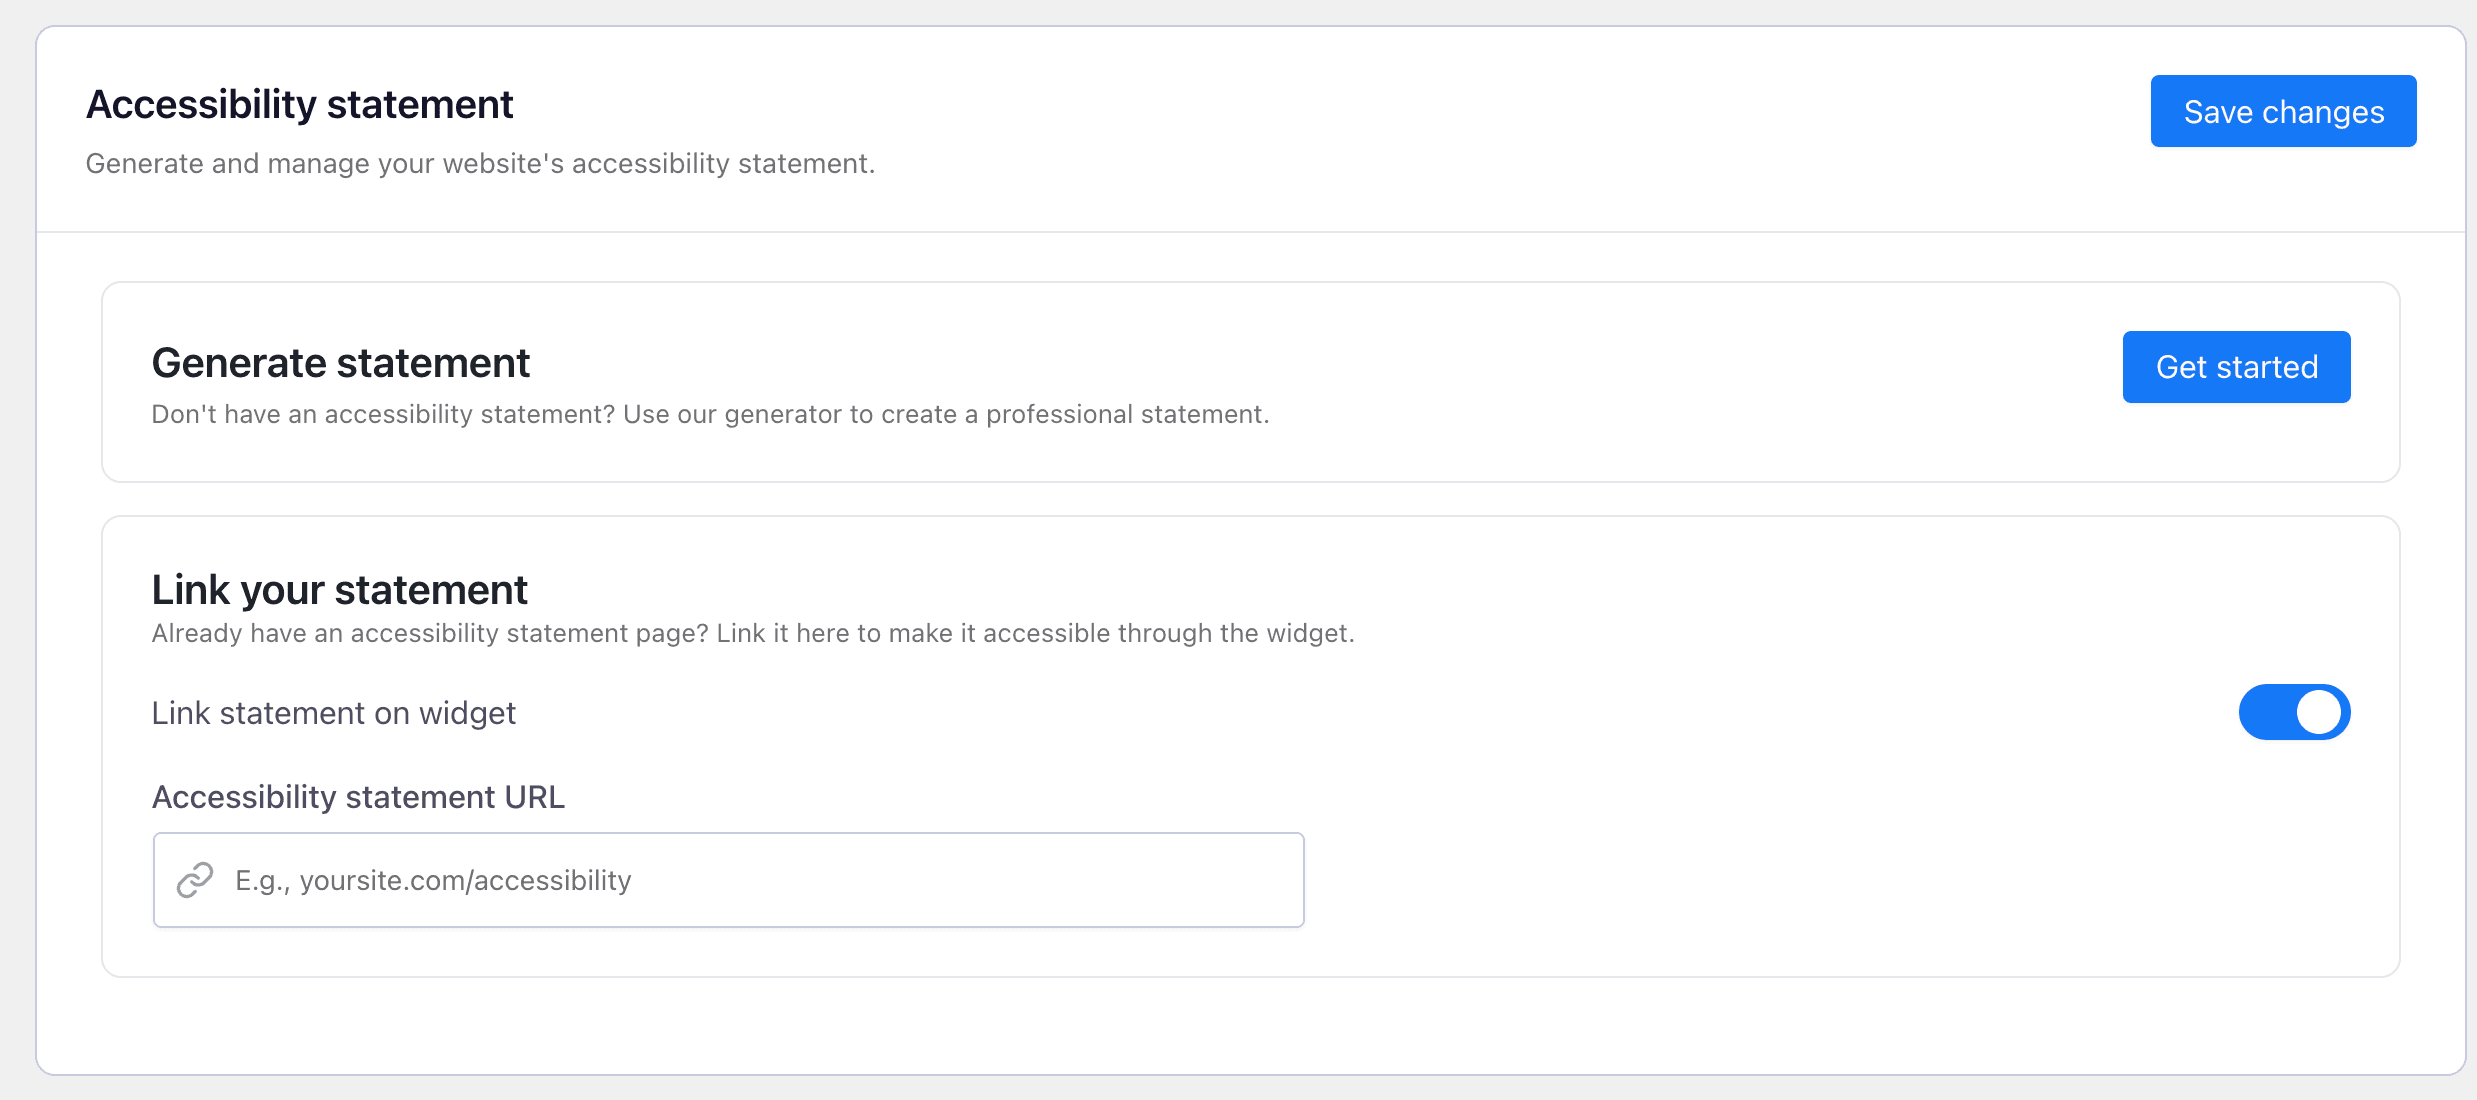
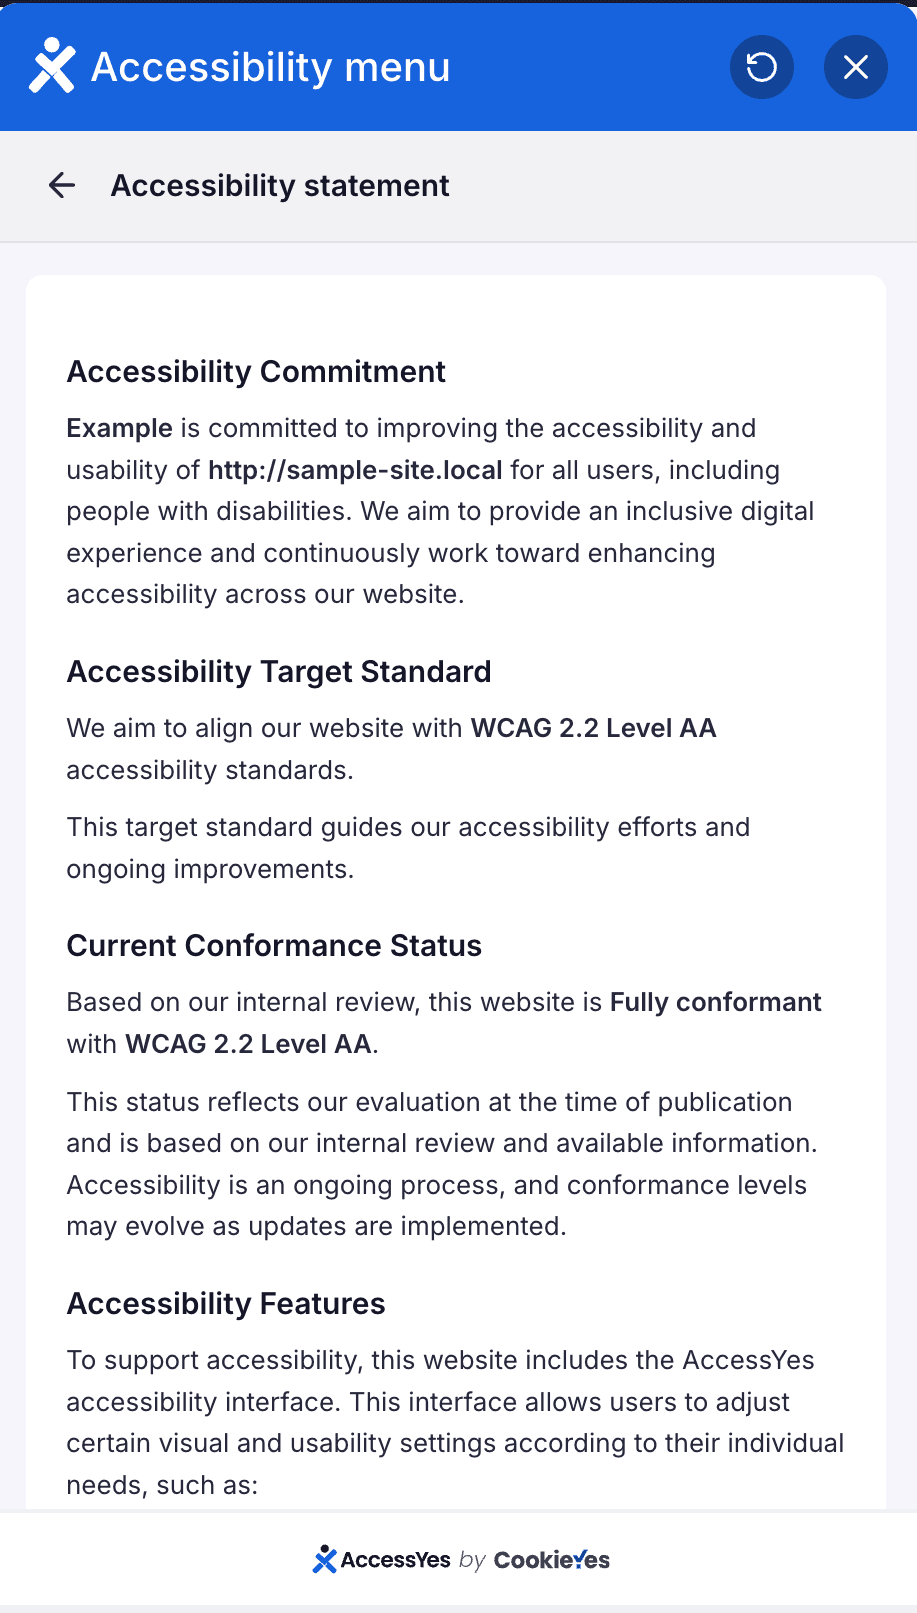
The Statement tab allows you to create, manage, or link your website’s accessibility statement directly within the AccessiYes dashboard.
An accessibility statement communicates your commitment to digital accessibility, outlines the standards you follow, and provides users with a way to report accessibility barriers.
You can either generate a new statement using the built-in generator or link to an existing accessibility statement page on your website.

To begin, click Get started in the Generate statement section.
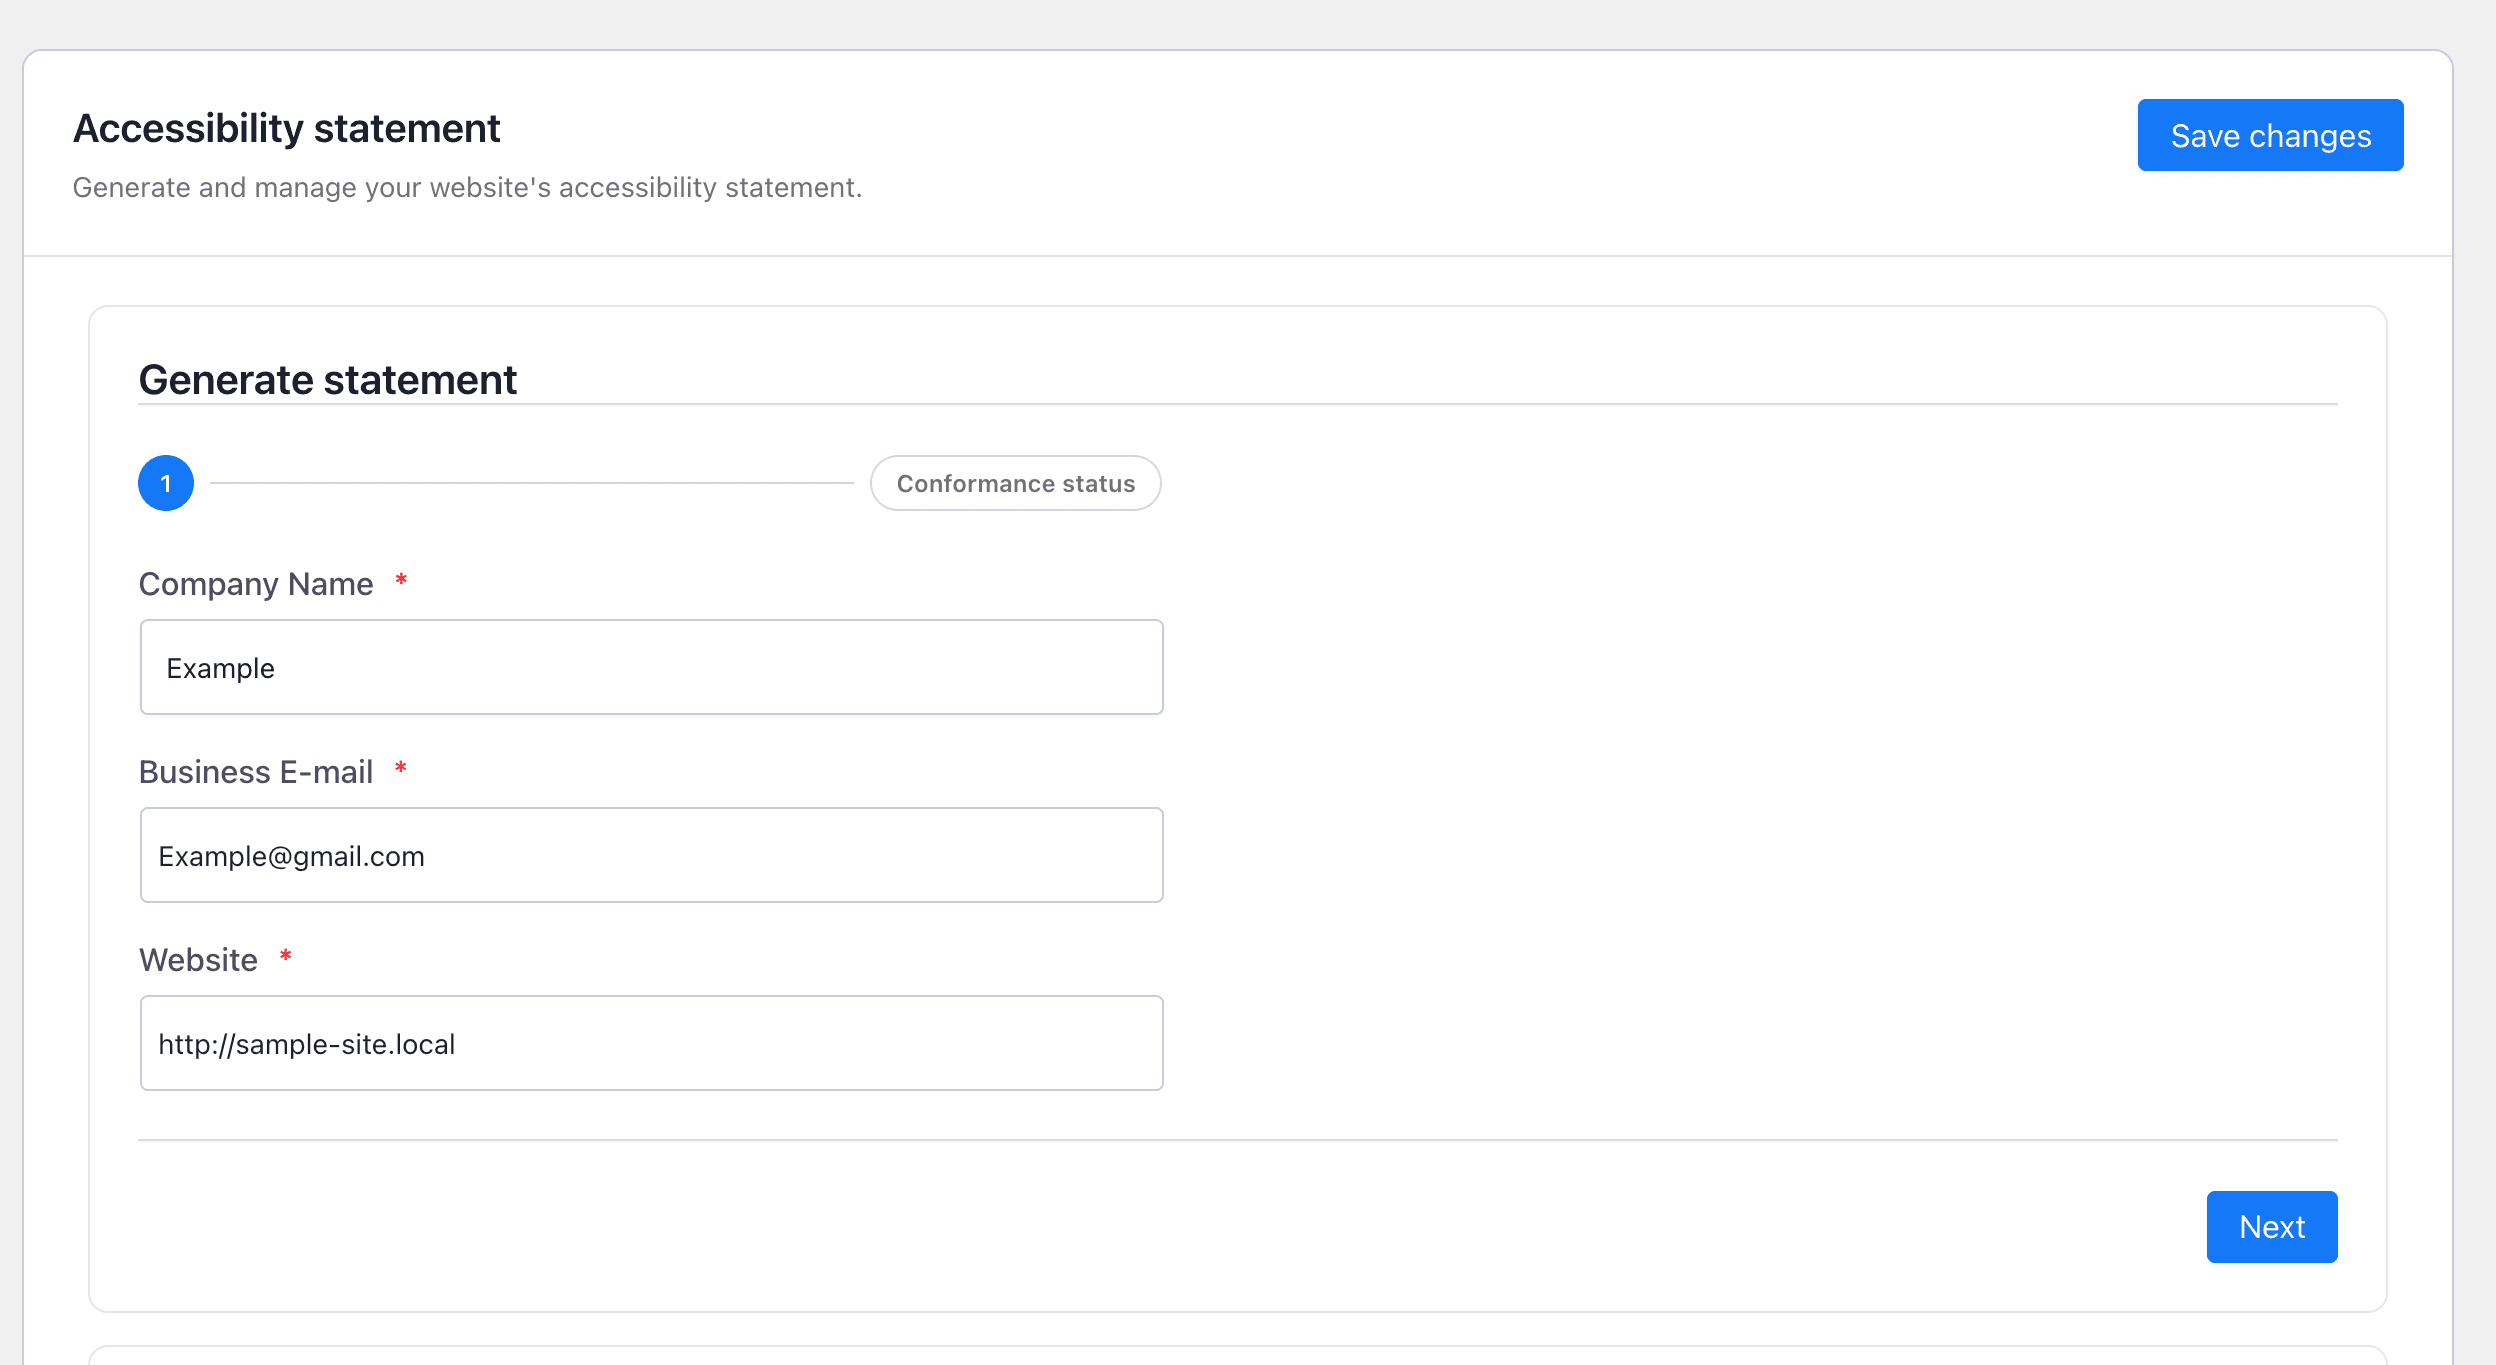
Step 1: Company Information
In the first step, you must provide basic details about your organisation and website.

Required fields include:
- Company Name: Enter the official name of your organisation or business.
- Business E-mail: Provide a contact email address where users can report accessibility issues or request assistance.
- Website: Enter the full URL of the website that the accessibility statement applies to.
These details are used within the generated accessibility statement to identify your organisation as the owner of the website and provide users with a way to contact you regarding accessibility issues.
After entering the required information, click Next to continue.
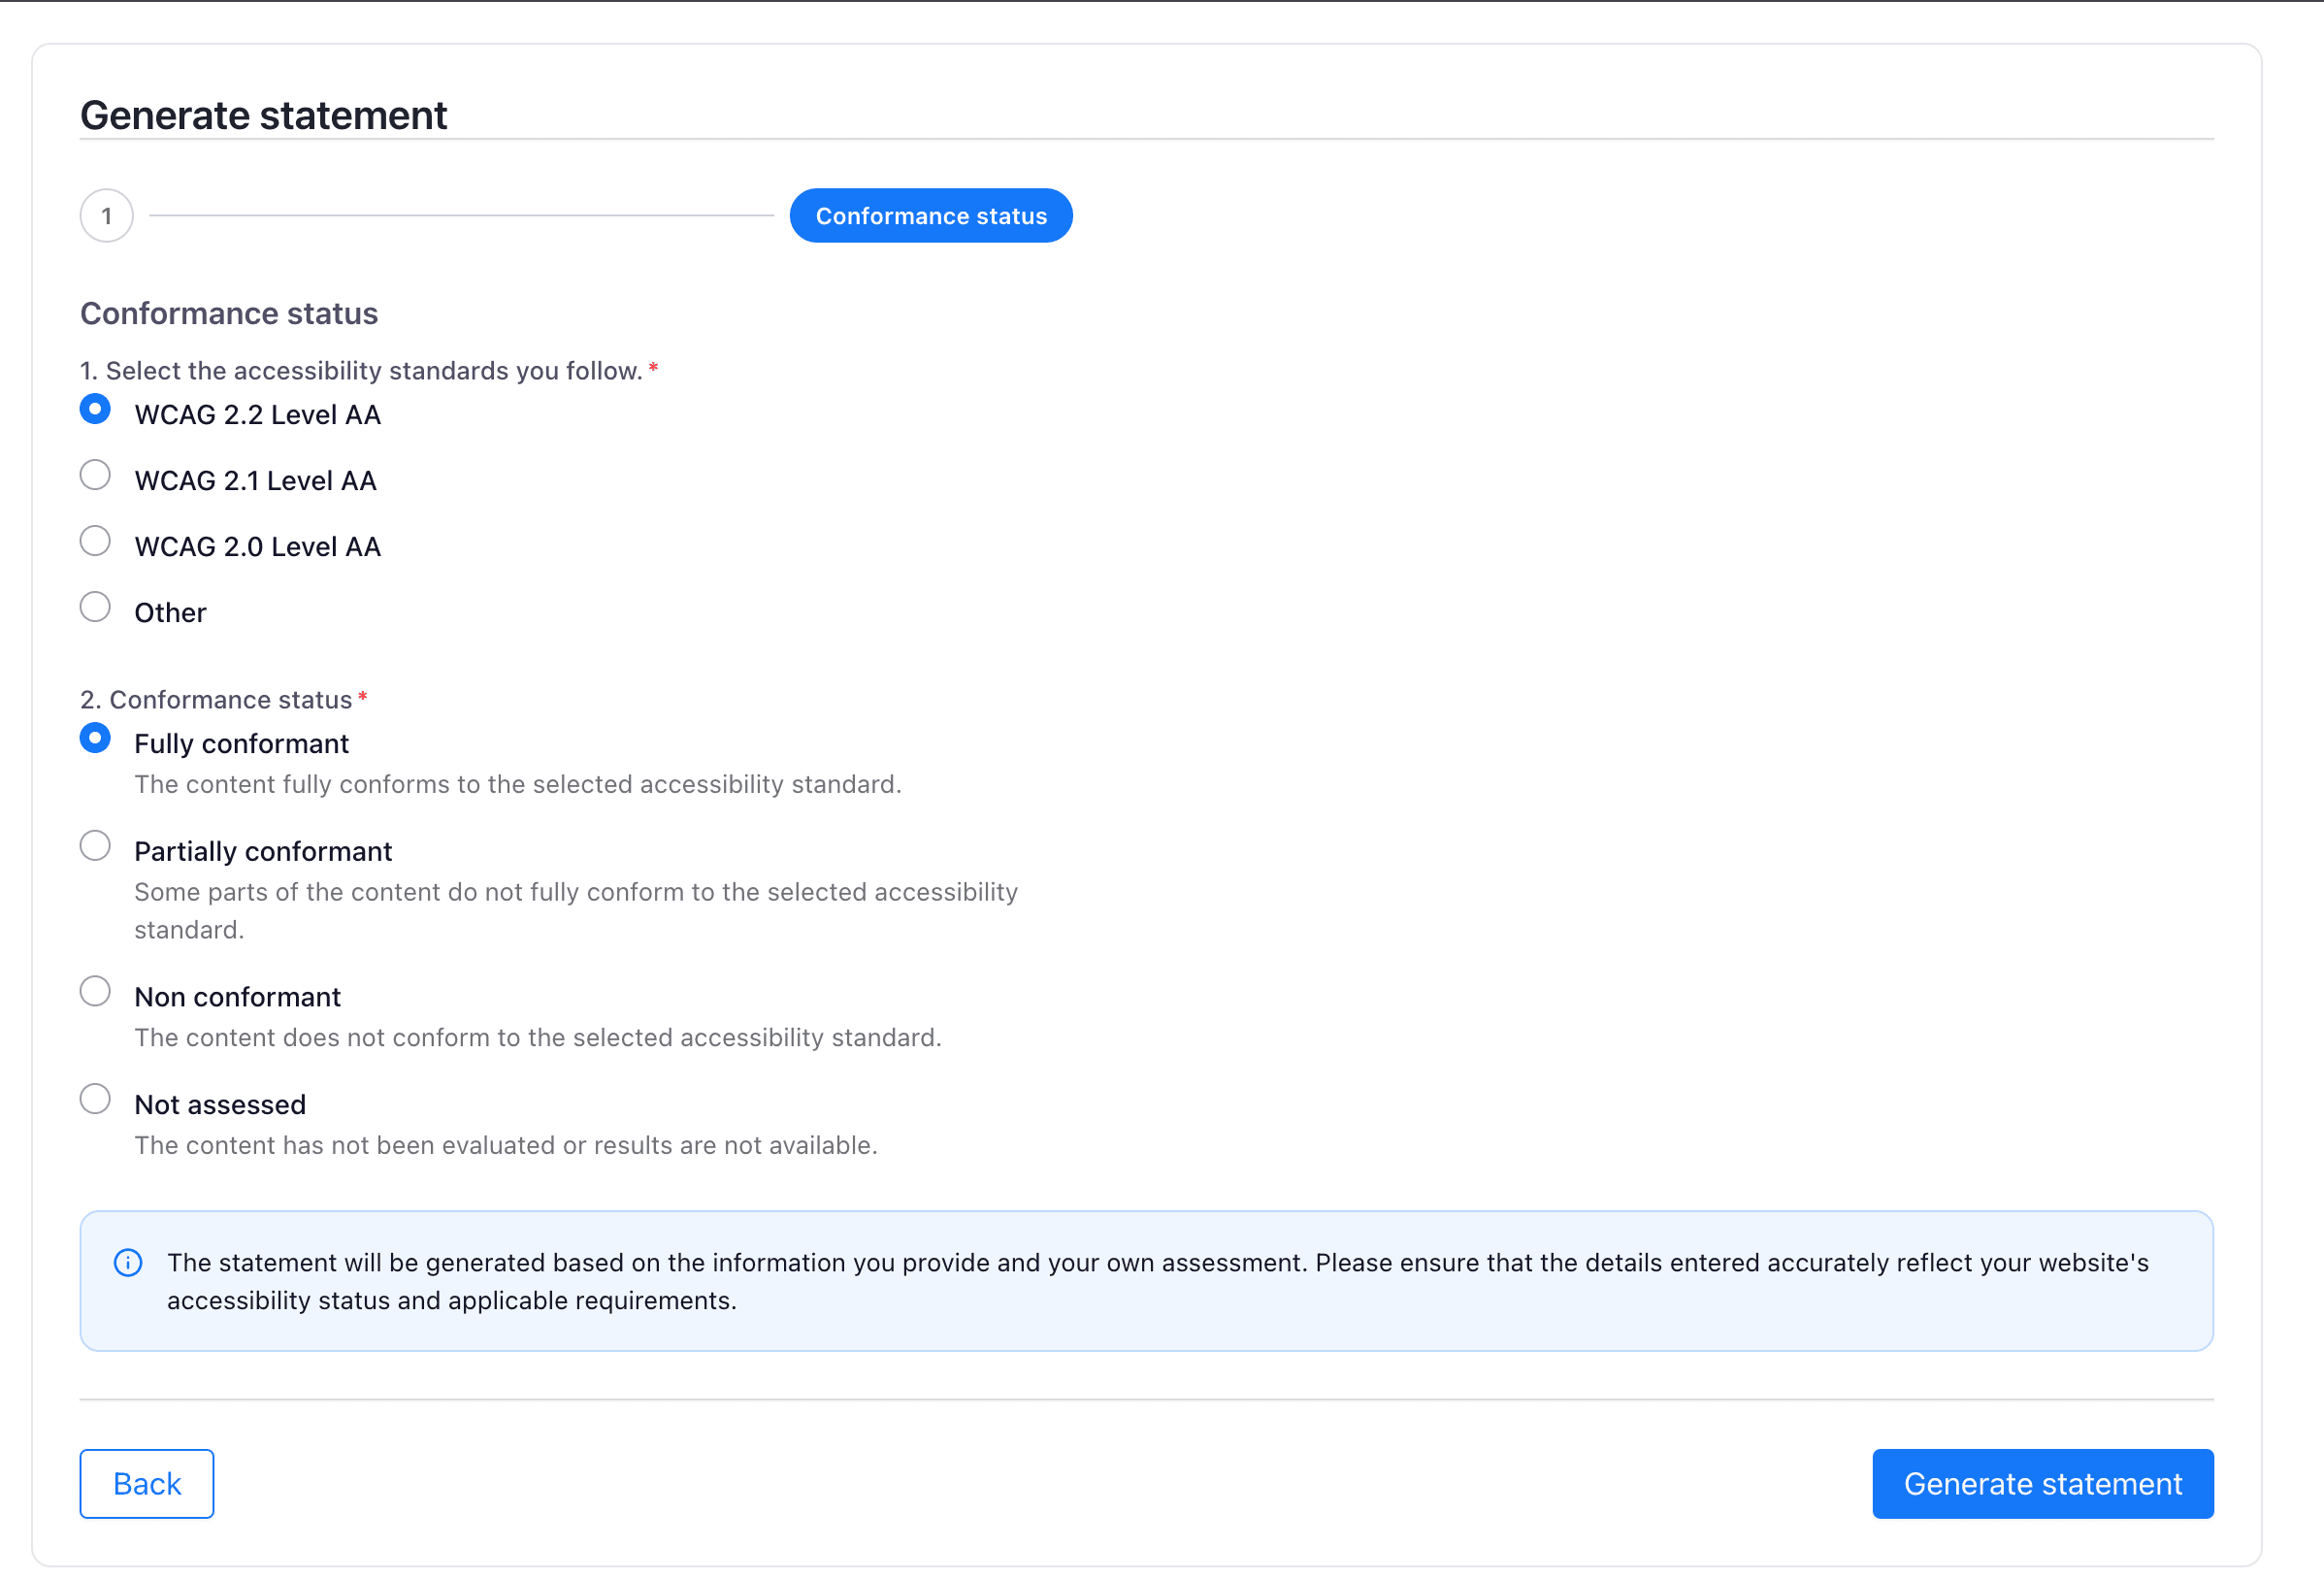
Step 2: Conformance Status
The Conformance Status step allows you to specify the accessibility standard your website follows and its level of compliance.

Once you select the appropriate options, click Generate Statement.
The system will generate an accessibility statement based on the information provided and your selected conformance level.
The statement is generated using the information you provide. Ensure the details accurately reflect your website’s accessibility status and applicable standards.
Link Your Statement
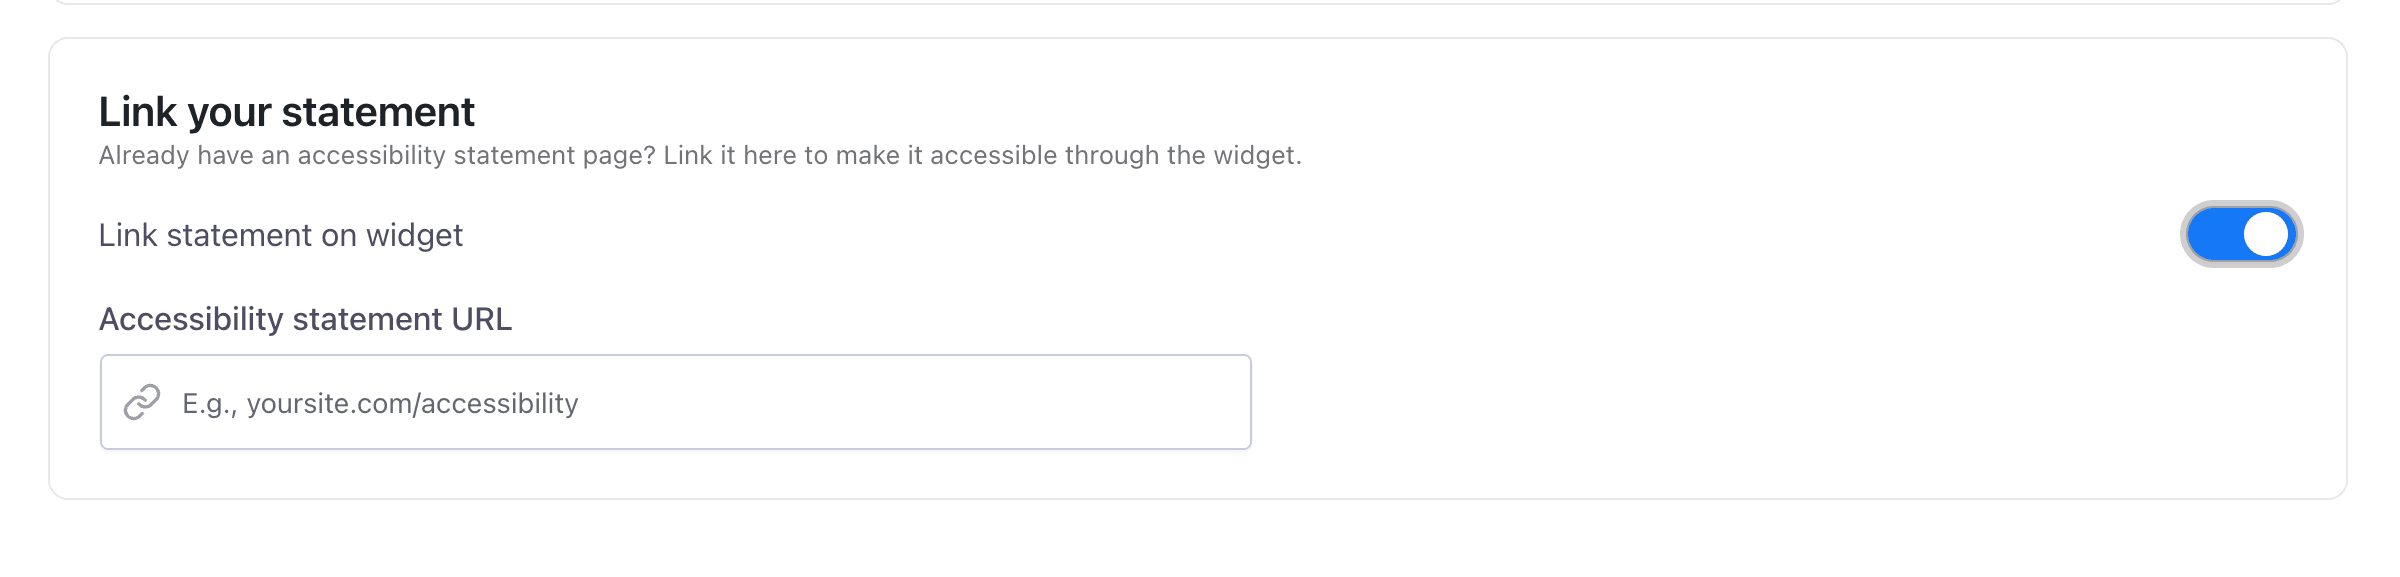
If you already have an accessibility statement published on your website, you can link it to the AccessiYes widget instead of generating a new one.

Link Statement on Widget
Enable the Link statement toggle to display a link to your accessibility statement directly from the accessibility widget.

Accessibility Statement URL
Enter the URL of your existing accessibility statement page.
Example: yoursite.com/accessibility
Once linked, users can easily access your accessibility statement from the widget interface.
Save Changes
After configuring the statement settings, click Save changes to apply your updates.
Settings Tab
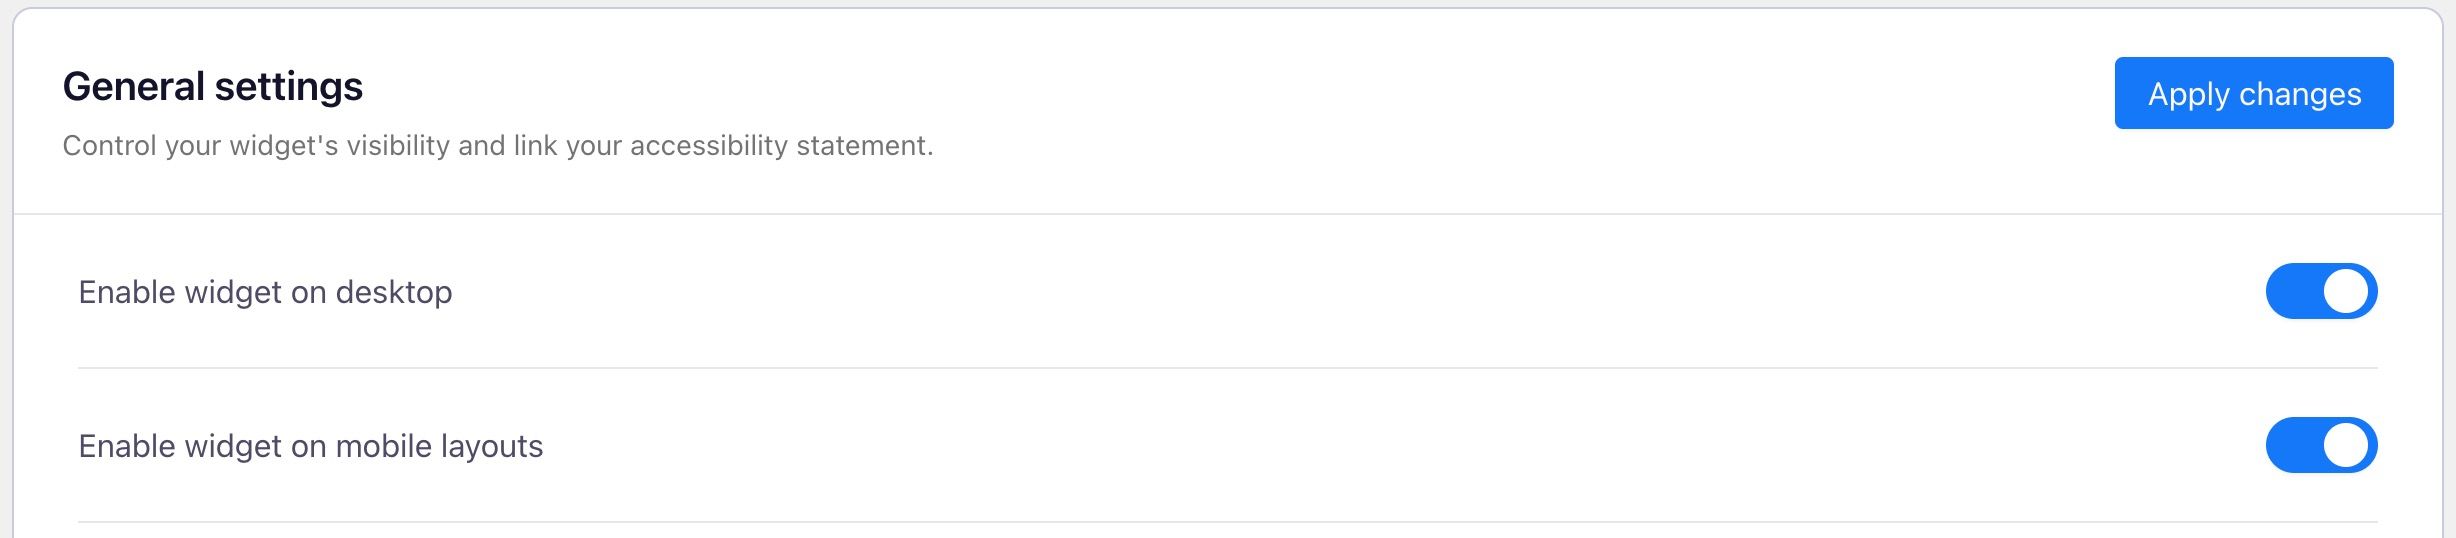
The Settings tab allows you to control how and where the accessibility widget is displayed, and to link your site’s accessibility compliance resources.
Enable/Disable Per Device
You can choose whether to show the widget on desktop and/or mobile devices independently:
- Enable on desktop: Toggle this on to make the widget visible on desktop and larger screen layouts.
- Enable on mobile layouts: Toggle this on to display the widget on smartphones and tablets.
- Enable keyboard shortcut access: Toggle this on to allow keyboard users to open the widget instantly using Option + A (for Mac) / Alt + A (for Windows), without needing to navigate to the widget icon using the Tab key.

This flexibility ensures the widget integrates seamlessly with your site’s responsive design.
To meet guidelines such as WCAG 2.1 AA and the European Accessibility Act (EAA), the widget should be available on all device types. Avoid disabling it on mobile unless absolutely necessary for usability reasons.
Apply Changes
After configuring any widget settings, click the Apply changes button located in the top-right corner of the settings panel. This action saves your configuration and ensures all updates are reflected in the live widget.
Modules Tab
The Modules tab allows you to control which accessibility features are available in the widget for your users. Instead of displaying every available feature, you can enable or disable individual features based on your website’s specific requirements. This helps you provide only the most relevant accessibility feature, creating a cleaner and more focused experience for your visitors.

Accessibility Profiles
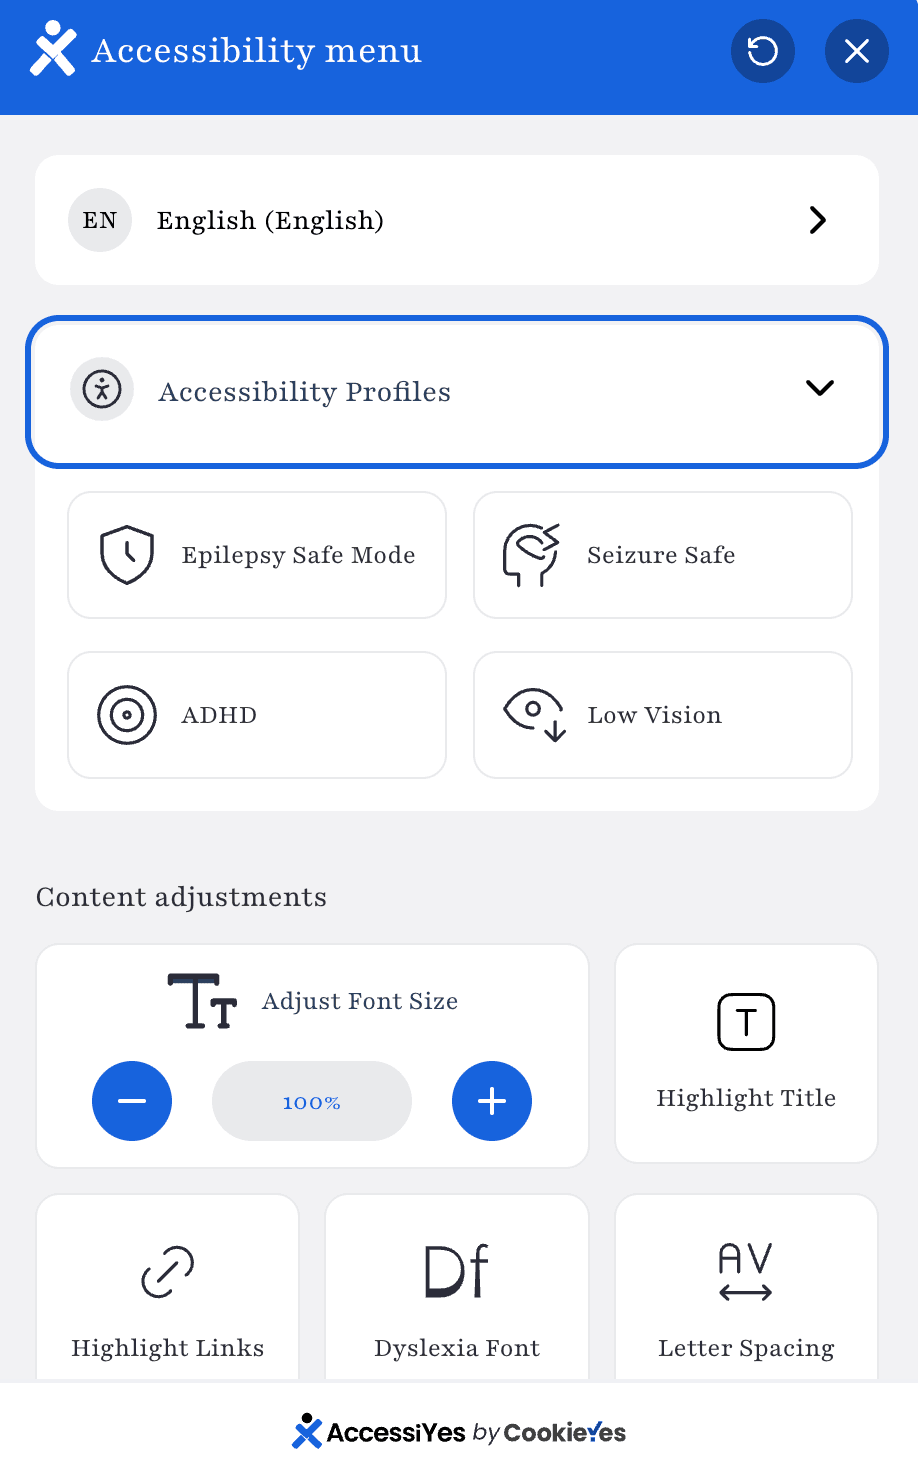
The Accessibility Profiles feature allows users to quickly apply a set of accessibility adjustments tailored to specific accessibility needs. When a profile is selected, the relevant accessibility features are automatically enabled to provide a more suitable browsing experience without requiring manual adjustments.

For example, when Epilepsy Safe Mode is enabled, features such as Monochrome, Mute Sounds, and Pause Animations are automatically turned on to create a safer and more comfortable browsing experience for users with epilepsy. This helps users personalise their experience faster and makes the widget more convenient and user-friendly.
Conclusion
Configuring the AccessiYes accessibility widget gives you full control over how it appears and functions across your site. From customising the language and design to defining device visibility and linking your accessibility statement, each setting helps create a more inclusive and compliant user experience.
Remember, after making any adjustments, always click Apply changes to ensure your configurations are saved and take effect on the live site.
By thoughtfully configuring the widget, you not only enhance accessibility for your users but also demonstrate your commitment to meeting legal standards and best practices for digital inclusion.